Fashion Week this year was the coldest yet! Some days were the coldest I have ever been and I am not exaggerating haha it really was like slap in the face freezing! I wanted create a hair diary for you, but I’m not going to lie, the weather didn’t always permit standing out on the sidewalk and filming. It was SO cold, or snowy, or both! But at least I got to go to the TRESemmé Salon at Lincoln Center to learn tips and tricks from the stylists for these 5 easy, cute looks! And yes I tried really hard to not look freezing in them – but don’t be fooled because I was!
It was so much fun partnering with TRESemmé again this winter. I went into their salon in the Lincoln Center pretty much every morning to get my hair done by their team before each show and always loved what they were able to do! So I captured all the looks in this diary to share with you. These looks are SO easy to recreate at home, especially with some of the tricks I learned from the salon. Let me know which are your favorite and I’ll make tutorials for you! Until next year!
Original article and pictures take barefootblond.wpengine.netdna-cdn.com site
Now Seeking Experienced Stylists and Independent Contractors
Apple Cider Vinegar is an amazing treatment for hair, and chances are it’s just hanging out in your pantry, waiting to be discovered. The vinegar is a gentle acid that can help regulate the PH of your scalp, temporarily tighten your cuticle, lock in hair color, reduce excess oil, and calm scalp issues like dermatitis, dandruff, and psoriasis.
Apple cider vinegar is great for when you want to remove product or oil and refresh your hair, but a shampoo could be too drying. It’s great for curly clients who are trying to wean off of, or reduce, their shampooing!
We recommend that you buy the generic apple cider vinegar for use in your hair. As much as we love raw apple cider vinegar, we have found that the acidity is not consistent the way it is with pasteurized apple cider vinegar and you can end up pickling your hair!
To give yourself an apple cider vinegar treatment:
– Mix 1 part vinegar to 2 parts water, pour it in to a spray bottle.
– Rinse your hair thoroughly under warm water, massaging your scalp to begin loosening up oils or buildup.
– Spritz your scalp liberally with your vinegar solution, and massage it throughout your scalp.
– Let that soak for 5 minutes.
– Massage through your hair again then rinse thoroughly with warm water.
– Follow with a conditioner!
You can even tint a small batch to enhance your hair color’s shine! – keep refrigerated and use within a week. It won't color your hair, but can add a really nice glow.
Redheads- 1 c strong brewed Rooibos tea + 1TBS apple cider vinegar
Golden Blondes- 1 c strong brewed Chamomile tea + 1TBS apple cider vinegar
Deep Burgundy Redheads- 1/4 fresh beet juice* + 3/4 c Rooibos Tea + 1TBS apple cider vinegar *this can stain light hair, clothing, towels, etc so please be careful!
Brunettes, 1 c brewed black tea + 1TBS apple cider vinegar
Dark, cool Brunettes 1c strong brewed coffee or espresso + 1TBS apple cider vinegar
The only kitchen remedy we don’t recommend are Baking Soda washes. Baking soda is a harsh alkaline and a mild abrasive. What that means is that it will raise the cuticle of the hair and remove hair color, and it will aggravate sensitive scalps. We only use it when we need something harsh to help pull chlorine build-up from hair, or remove over deposited hair color. It is not a good idea when you want to preserve your color and shine!
Original article and pictures take www.thehivesalon.com site
Do you ever have the feeling that your ponytail doesn’t look quite as you wanted it to? It’s a bit droopy or not as full and usually it drops as the day goes on? Well, for years I’ve been searching for the perfect ponytail trick and guess what, I finally found it! It involves 2 minutes of your time and 2 bobby pins – that is all!
Fancy trying it too? Here is how it goes: Once you've put your hair in a ponytail, insert two bobby pins halfway inside the elastic and facing downward toward the crown of your head. Then, fluff your ponytail and flip it over for a fuller look that won't sag or droop.
That is how it’s done – the perfect summer hairdo! Btw: I'm wearing it right now:) Will you try it too? What's your go-to summer do? xo
P.S: Just got myself this set of sassy hair bands.
When my husband told me he wanted to make me a potting table, I was hesitant at first. After all, the patio table seemed to work fine for the little “potting” I actual did. And honestly, I could think of better places to spend the money such as new hostas for the shade garden, another ornament or two for the perennial border, more day lilies, you know……the essentials in life.
But then he said he could make it from reclaimed pieces of wood cluttering stored in the garage, it didn’t seem so silly. We had been holding onto this old wood since we found it stored in the garage when we moved here three years ago, knowing that one day the perfect project would come along.
So on Easter weekend, he got to it and quickly built a basic potting table. In fact, it didn’t take longer than an hour to take those reclaimed pieces and put together a really decent sized table. And he even custom made it to my height specifications – I’m 5’10” and am constantly hunching down to complete table top tasks.
(Nearly there) “after” shot
Once it was completed though, I knew it needed gussying up a bit. And I had the perfect thing stored cluttering up the garage – the top piece off of a sideboard, mirror and all.
Out came the Annie Sloan, this time in French Linen. I wanted to create a worn look to go with the table and the old door which stands next to it. So once it had a couple of coats of paint, I got out the old garden hose and “wet distressed” it.
perfectly aged reclaimed piece
By spraying the piece with the hose nozzle set on “jet”, it removed just enough paint to make this reclaimed piece look old and worn. You can achieve the same look with sanding, but this was a lot easier and quicker and outside. And hey any time this Canadian can get outside to work, she’ll go for it!
Never enough thyme
Once I got it down to the desired look, it was sprayed with outdoor polyurethane to protect the look. And finally a little saying was added to the mirror, just to give it a little humour. After all, there never is enough thyme (or time for that matter).
The table has come in handy already. It was the perfect place to thin some garlic shoots for replanting today. And it provides some much-needed storage for important things like the old chicken feeder and egg basket which had been lovingly cluttering up stored in the garage!
Linking with the following wonderful blogs:
Related articles across the web
Original article and pictures take www.newhousenewhomenewlife.com site
I need your help! I wanna get my hair cut and colored, since I haven't since I was pregnant with my son. I just don't know what to do with my hair. I don't want it super short, but Im open to any suggestions. This is me......any ideas what would look good with my face shape?
Since you have a baby, I imagine you don't have a lot of time for styling your hair. I think a subtle swoop bang would be nice; you could blend it back into your hair when you don't want to deal with it, or bring it forward when you want to look more styled. As far as the rest of your hair, in the name of keeping it simple, I'd go for long layers trimmed in to give it shape.
For color, a mix of lowlights and highlights would be nice. It would give dimension without requiring you to get a super styled cut (which means more maintenance!). You want to look a little sunkissed and give your hair the vibrance of tone that most of us seem to lose as we get older.
Products are important too. I'm a big fan of Redken's Guts 10 root boost. Spray it directly at your roots in a few layers and rub in. Blow dry your hair upside down and it will give you lots of volume and movement. I'm also a fan of Redken's Satin Wear 02 Ultimate Blowdry Lotion, which would be good to a) help style your hair and b) help protect it from the heat and keep your color looking fresh.
Original article and pictures take jjb.yuku.com site
Are you like me and want to change up your outdoor Christmas decorations every year? Maybe it’s just because I’m blogging, but last year’s decorations just seem…..well…..last year. Or maybe it’s because we’ve changed things around a bit since last December……
We got rid of the red/burgundy/purple paint and took out the black wrought iron railings. I also moved the concrete urn to the back entrance to give some light to a dark corner by the garage. These were replaced with a pair of classic urns on either side of the landing. All in all, I think it’s a lot cleaner looking with the brown paint. We still need to replace the light fixture and door mat. Which I never really realized how ugly it was until I looked at these photos. Time to go – you are out of here, Mr. Door Mat.
Because there’s so much brown around the house now, I didn’t want to add too much colour so chose a burlap ribbon as a base. (All you florist/crafty people out there – please forgive my awful bow making – it’s a skill I’ve never learned despite the hundreds of tutorials I’ve watched). Anyways…..
So to add to the natural theme, I used what I had around the yard – boxwood clippings, pine clippings, spruce, cedar and my favourite weeping cypress as an anchor. Adding some hydrangeas which had been drying in a jug in the kitchen, gave the urn some life. And of course, the ubiquitous twigs – this time in gold.
The natural theme continues on the store-bought pine wreath by tucking in some additional clippings, a burlap ribbon casually draped throughout and some gold twigs.
I love heading out to the garden on a nice late fall day with my secateurs in my hand to find the material. If you’re lucky enough to have a naturalized area close-by, you can always head out for a walk to gather some clippings. Using found items instead of purchasing things at the grocery store gives your holiday decor a more personalized touch.
Original article and pictures take www.newhousenewhomenewlife.com site
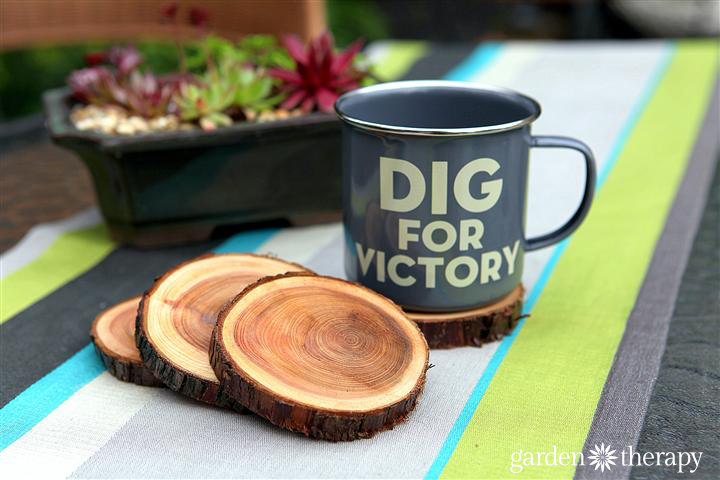
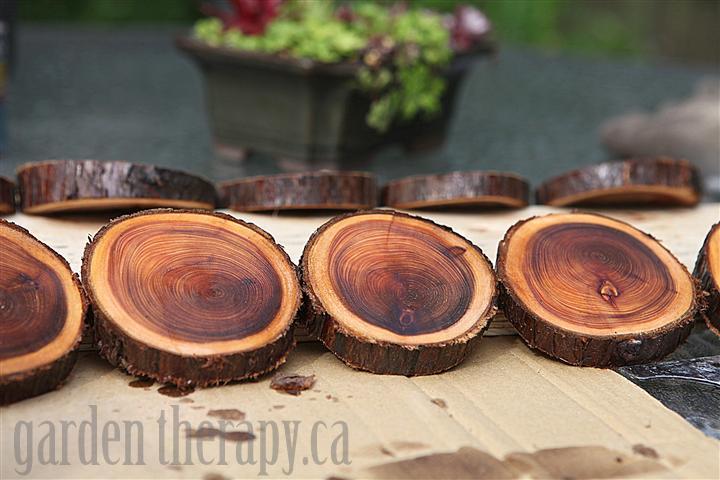
Making a set of branch coasters from a fallen tree will allow the beauty of that wood to live on and tell the story in its rings. When you are out pruning and cutting back the garden, take a look at what you are about to throw in the wood chipper or firewood pile. Wood slices can be turned into many things, but my all-time favorite is these branch coasters that I made back in 2012.
I’ve had my cedar coasters now for almost 4 years and have had plenty of questions on the practicality of them. I’ve updated this, the original article, with some FAQs at the end of the DIY instructions.
DIY Branch Coasters
It was a sad day when the largest, oldest tree on my street was hacked down and unceremoniously chucked into construction waste bins. The 50’ Western Red Cedar still had a lot of good years left, but got in the way of developers’ dollar signs and no amount of reasoning could sway them. Neighbors came to say goodbye, walking through the wreckage, collecting a memento or two; tears were shed. It’s amazing the impact a tree can have and the immensity of the sense of loss for one treated with so little respect.
I collected a few thick branches to turn into sets of coasters that I will pass on to neighbors who remember their kids climbing those same limbs many, many years ago.
The project is simple but it will take some time to cut and sand each piece. The more time you spend getting them right, the nicer the final product will be.
Materials:
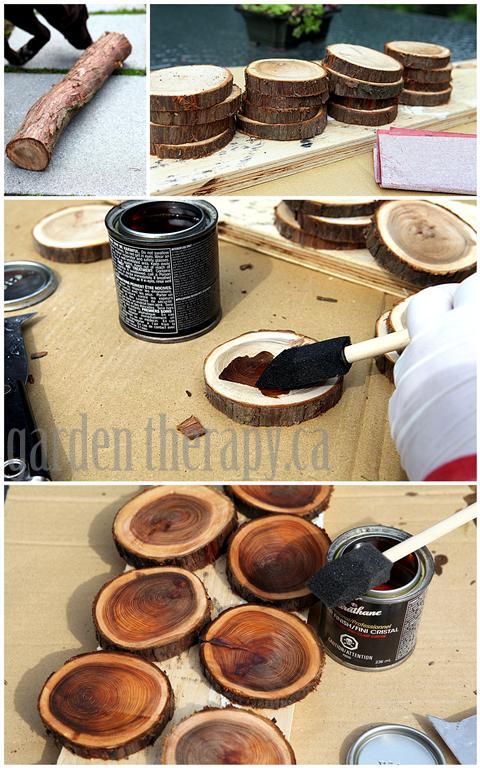
Straight branches that are no smaller than 3.5” in diameter
How to Make Natural Branch Coasters (via Garden Therapy) Staining Natural Branch Coasters DIY project via Garden Therapy #coasters #recycle
Make it!
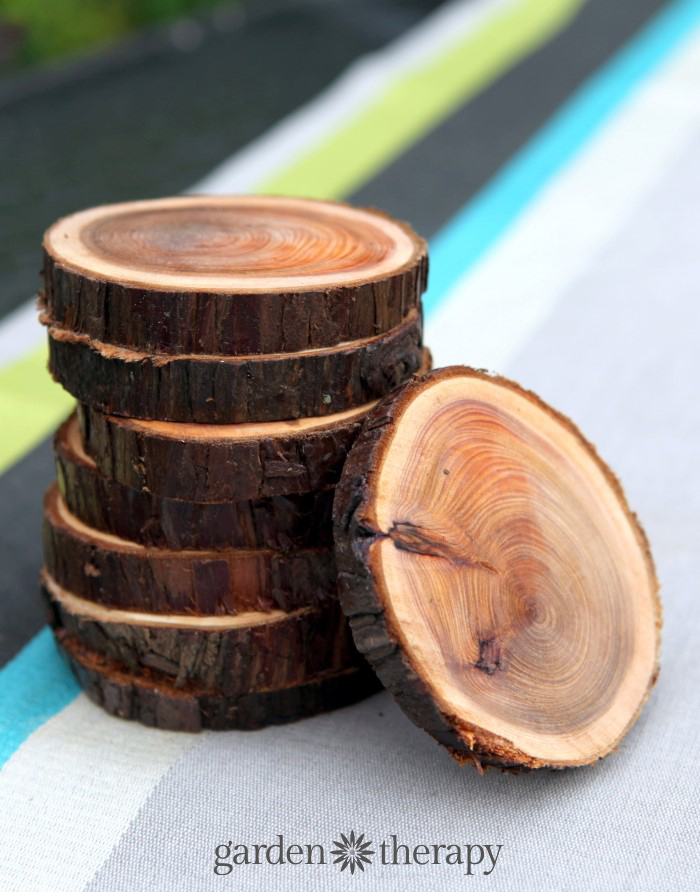
1. Using the saw, cut sections of branches that are ½” thick.
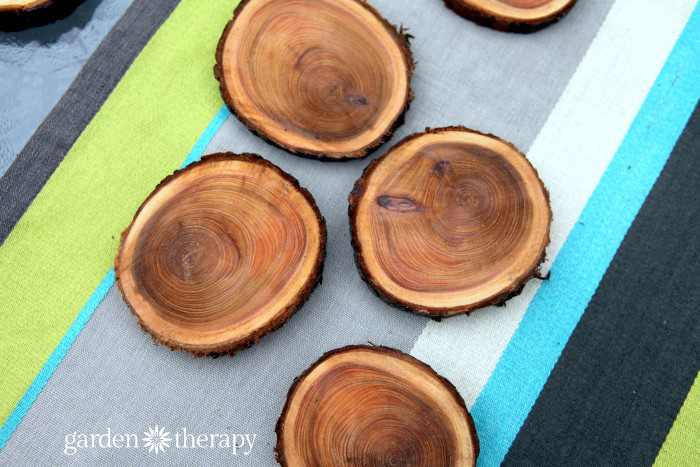
2. Sand each section with heavy grit sandpaper, and then use a finer grit to smooth out the surface. Do not sand the bark on the edges.
3. Coat front, back, and sides with clear varnish and let dry. Untreated wood can also look beautiful as it absorbs the drips and condensation from the glasses that sit on it.
FAQ
How do you keep them from cracking?
I dried the wood slowly in a cool, dry room before cutting the coasters. A few cracked. I discarded those as I had plenty more to work with.
What varnish/stain did you use?
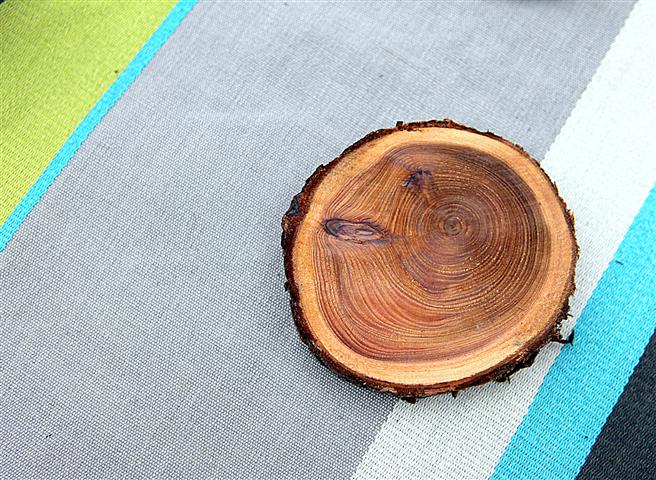
I used Varathane clear satin varnish. The varnish was labelled as clear, but it does have a honey color in the can. It made the final coasters look a little darker than the dry wood (like wet wood), which I expected and like.
Don’t they leak sap?
No. Perhaps a different kind of wood could leak sap. But I dried the wood thoroughly and have never seen one drop of sap in 4 years of using them.
How did you keep the bark on the outer edges?
The bark stayed on due to the type of wood, Western Red Cedar. I was careful to not pull it off but it is pretty sturdy. I did varnish the sides around the bark as well.
Did you glue felt or anything to keep the coaster from marking the furniture?
When sanded they are smooth so won’t scratch anything, and they are varnished and dry so they don’t stain. You certainly could put felt or little feet on them if you choose, though.
Any more advice?
There are plenty more ideas and tips in the comments section. Have a read over it and please chime in if you have any advice to share!
Pin it!
Save
Original article and pictures take gardentherapy.ca site
The Sponsored Listings displayed above are served automatically by a third party. Neither the service provider nor the domain owner maintain any relationship with the advertisers. In case of trademark issues please contact the domain owner directly (contact information can be found in whois).
Myra’s historic home is surrounded by a creative garden filled with garden art, all salvaged and upcycled in her own way. We think she’s sensational!
Meet Myra Glandon
“My husband Mark and I live on about an acre just outside the small rural town of Prospect, Ohio. We live in an old brick house built in 1882 which is a work in progress, just like our outdoor areas. Here is a picture of our house in the early years. My daughters and grandchildren all live nearby,” Myra tells us.
Myra’s historic 1802 home
“I discovered Flea Market Gardening surfing the Internet one day looking for garden art. I thought I had unusual taste until I found this group of kindred spirits. It was love at first sight, and I’ve been checking in every day since. I have been inspired by Flea Market Gardening to create several things I wouldn’t have thought of on my own, like my garden sparkler (inspired by Sue Gerdes), my tipsy tubs (inspired by Annie Steen) My planted ladder (inspired by planted ladders here on FMG.”
A true ‘FMG’ vignette…with all of Myra’s inspiring projects
“I have enjoyed gardening for over 30 years. My mother, grandmother and mother-in-law all like flowers, and all raised vegetables. It is impossible to buy store purchased vegetables that taste as good as fresh from the garden veggies. My vegetable garden isn’t as big as they once were, but I still grow cucumbers, tomatoes, and shallots, my favorite summer veggies.”
Here is my newly planted ladder…
“I have always been a collector of old stuff, aka junker, my mother was a junker, and we collected old stuff long before shows like American Pickers made it popular. My mother was a self taught upholsterer and furniture refinisher. She was very independent, creative and hard working, and she passed those traits to me. When I bought this house 28 years ago it was empty and boarded up. The back and side yard had been used as a dump, and was overgrown and a mess. There had also been a gas station in my front yard in the 50’s, so I had old cement foundations and tons of gravel with which to contend.”
Shed garage corner
“Back in the late 1800s and early 1900s, an addition on the back of my house was also used as a meat processing butcher shop. There is a double sided fireplace, and wagon grooves in the floor. Over the years I have cleaned it up, created flower beds, and laid pathways. I also planted sixty-five 6” white pine seedlings about 20 years ago which are now over 30’ tall. They provide a windbreak and a backdrop for our circular patio, picnic area, flower beds and pond.”
This is my interpretation of a dragonfly
“I make dragonfly garden stakes out of old wooden chair legs, spindles, old bobbins etc, add metal wings made from metal flashing, wire, wire strapping, etc., and miscellaneous for eyes, antennae, mouth …. each is unique and hand crafted. I have them scattered all over my garden.”
Myra’s garden angel from salvaged materials Another of Myra ‘s dragonflies
“I enjoy being creative whether working in the garden, or creating with wood, metal, fabric… I like scrap metal sculptures, and have several in my yard. Hubby and I have made some indoor sculptures too. I love making dragonflies out of broken chair parts. I guess I’m big into up-cycling, recycling, junking and repurposing. For me being creative and gardening are therapeutic. I love adding unique items with a story to my home and garden. I’ve never been a person who wanted the same thing everyone else has.”
The brick patio, Myra’s husband made for them
“My husband, Mark, laid the circular patio and we were only short about 25 bricks. If you look close the two innermost circles of brick are a little different color. I used a large grinding stone I had as part of the entrance to the circular patio. When I met Mark he didn’t care about gardening, but he’s evolving, and now loves sitting on the patio looking at the fishpond, or admiring our flower beds. He also enjoys helping create things for our yard, like our pond, birdhouses and trellises.”
Angel in sedum Through the pines… Woodsy setting for the bottle tree
“We have a huge old weeping willow tree near our house which was dug up down at the river and brought home in a quart mason jar when the house was built. So, our willow is 131 years old and last I measured, it was 17 feet in circumference! I installed my garden angel in a flower bed I made around my old willow, using salvaged rock as a short retaining wall around it.”
Old collection of street signs hides mismatched windows
“When my sister’s neighbor replaced their picket fence I asked for their old fence that was stacked in their trash. After replacing a few pickets or boards, I have used them throughout my gardens for many years, and recently shared some with my daughter.”
Myra’s funnel planters
“All of my garden beds are edged in either old brick or rocks. I must confess I love rocks. Big rocks, little rocks, I just love using rocks in my landscape!”
Sink birdbath under the trumpet vine Myra’s awesome and now famous cornzebo snugged up against the house
“I have never had a lot of money to spend, but even if I did I would still be want to be creative and use repurposed, salvaged stuff instead of spending a lot of money. I feel anyone can have a beautiful home and gardens if you have lots of money. But creating these spaces with minimal money, and lots of creativity and personality is much more interesting and challenging. I like to think the things I make reflect my personality in a small way.”
“Here are two of my favorite people, my grandkids Cody and Kaylee.”
Besides gardening and being creative my husband and I enjoy riding our motorcycles, going to flea markets, woodworking, creating scrap metal sculpture, traveling, and spending time with our family. ~~ Myra