I love lots of color and whimsy in my backyard, and I’m (very) slowly putting together a garden area that’s inspired by the Mad Hatter’s tea party in Alice in Wonderland. When I saw this garden sculpture at Anthropologie, I knew it would fit in with my “fantastical” garden. The price tag ($498!!!) was wayyy out of my budget, so I made my own. Here’s how I did it.
Supplies
Step one: Paint the bird houses. I used blues and greens to mimic the Anthropologie piece. Paint the board and small wood pieces (from this kit), as well.
Step two: Brush a dark stain on the bird houses and wipe the stain back. I mixed Americana Stain Antiquing Medium with chocolate brown paint to make my own stain.
Step three: Place the birdhouses on the wood board to make an arrangement that you like. I tried several different options and took pictures to decide which one I liked best. To stack the houses, I used some of the small wood pieces to prop them up or to fill in empty spaces.
Step four: Once you’ve found an arrangement you like, use the wood glue to adhere the bird houses to the board. I started with the pieces that were glued directly to the board. With some, I had to add wood shims to the back to keep them level. Then I glued the birdhouses that “pop” out on top. Let the glue dry for 24 hours.
Add a photo hanger to the back of the wood panel, and find a place outside to show off your garden art! My piece will be in a covered courtyard, protected from the elements, so I didn’t seal it. It’s a fun, unexpected piece that’s sure to generate lots of conversation!
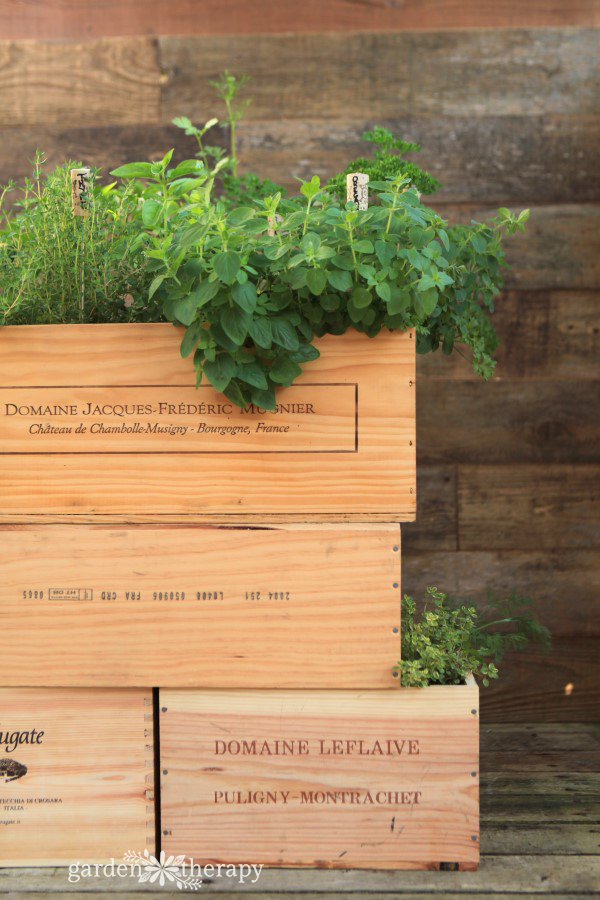
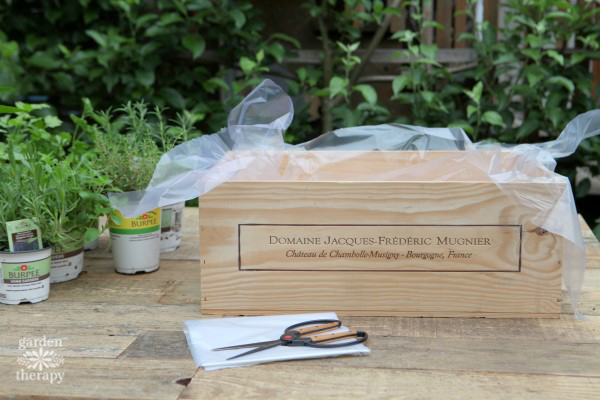
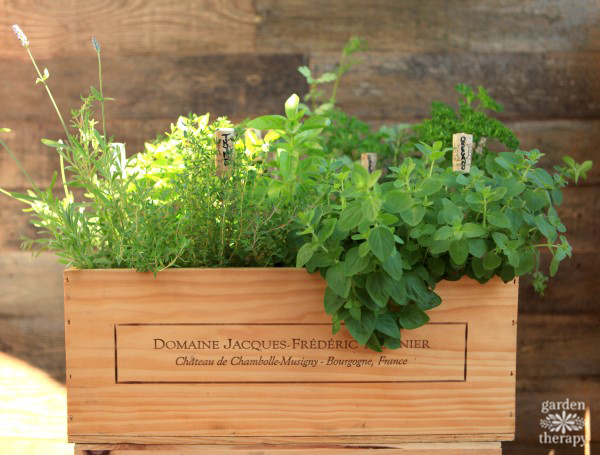
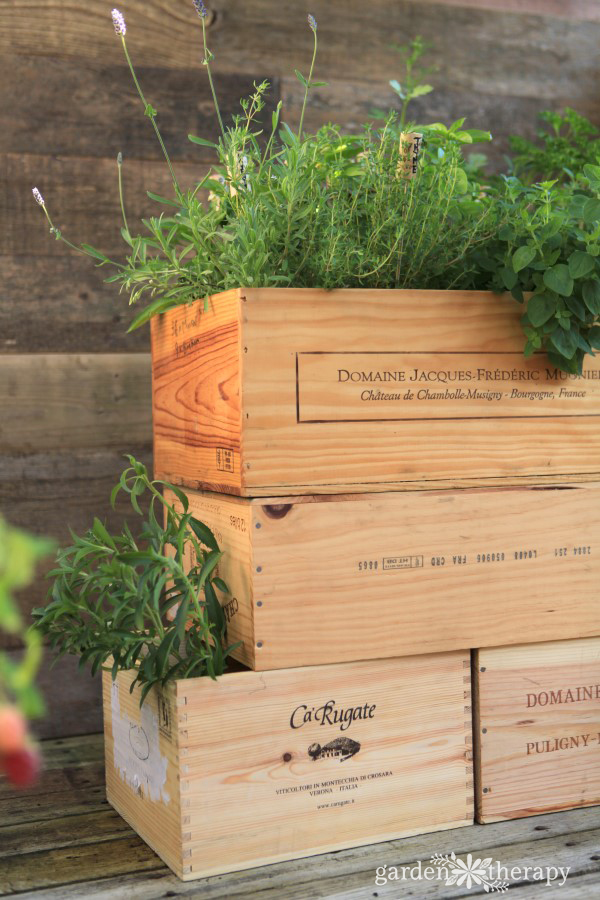
A beautiful mix of aromatic herbs planted in a wooden wine box makes for a perfect small-space kitchen garden for those who love to cook and entertain. A wood wine shipping crate is just the right shape and size to grow a culinary herb garden on a balcony, deck, patio, or even set right in the entertaining space. With a few structural modifications, this wine box herb garden will be set up to last the test of time and allow the plants within to thrive.
Plant a mix of herbs and vegetables that grow well together in the same conditions and that can be used to spice up a summer wine tasting.
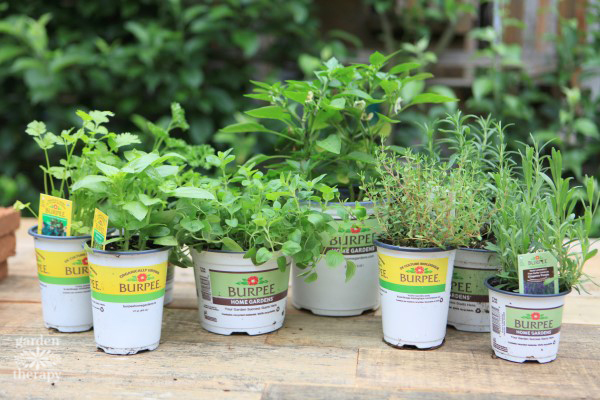
Disclosure: this project was sponsored by Burpee Home Gardens, who also provided me with the plants for this project. I used a combination of herbs and vegetables that do well in the hot sun so that I can leave the planter box on my sunny deck, where I often entertain (and drink wine). The project instructions and opinions are my own.
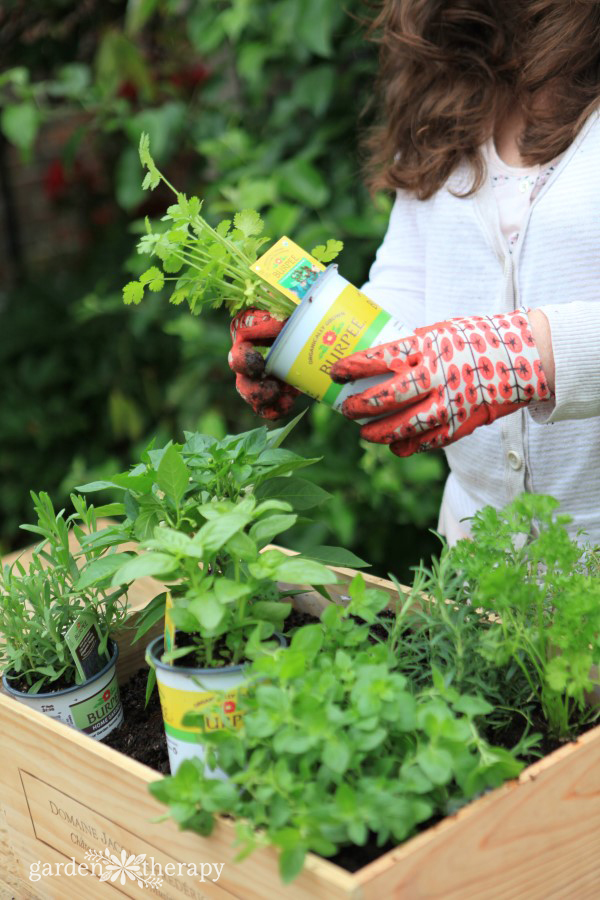
The plants I used in the project all came from Home Depot. They had many racks filled with lush herbs in both the Burpee Home Gardens Organics and Burpee Home Gardens lines. For this project, I chose lavender, thyme, basil, cilantro, rosemary, oregano, parsley, and ‘Lemon Dream’ peppers.
The container is packed tightly with a variety of different aromatic herbs so that I can harvest them frequently throughout the growing season. Different textures and heights add to the interest of the arrangement even though they are all the same shade of green. The flowering lavender and colorful yellow peppers add even more variation, making this planter as beautiful as it is tasty.
How to Make a Wine Box Herb Garden
I found a bunch of wine crates for sale on Craigslist, but you can also contact wine stores, wineries, and restaurants to find crates in your area. To make a wine crate suitable to last as a garden bed it needs a few adjustments.
Prepare the outside of the wine box by removing any shipping stickers that might be attached. The easiest way to do this is to use a hair dryer to heat up and melt the glue before slowly peeling the sticker off. Any residue that cannot be removed can be sanded off.
Fill the joints and any cracks with wood glue to ensure that the structure holds together when it’s filled with heavy soil. If necessary, use a couple of screws to further secure the joints.
Sand the outside of the box to smooth the surface. Just be careful not to sand so much that you remove the lettering.
Use a clear sealer stain to protect the color of the outside of the box. Allow the sealer to dry for 24 hours before preparing the inside of the box.
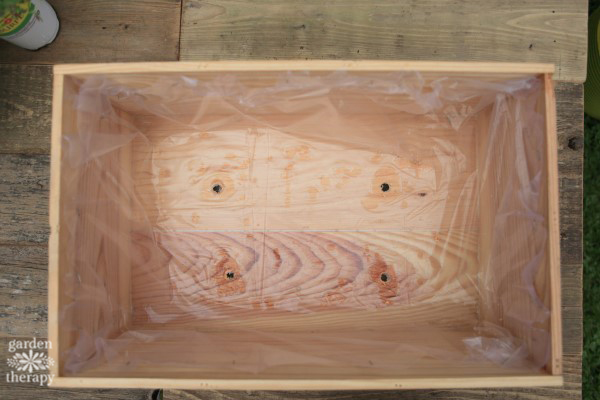
To create a waterproof planting bed, line the inside of the box with a sheet of plastic.
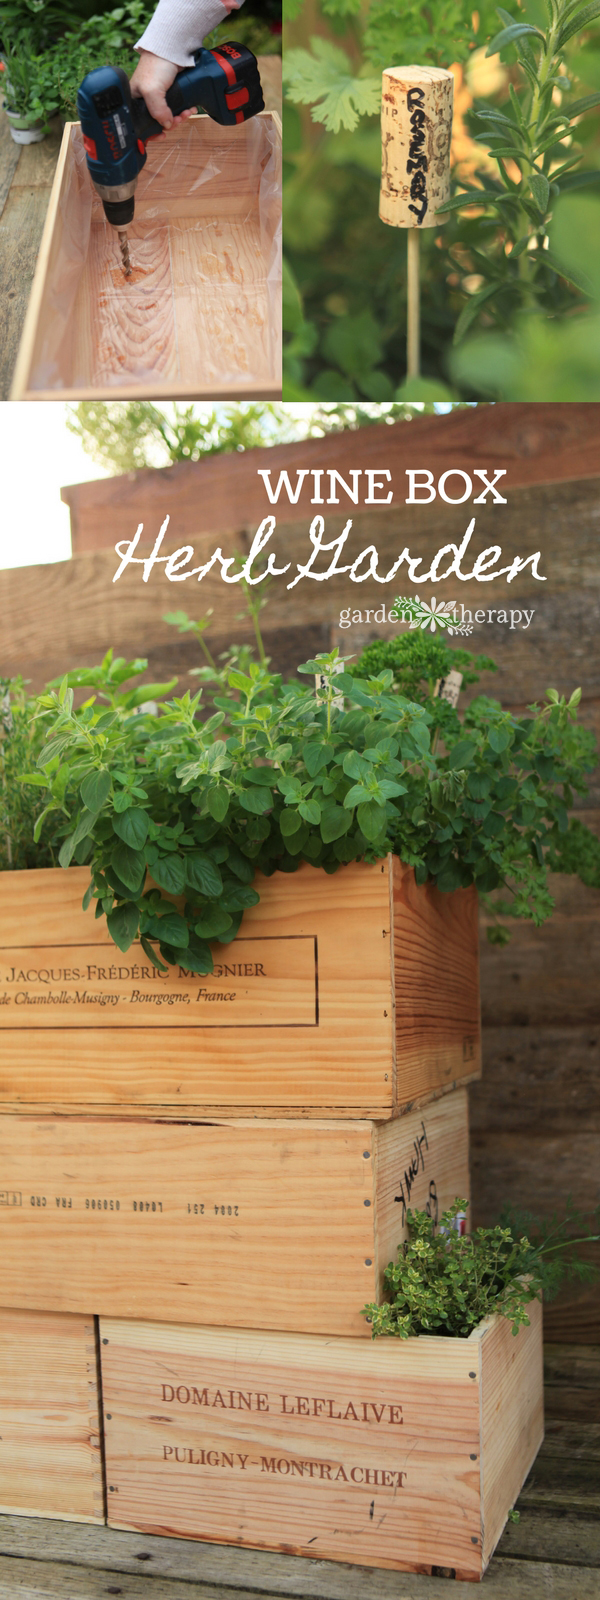
If you’re going to use the wine box outdoors you’ll need to add drainage holes through the plastic and wood, and silicone sealer to make them water tight.
Create a few circles of silicone sealer where you want your drainage holes in the bottom of the box. Place the sheet of plastic on top of the sealer before it dries and press the plastic onto the sealer so that it adheres together.
Using an electric drill, make holes in the center of the silicone circles, going through the plastic and the wood.
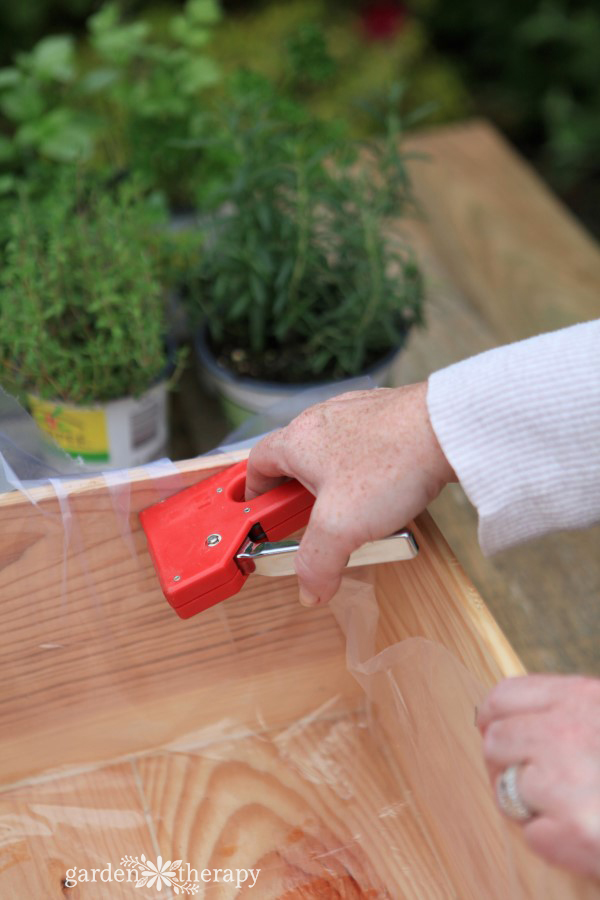
Use a staple gun to attach the rest of the plastic to the inside sides of the box about an inch down from the top.
Lay a piece of landscape fabric along the bottom to cover the drainage holes and prevent soil from coming through the holes when watered.
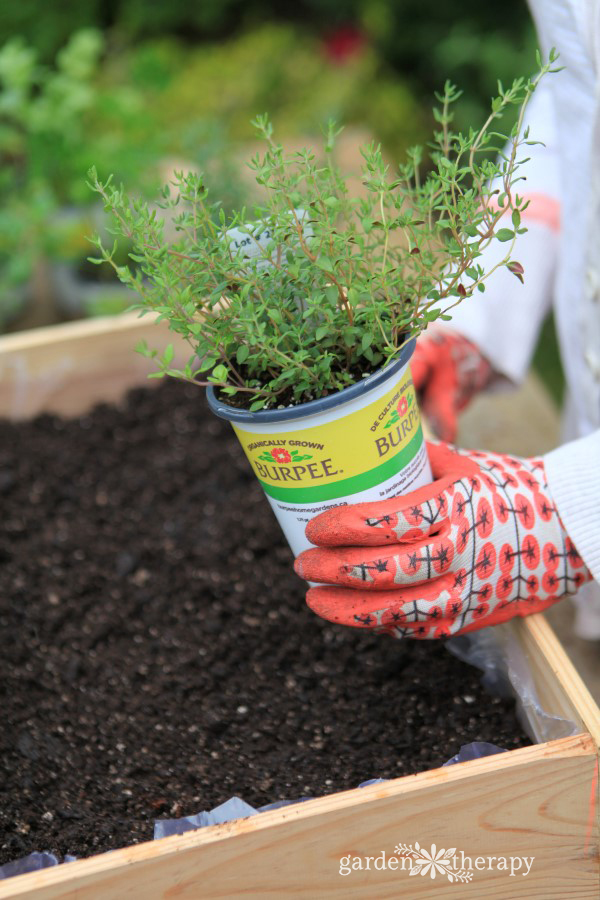
Fill the box with a good quality container garden soil and add the herbs.
Water the garden well and set it in a sunny area to let the herbs grow and fill in.
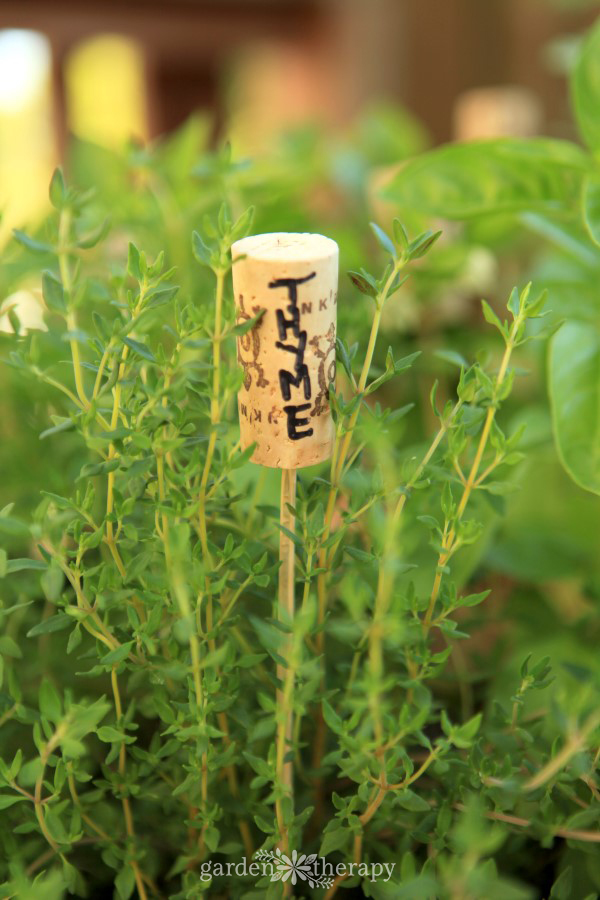
Add an extra special touch to this wine box garden by labeling each of the plants using a wine cork, permanent marker, and a bamboo skewer.
The wine box garden is now ready for some summer entertaining.
Why not throw an herb garden wine tasting party?
Save
Original article and pictures take gardentherapy.ca site
At last! I finally made my little window greenhouse. I found the windows on the side of the road quite a while ago and they have been occupying precious space on my covered patio ever since so it’s great to have it done.
How to use old house windows to create a mini greenhouse for the garden
I may receive a commission if you purchase something mentioned in a link on this post for sites including Amazon.com. Other links may go to websites where I have been paid to write a blog or article. See the entire disclosure here.
Free Roadside Windows
First, how many 35 x 42″ (ish) windows you can fit in a small hatchback car (without having to leave your companion) at the curb?
For the record, the answer is 16.
This project requires just 6 windows so I have 10 more to play with later.
Getting Started
Here’s the problem. These windows came from a house built in the late 1800s. And every single window is a slightly different size, varying anywhere from .25″ to 1.5″ in height and/or width. That’s a huge variation to work with when you’re trying to frame something!
After sketching out several different plans, and worrying that I was not thinking it through properly, I decided to build a very sturdy inner frame that I could attach the windows to.
You see a lot of projects like this where the windows are simply joined to each other, but I wasn’t confident the wood was strong enough (could have some rot inside) plus, there was the problem of varying sizes. I might be able to join them together but they would be so far from square that it would look somewhat ridiculous. Even I have my limits, so the frame seemed like a good idea.
I also wanted to create the roof with windows and these suckers are very heavy. By creating a support frame, I could be confident that there would be no tricky joins or mishaps later.
Related: Decorate a Fence with Faux Windows and Doors. Related: 7 DIY Growing Season Extender (free project tutorials)
Part One: Build A Table Base
Window greenhouse on tabletop | DIY project at empressofdirt.net
As you can see with the completed table base shown here, it’s a simple structure designed to be very strong and sturdy. Since the windows were already a mishmash of sizes, I opted to buy wood from the seconds pile at the lumber store to keep costs down.
Wood for building table base for window greenhouse | empressofdirt.net
Table Parts
(4) 4×4 legs
(4) 2×4 side panels
(4) 2×4 for support – cut at 45°
(6) 1×6 pieces to form table top
Table Assembly
As you can see in the photos, I formed a square frame with the outer 2×4 pieces and attached the legs to the inner corners.
Extra 2×4 pieces with 45° miter cuts were attached to make it really secure.
The 1×6 table top boards (not shown) were cut to fit on top of the frame.
Building outdoor table to hold window greenhouse | empressofdirt.net
Once the table top was added, it became very sturdy with no wiggle room. Again, I knew the greenhouse would be very heavy so this baby had to be strong.
Next it was time to make the greenhouse frame which was my introduction to
Now that the table base for the window greenhouse was built, it was time to create a structural frame to hold the windows in place.
I’m obviously not a carpenter (nor do I play one on TV) so it took a lot of thought (my poor brain!) to come up with (what I think is) the best way to build this.
My main concern was sturdiness. If it could be good-looking and very solidly built, I’d be a happy camper. And yes, as it turned out, I’m a happy camper.
If you’re just joining in the story, I’m making this mini greenhouse from old, wooden windows found on the curb. No two windows are the same dimensions and neither are any of them actually square, so it’s a building challenge to say the least.
Part Two: Building The Structural Frame
This is what I built:
The frame is made entirely from 2×4 lumber:
I made the sides to match the average width and height of windows (which are odd sizes and not square).
Notice the height: I cut the vertical pieces extra long to allow room for the roof windows to hang down without blocking the sides of the greenhouse.
The tops of the vertical 2x4s are cut at 45° angles. This allowed me to join the roof windows at a 90° angle (= 2 x 45).
Making Frame For A Window Greenhouse | DIY project at empressofdirt.net
I got this dual bevel sliding compound mitre saw (with laser) at an excellent sale (see one here) and what a great tool it is. Mine has a 10″ blade. If you have a choice, I’d go for a 12″ blade so you have just a few more options for the size of wood you can cut. It truly just takes seconds to set up the mitre cuts and the laser guide makes it so easy to get right every time.
This is where the project got really fun. I finally used my Kreg Jig K4 Pocket Hole System. It’s a drill guide that lets you create perfect pocket holes in wood.
It’s simple to use. You just need to know which size wood you are using (I used 2x4s) and the Kreg system tells you which size screws to buy and where to drill the pocket holes. It takes under a minute to create the holes and you’re ready to join your pieces.
Using self-tapping screws (and some wood glue), you can join wood pieces together very snugly and securely. Once you use one of these jigs, you’ll want to make all sorts of things! It’s quite fabulous.
Pocket holes in wood for greenhouse frame | DIY project at empressofdirt.net
In the photo (above) you can see the self-tapping screws have been placed in the pocket holes, ready to be drilled into the adjoining piece of wood. No pilot holes required.
If you’re a geek like me, there’s a mini thrill to be had when you hear this little squealing sound the screws make when they’re placed just perfectly. Love that!
Assembly
As I was assembling the frame, I also sanded all the edges with the palm sander so it was smooth and ready for priming and painting.
Between coats of paint, I got to work on the windows…. –
Painting & Decorating A Window Greenhouse
With the base table and greenhouse frame built, it was time to get the windows ready. This is where we had a wee mishap.
Prepping The Windows
The old windows had many coats of paint and lots of layers of caulking holding them together. I removed what I could, sanded, primed, painted and sealed everything to make them strong enough to hold up in our weather extremes (-20°C to +40°C).
Little Fences
Fence Panels - Make A Window Greenhouse | DIY project at empressofdirt.net
Funny how the mind works…. I saw these little, decorative fence panels in a shop and thought they’d look sweet on the windows. This was what actually spurred me on to get this project built! Once you have a vision of what you want to make, it’s so much easier.
Painted Windows - Make A Window Greenhouse | DIY project at empressofdirt.net
I painted the fence panels blue to match the shed door, hoping it would unify the look of the garden (I think it does).
Decorating The Windows
We* used an assortment of craft paints suitable for painting glass including these
I had not used these paints before and they go on really nicely. But they are expensive (thankfully, we used a 50% off coupon at Michaels) and the ones in the smaller containers don’t provide a lot of paint. I soon realized I should not be cleaning my brush so much between colours because I was wasting precious paint (instead I tried to use up what was on my brush first).
*I started out painting the windows but my daughter soon took over. I love it when that happens.
When all the windows were painted and I was getting ready to take them outside, Bobo (we were cat-sitting) jumped onto one window, knocked it over, and the glass shattered. We actually had a laugh because the window she broke was the only one I had painted! Everyone’s a critic.
I didn’t want to pay for a new piece of glass but I had to use this particular window because I built the wood frame to match it (and none of the other windows are the same size). So, I opted to use chicken wire instead. It’s the window that is placed at the back of the greenhouse so it works just fine.
One minor disappointment was, we had painted a series of clouds that continued from one panel to the next, and this broke my main clouds. Boo-hoo, I know! Seriously, it was just a mishap and I do not blame Bobo. She was just being her Bobo-ish self (which I adore).
This next photo shows the chicken wire: I like how it looks.
Assembling A Window Greenhouse
Here’s a quick review before we put this all together.
1. Table Base
I built this table base to be super strong and withstand our crazy weather through many seasons. The 4×4 legs are pressure-treated, the rest of the wood is not. I sanded, primed, painted, and stained to match our garden shed.
2. Greenhouse Frame
Frame for DIY Window Greenhouse | empressofdirt.net
I could not find any examples online to follow so I made up my own plan for this frame. I needed something really strong (stronger than the windows) that would hold up to wind and weather.
I attached the 2x4s together using pocket hole screws (and my Kreg K4 pocket hole jig, that I adore), sanded, primed, and painted. It’s very sturdy!
3. Paint & Decorate Windows
The old windows needed some TLC including removing old caulk, sanding, priming, and painting.
We used acrylic craft paints suitable for glass to decorate the windows. I came up with the design I wanted, painted one window (which was accidentally broken by the cat), and my daughter did the rest. The broken window was brought back to life with chicken wire in place of the glass.
I added some decorative picket pence panels as well.
I attached them to the windows using Goop. Any strong, all-purpose adhesive will do.
If you’ve been following this story from the beginning you’ll know that I mentioned I did all of the building in our covered patio (so I wouldn’t be at the mercy of the weather) but this also meant I had to make sure everything I assembled could still fit through the door.
Well…. as I was working, I began to see how the fact that windows were not square was starting to throw my measurements off. It was one thing to accommodate the various lengths and widths, but this did not compensate for the odd shapes of the actual window frames.
Long story short, the greenhouse frame got through the doorway with about an eighth of an inch to spare! Worst case scenario, I would have had to take it apart and re-assemble it outside, which is no big deal, but it was a lesson to think about with future projects from repurposed items.
I actually buried a few inches of the table legs in the ground for extra support.
b) Set Up Greenhouse Frame
The greenhouse frame was secured to the table using L brackets.
c) Attaching The Windows
I made pilot holes through the window frames and attached them with self-tapping screws.
d) Attaching The Door Window
The front window was made into a door by attaching it with two metal hinges.
e) Up Goes The Roof
I pre-assembled the roof using a 2×4 on the interior join and a 2×2 on the exterior join. It was definitely a 2-person job to lift it up on onto the support frame.
I’m intending to add some metal flashing over the top when I find what I need at the thrift store.
Garden trowel door handle on DIY window greenhouse | empressofdirt.net
f) Decorating
I like to take my time and find just the right accoutrements (at the right price) at thrift shops so it may be a while before I find the touches I want.
For now I stuck a metal basket at the front peak while I think it over. The metal bird came from a thrifted pigeon racing trophy (!), reminding me of a very sweet bird that adopted us for a while (you can see the story here).
At Last
Now that the project is basically completed (except for more, fun cosmetic stuff), I’m very pleased with it. I’m sure my procrastination was linked to the fact that there were many steps involved and some of them had learning curves (including learning to use the new saw, the jig, and figuring out a good design). But I did it, and I love how it looks in the garden:
This year when you are harvesting your lush herb garden, why not reserve some for making an herb wreath? Not only are they beautiful, but they are functional too! Hang an herb wreath in your kitchen and harvest sprigs here and there to add to your cooking. The herbs will dry on the wreath form, looking beautiful and preserving the flavor while releasing fragrance throughout the space.
Herb gardening has become one of my favorite hobbies and this year I’m growing over 25 different types of herbs! There’s nothing better than a backyard garden full of fragrant edible plants. Now that it’s harvest season, I’ve been researching ways to use them. I mainly use fresh herbs in cooking. Last year I made up a batch of yummy oregano pesto. I also made my own herbal vinegar, and of course I made this gorgeous culinary herb wreath.
Herbs to Choose
You can use a wide variety of herb stems, flowers and leaves to make your wreath. I found it’s best to use woody-stemmed herbs (like rosemary, sage, and lavender) because they tend to hold their shape once dry. But feel free to experiment with soft-stemmed herbs like mint and lemon balm too. I found some beautiful basil wreaths on Pinterest! And don’t forget to add a touch of color by adding herbal flowers such as chive or fennel blossoms!
Choose Herbs Based on a Theme
Culinary Wreath: Create a snip-as-you-cook wreath to hang in your kitchen. Culinary herbs to include are rosemary, thyme, oregano, marjoram, parsley, and chives.
Tea Wreath: If you’re a tea lover you can create a wreath with all of your favorite brews like chamomile, lavender, lemongrass, mint, and lemon verbena.
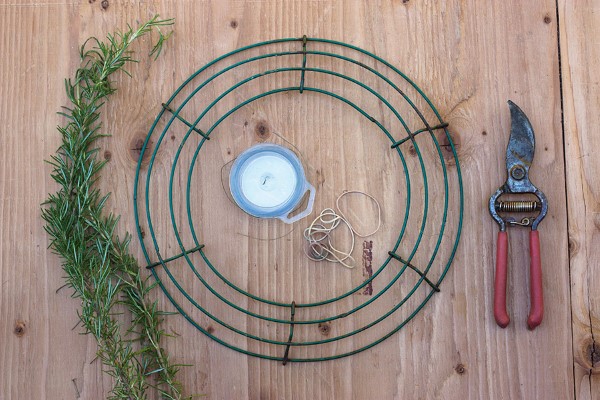
Gather your supplies and choose an herb to become the base of your wreath. I chose rosemary. Using twist ties and/or floral wire, begin covering your wreath base. Be patient with this process. It took me longer to do this than I had originally anticipated.
Once you have an herb base covering your frame, you can begin building off of it. There are a few different techniques I tried. I selected 2-3 different herbs and created small bunches using rubber bands. Then I added each bunch to the wreath, using floral wire to secure it. The other method I tried was simply poking individual sprigs into the wreath and securing them again with floral wire.
Work slowly and experiment with different placements and herb combinations. Continue to add herbs until you’ve completely covered the wreath frame.
And that’s it! Now find a place to hang your wreath and enjoy.
About the Author
Rachel Beyer is an artist, designer, and creative maker living in Portland, Oregon. She spends her days working at Molly Muriel Apothecary and blogging at Adventures In Making. Her favorite hobbies include cooking, gardening, and crafting.
Save
Original article and pictures take gardentherapy.ca site