Friday, July 29, 2016

How to Make Tin Can Garden Art Robots

How to Make Tin Can Garden Art Robots
Turn empty food cans into sweet garden art robots and pets with these ideas.

I may receive a commission if you purchase something mentioned in a link on this post for sites including Amazon.com. Other links may go to websites where I have been paid to write a blog or article. See the entire disclosure here.


Save Your Cans And Turn Them Into Garden Art


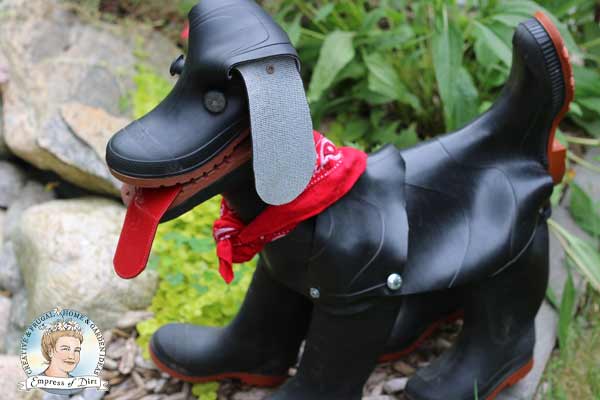
Tin can garden art repurposes all sorts of used household items and turns them into fun garden decorations. There are more fun recycled Earth Day craft projects here.


How to make tin can garden art robots and more

This tutorial will give you ideas for making a tin can robot, person, or pet, as well as how to connect the parts.


To prepare, you will want to start collecting parts such as empty food cans, paint cans, lids, and random other metal items including kitchen utensils (knives, forks, spoons), metal dog leashes, old tools, belt buckles, saw blades…. Really, anything that will be durable outdoors will work.


DIY tin can garden art

Ideas For Materials


  • Empty food cans and lids in various shapes and sizes.
  • Empty paint cans and lids.
  • Bottle caps (for design elements and/or joins).
  • Metal chains (old dog leashes).
  • Metal kitchen gadgets (funnels, strainers, cutlery-knives, forks, spoons, sieves, etc.).
  • Metal belt buckles.
  • Nuts, bolts, screws, nails, washers….

Tools & Other Supplies


  • Power drill and metal drill bits (unless you can punch through the metal with a hammer and awl)
  • or hammer and hole puncher /awl
  • Needle-nose pliers for twisting metal wire
  • Wire for joining part (I use 16 gauge wire for many garden art projects).
  • Wire cutter
  • Tin snips or metal cutters
  • Screwdriver
  • Epoxy or other adhesive suitable for outdoor metal projects
  • Duct tape
  • Paint suitable for tin/metal. I use spray paint. Read the label to see if a primer is required
  • Primer (if required for your paint product)

Safety Protection


Beware of sharp edges and take precautions with glove and safety glasses as needed.


Transform Everyday Objects into Robots

CLICK HERE


Tin Can Project Ideas


Tin Can Garden Art Ideas & Tutorial

I suggest doing a Google image search “tin can garden art” first to gather ideas you like. You could make:


  • Robots, people, scarecrow, aliens
  • Animals: dog, cat, snake, lizard…

Planning


Plan your project first and decide all parts you will be using.


Decide how you want to join the parts together. Options include creating holes through parts and joining them with:


  • Nuts and bolts.
  • Wire wrapped around a nut or washer at either end.

If you want moving joints:


  • Use washers or bottle caps between the parts, threading the joining wire or bolts through.

Also pre-plan what you’ll need to hang your creation up, for example, a wire through the top of the head or a rebar post to stand it on.


Preparation


  • Wash and remove labels from all cans.
  • Cut any parts you will need – think about eyes, ears, mouth, hands, feet, and, the best part—unique decorations such as belt, heart, necklace, headdress, earings…
  • Drill holes for all joins and joints. Make sure the hole is large enough to fit the bolts or wire you are using.
  • Paint parts that will be easier to access before assembly. Allow to dry according to product label.

Assembly


  • Assemble in sections, completing the head, body, and limbs before putting it all together.

Tip


  • If you’re attaching any parts with adhesive, it can help to secure them in place with tape while you’re waiting for the adhesive to dry.

~Melissa the Empress of Dirt ♛


Turn empty food cans into sweet garden art robots and pets with these ideas.

Original article and pictures take empressofdirt.net site

Wednesday, July 27, 2016

How to Make Rubber Boot Dogs

How to Make Rubber Boot Dogs

This recycled project shares tips for making garden art dogs from old rubber boots or wellies.


If you want more, see all the projects using recycled / upcycled / old stuff here.


This recycled project shares tips for making garden art dogs from old rubber boots or wellies.

I may receive a commission if you purchase something mentioned in a link on this post for sites including Amazon.com. Other links may go to websites where I have been paid to write a blog or article. See the entire disclosure here.


This recycled project shares tips for making garden art dogs from old rubber boots or wellies.
Let’s Make Dog Boots

Dog Boot Inspiration


I first saw this idea when UK artist David Kemp created these fantastic dogs from redundant miner’s boots. I love them. And the project has been on my creative to-do wish list since then. It took all this time to find cheap boots, all in the same colour and style, at the thrift shop. It’s a totally goofy yet fun project and I enjoyed making it. Hat tip to David Kemp. His art is fabulous.


See How It’s Done (see the dog walk!)


I cannot call this a proper tutorial because there are so many different boots out there and no two will be cut and arranged the exact same way. And, although the project is not really complicated, it’s hard to describe some of the steps! I will, however, share my tips for making this pup, so you can make your own. I’ve provided a video and lots of photos to help you. The biggest concern is making a wrong cut and wrecking a boot—although there’s probably a way do adapt to such bloopers. To take the pressure off, get a few extra boots or, better still, do some test cuts with sheets of paper to be sure they will fit as desired.


Supplies & Materials


Here’s everything I used to make the dog.


  • Rubber boots (1 adult pair, 3 kid pairs=8 boots total)
  • Scrap wood – 2×4 and 1×2 pieces to form a body, legs, and neck
  • Wood screws – to construct frame and secure boots to frame
  • Scissors – strong, all-purpose for cutting the boots (it’s not hard)
  • Eyes – I used bolts – test out what you have and see what looks good / dog-like
  • Tonguered belt
  • Scarfbandana
  • Bolts and washers – to join rubber pieces and add a little steampunk finishes
  • Drill and bits – to put holes in rubber for bolts and affix screws
  • Optional – a proper dog collar and leash would be cute too!

This recycled project shares tips for making garden art dogs from old rubber boots or wellies.

Make a Boot Dog Steps


First, plan how you will place the boots. You could use boots of various sizes like I did, or all the same. Just make sure the four leg boots are all similar.


This recycled project shares tips for making garden art dogs from old rubber boots or wellies.

Make a Frame


I used a piece of 2×4 and some 1×2 wood to make a body, four legs, and a neck support. Size them according to your boots. I made mine so it was just a few inches taller than the leg boots.


This recycled project shares tips for making garden art dogs from old rubber boots or wellies.
Assemble and Create

The four legs go on as-is.


This recycled project shares tips for making garden art dogs from old rubber boots or wellies.
Secure them to the wooden legs with small wood screws.

This recycled project shares tips for making garden art dogs from old rubber boots or wellies.
The tail, body, and neck and head are made from 2-3 boots.

Tail and Body


In this next photo, you can see the tail boot. I cut it right down the middle of the back, and then around the ankles (a few inches), from back toward the front. Test before you cut! Use a sheet of paper to test out the best cuts first.


This recycled project shares tips for making garden art dogs from old rubber boots or wellies.
The tail boot is secured to the frame with a 2″ wood screw in the sole, right into the wood.

This recycled project shares tips for making garden art dogs from old rubber boots or wellies.

Dog Head


The head is made from two boots (top of head boot and lower jaw/neck boot). The neck boot has some cuts to help it contour to the body. I also added an extra piece of boot to better conceal the area where the neck and body (tail boot) meet.


Before attaching the top boot (top of head), do the cuts for the ears and top of head (see below).


This recycled project shares tips for making garden art dogs from old rubber boots or wellies.
Then attach it with a screw to the lower head boot. The last step is to fold over the top head flaps (more on this below) and secure them in place.

This recycled project shares tips for making garden art dogs from old rubber boots or wellies.

To finish the head (when it has been secured to the jaw/neck boot), the back flap (heel of boot) is folded down into the boot (toward the front) and then the big front piece is folded right over it, and down the back, forming the top and back of the head. Secure it in place with a screw into the sole (at back of boot).


Here’s the back of the head. It kind of looks like a goat!


This recycled project shares tips for making garden art dogs from old rubber boots or wellies.
Finishing Touches

I added two screws to the tops of the ears because they were sticking up too much. Your dog might have ears that should stick up: depends on the breed.


Test out different options for eyes. Dogs eyes are basically a solid colour without whites showing. I used the drill to make holes for the eye bolts.


This recycled project shares tips for making garden art dogs from old rubber boots or wellies.

If the area where the neck boot joins the body/tail boot looks unfinished, add an extra piece of boot overlapping the two. I used nuts and bolts at these joins both for vanity (I like the steampunk look) and to keep things secure.


The tongue is a piece of red belt. I used a bandana instead of a collar, as all the fashionable dogs like to do.


This recycled project shares tips for making garden art dogs from old rubber boots or wellies.
And that’s it. If you did it right, your dog will walk like mine does (see video, above).

This recycled project shares tips for making garden art dogs from old rubber boots or wellies.

Yes, I’m kidding.


This recycled project shares tips for making garden art dogs from old rubber boots or wellies.

If you make a boot dog, please show me a photo on the Empress of Dirt Facebook page.


And sign up for the free newsletter (every two weeks) if you enjoy creative gardening ideas delivered right to your inbox.


~Melissa the Empress of Dirt ♛


This recycled project shares tips for making garden art dogs from old rubber boots or wellies.

Original article and pictures take empressofdirt.net site

Tuesday, July 26, 2016

How to Make Potted Plant Shelves

How to Make Potted Plant Shelves
These hanging potted shelves from the book, Big Ideas for Small Spaces, offer a creative way to add vertical, green space to your little garden. Grow a mini herb garden or add trailing, flowering annuals for a burst of colour.

I may receive a commission if you purchase something mentioned in a link on this post for sites including Amazon.com. Other links may go to websites where I have been paid to write a blog or article. See the entire disclosure here.


Big Ideas for Small Spaces


Big Ideas for Small Spaces: Creative Ideas and 30 Projects for Balconies, Roof Gardens, Windowsills and Terraces

This project from Big Ideas for Small Spaces: Creative Ideas and 30 Projects for Balconies, Roof Gardens, Windowsills, and Terraces


by Kay Maguire and Tony Woods is used with permission from Firefly Books who also provided a review copy of this book.


Potted Shelves


These hanging potted shelves from the book, Big Ideas for Small Spaces, offer a creative way to add vertical, green space to your little garden. Grow a mini herb garden or add trailing, flowering annuals for a burst of colour.

Shelves are an increasingly popular way to display pots in the garden, and this project brings the concept bang up to date — without the need for endless drilling and brackets. These rope-hung shelves can be used to cover a wall or be left free-standing to divide or screen a space.


Our hanging shelves had three tiers holding three pots in each, but the boards could be made longer to hold more pots or there could be more tiers —whatever suits the space you want to “green”. Once you have worked out the position of each pot, use a circle drill bit to make the pot holes. String the shelves together with two lengths of rope at each end, to ensure they are balanced.


To make sure that the distance between the shelves is equal and that there is enough light and space for the plants to develop between them, carefully measure and mark on each rope where each shelf is to go. The ropes are knotted below each shelf and then gathered together at the top and knotted again before being hung from hooks.


For our shelves, we selected our favourite mix of herbs, but any potted planted could be used to match your planting scheme.


Top Tip

To establish the position of three pots along a shelf, we measured the length of the board and divided it by four. We then measured the width of the board and halved that figure, to ensure each pot was exactly in the center of the board and equally spaced along it.


What You Will Need


  • Tape measure and pencil
  • 9 x plain terracotta pots
  • 3 x wood boards of equal length

  • Drill and circle bits (also known as Hole Saw Kits) to match the diameter of your pots
  • Sisal rope8mm (1/3-inch) in diameter (we left about 40cm (16-inches) between each tier so each rope length was at least 1.6m (5.25 feet) and there were 4 pieces of this length)
  • Hooks for hanging
  • Suggested Plants: Mint, arugula, thyme, rosemary, sage, strawberry
    If you love a burst of colour, look for plants that either flower or have year-round leaf color and will spill over and soften the edge of the pots.

Steps for Making Potted Shelves


These hanging potted shelves from the book, Big Ideas for Small Spaces, offer a creative way to add vertical, green space to your little garden. Grow a mini herb garden or add trailing, flowering annuals for a burst of colour.

These hanging potted shelves from the book, Big Ideas for Small Spaces, offer a creative way to add vertical, green space to your little garden. Grow a mini herb garden or add trailing, flowering annuals for a burst of colour.

These hanging potted shelves from the book, Big Ideas for Small Spaces, offer a creative way to add vertical, green space to your little garden. Grow a mini herb garden or add trailing, flowering annuals for a burst of colour.

These hanging potted shelves from the book, Big Ideas for Small Spaces, offer a creative way to add vertical, green space to your little garden. Grow a mini herb garden or add trailing, flowering annuals for a burst of colour.

Ideas for Display


These hanging potted shelves from the book, Big Ideas for Small Spaces, offer a creative way to add vertical, green space to your little garden. Grow a mini herb garden or add trailing, flowering annuals for a burst of colour.

Hanging potted shelves work nicely next to a balcony or patio wall. They could also be used to create a living wall, suspended from a tree branch, in the garden.


For extra colour, consider painting the wood boards.


30 More Projects


Big Ideas for Small Spaces: Creative Ideas and 30 Projects for Balconies, Roof Gardens, Windowsills and Terraces

Big Ideas for Small Spaces is for anyone with a small outdoor space that they wish to “green up”. While the projects and advice are valuable to any gardener, they are especially useful to urbanites surrounded by concrete who nonetheless want to enjoy the soothing environment of a garden.


Thirty step-by-step projects show how to transform balconies, windowsills, rooftops, pocket-sized patios, even walls, into features of lush greenery, grasses and blooms. They reveal how to create space for perennials, herbs, vegetables, bulbs for season-long flowers, and even shrubs or small trees, as well as seating, tables, lighting, and decorative elements.


The projects include “You Will Need” checklists, tip boxes, and step-by-step photographs. They use inexpensive or repurposed materials, standard tools, and are exceptionally easy to do.


  • Vertical – Green wall pallet; Succulent picture frame; Gutter planters; Hanging planted screen; Pocket planters; Instant green wall; Slatted and hanging chain screens; Mirror wall
  • Hanging and Highrise – Shady hanging basket; Hanging herbs; Triple hanging baskets; Pots on hooks; Potted shelves; Balcony rail planters
  • Pots and Planters – Pots for year-round interest; Tin can salad bar; Skinny balcony planter; Crates of produce; Wildlife windowbox; Chunky trough; Pond in a pot
  • Down on the Ground – Raised bed seat, Green roof, Paving slab garden; Herby table planter; Gabon coffee table; Balcony bench; Below-bench planter; Mobile garden.

Empress of Dirt TV


Original article and pictures take empressofdirt.net site

Monday, July 25, 2016

How to Make Plush Velvet Pumpkins

How to Make Plush Velvet Pumpkins

There’s all over the place, these cute plush pumpkins. I originally saw them last year over at The Inspired Room and have been dreaming about them ever since. Of course the ones featured there are incredibly expensive albeit the nicest ones I’ve seen- being made of silk velvet and all that. So scratch that idea. I’d have to make my own. Here’s how to make my version of plush velvet pumpkins.


With a little “googling” under my belt, I figured out how to do it and headed off to the fabric store to buy some silk velvet. Now keep in mind that my fabric store is 45 minutes away in a small city of about 50,000 – one fabric store in town, small selection AND velvet in black, dark green or red. Not exactly 50 shades of pumpkins. So with a little digging I came up with some velour, some suede-like and velveteen. Not quite as luxe as the originals, but still workable in my opinion. I bought 1/2 metre of each in about 6 shades and headed home.


guess I could have gotten all “magaziny” with this shot of the different fabrics

Now the fun part, cutting and sewing……here’s some easy instructions.


tools you’ll need (besides scissors, needle & thread) – circles (cake pans), a funnel and some pumpkin stalks

1) Get out your biggest cake pans. I’m lucky because I have a whole set of cake pans ranging from 6″ to 16″ – I used the 12″, 14″ and 16″ for the three different sizes. The diameter of the pumpkin works out to be about half the size of your pan – 16″ pan resulted in an 8″ pumpkin. If you don’t have a large cake pan, you can cut a circle of paper or cardboard to any size as a template.


2) Draw a circle and cut it out. It’s easiest if you use a marker to see the outline – don’t worry, you won’t see the marker lines when the product is finished.


3) With a heavy thread (I used button thread) hand sew a line just 1/4″ from the outer edge of your circles. Leave the ends of threads at both ends so that you can tie them together as you gather the top.


4) Leaving a hole big enough for the opening of your funnel (I made one out of an old water bottle with the bottom removed), fill the bottom 1/4 of your pumpkin with rice or beans to weigh it down. Fill the rest with polyfill stuffing. Draw the thread together and tie tightly. Cut off excess thread.


5) With a hot glue gun, secure the pumpkin stalk to the top of the pumpkin pushing down as it dries to create a more natural look.. Add some grapevine “twirls” for added effect. Let dry completely before moving (about 15 minutes).


That’s it! Easy peasy lemon squeezy. A pretty good knock-off of this popular Pinterest item. My biggest challenge is finding the pumpkin stalks. After visiting several veggie stands, I finally found someone who would “gather” some for me when picking up his pumpkins from a local farm. Got about a dozen from him with the promise of more. But last week the building he was in burned to the ground!!! Nobody hurt, but my pumpkin stalks got roasted.


creative corner hop

Original article and pictures take www.newhousenewhomenewlife.com site

Wednesday, July 20, 2016

How to Make Planted Pumpkins Last

How to Make Planted Pumpkins Last

Planted pumpkins make festive fall containers for autumn flowers with stunning arrangements set off by vibrant colors. They are simple to make and worth the wow factor, as long as you can keep them looking fresh for more than a week. As much as these planted pumpkins make for gorgeous decor, nobody likes a moldy pumpkin arrangement! So, what can you do to make them last? I have done the research and will share my tips on how to make planted pumpkins last this season.


How I keep my pumpkin planters looking beautiful for a month!

I make pumpkin planters every year (like these ones) and they last for at least a month. Sometimes they last a bit longer but for me, a month of a good-looking outdoor arrangement is just perfect. I’m ready to transplant the flowers and compost the pumpkin by then, and move on to other holiday projects. And frankly, tossing the pumpkin in the compost bin is a lot less work than cleaning and storing outdoor containers.


First, (and this seems to be a pretty good rule of thumb for making most perishables last), pick the freshest pumpkin you can. Choose one with no soft spots, visible mold, browning…you get it. A firm, clean pumpkin from a farm or one that feels cool to the touch (meaning it has been in cold storage at some point since harvest) will give you the longest-lasting pumpkin.


Next, don’t fuss with those rumored preservation methods: bleach, white glue, petroleum jelly, and even jack-o-lantern preservative spray. There have been plenty of home studies (like this one) that show they are no more effective than just leaving the pumpkin as is. I have even tried spritzing the cut parts of the pumpkin with food-grade hydrogen peroxide (the same that I use to prevent mold growth on my sprouts) and have had no more success than leaving it the heck alone! Plus, when you add all that junk, you can no longer compost your pumpkin, meaning no nutritious, soil-amending pumpkin in your garden compost.


Then we must discuss climate. I live in Vancouver, BC (zone 7-8) and it rains a lot here. It’s warmer than the rest of the country with mild fall days and cool nights. I find that a pumpkin planter set out on October 1st will last until October 31st (great timing for Jack-o-Planterns). September pumpkins don’t last as long because it is much warmer. I can’t say how that relates to other climates, but you can use this as a guide for figuring out your area.


Don’t forget location, location, location. If you put your pumpkin in the hot sun, pouring rain, or freezing snow what do you think will happen to it? The sun will accelerate decomposition. The rain will promote rot. And the snow, well, it may actually preserve the pumpkin if it sticks around. If it freezes, thaws, freezes, thaws, etc, then you will quickly have a pumpkin puddle. Display your planter in a covered area, outdoors in cool weather, out of direct sunlight and you will have a great chance of extending its life.


Tips and ideas on making carved pumkins last

Still not buying it? Well, here’s an idea: forget about pumpkins! Try ornamental squash instead. They look a lot like mini pumpkins and are much much firmer and harder to break down. These are usually the ones I cut up for inside the house where the climate is not at all suitable for softer squash.


Now, let’s not harsh on pumpkins too much here for doing their job. I mean, they have to break down a lot of stuff to get those seeds to the soil, planted and ready for next year. Sure, there aren’t many wild pumpkin populations out there and squash today greatly requires our help to reproduce. It’s just something to think about when you are feeling frustrated with a rotten pumpkin. If they really get you down, then grab a plastic one. They are zero maintenance!


Now, go check out these Jack-o-Planterns and other outdoor pumpkin decorating ideas.


tons of ideas for decorating with pumpkins and squash outdoors

Original article and pictures take gardentherapy.ca site

Tuesday, July 19, 2016

How to Make Pickle Dish Garden Flowers

How to Make Pickle Dish Garden Flowers

Making garden art flowers from repurposed dishes is quite popular right now. These pickle dish flowers are simply a smaller version and quite fast and easy to make.


Gather up some old pickle dishes (or other serving plates), glass craft paints, and a few other supplies, and you've got yourself some adorable, decorative flowers.


I'll show you which supplies you'll need and how to make them.


You'll want dishes that are fairly lightweight so the flower is not too heavy on the stem.


  • Pickle dishes or other small glass serving dishes for the flower petals.
    You'll want clear glass if you're going to paint them like I did.
    You could also use colored glass for a neat effect.
  • Ballpoint pen cap (for the stem holder).
    Make sure it fits over the tip of the shish kebab skewer.
  • Leaves (optional). You could use synthetic, decorative plant leaves, metal wire, or small cutlery items including forks and spoons.
  • Craft paints suitable for glass surfaces.
    I use Martha Stewart® Crafts Glass Paint and Folk Art® Enamels for glass and ceramics.
  • Adhesive: I use GE Silicone II silicone sealant (clear, waterproof, made for gutters and flashing) for all of my outdoor garden art projects.
    Some crafters also use E6000.
  • Clean, protected work surface, soapy water for brushes, rag.


Decide how you want to arrange the flowers. I use one clear plate for the flower petals and a little vase (or sherry glass or salt shaker) for the center stamen. You can always change your mind before you glue them together.


If it helps, browse images of actual flowers to get ideas for colors and design.


Before assembling them, you will paint the separate pieces.


I use GE II Silicone sealant in a caulking gun. It also comes in squeeze tubes. Check the date on the container to make sure the product is fresh. Old sealant is runny and won't dry properly or form a bond.


Apply the glue (sealant) to the bottom of the vase and press firmly onto the clear plate. Hold in place for a minute. Carefully remove any excess (I use an old butter knife).


Read the directions on the sealant for required drying time.


If you would like leaves, there's several options:


  • Create your own leaves with wire. Attach with tape or wire.
  • Tiny forks and spoons. Attach with tape, wire, or clear adhesive.

All done!


Now go get some pickle dishes!


Tags:


garden art


garden junk

dish flowers

diy

garden decor

garden crafts

repurposed

painted flowers

easy crafts

garden gifts


Original article and pictures take www.ebay.com site