If you’re frugally minded then pallet wood, and pallets themselves, can be a versatile and useful material. I’ve used them to make strawberry planters, wooden trugs, and my boyfriend has even used them to create a stunning herringbone table. That got me to thinking — I actually need a potting bench in the greenhouse. Nothing fancy but something to keep trays of seedlings off of the ground. I got Josh back on the case.
The surface is literally half of a pallet
Within an hour, he had a basic table made for me that’s perfect for my size greenhouse. I didn’t want it to stretch all the way across since I have some taller plants I’d like to fit in beside it. If I change my mind about how I want to use that space we can make a second potting bench from the other side of the pallet and set them side by side.
Josh started by cutting a standard wooden pallet in half with a jigsaw. There were some little wooden bits left on the sides that jutted out so he knocked some of them off with a hammer. The others he went back and trimmed with the jigsaw.
Fitting the pallet table top with legs
The legs came from my old chicken run and so we actually didn’t end up spending any money on this project. They’re 2x2x30″ (5x5x75cm) lengths of pine and they’re screwed in from the top and side of the pallet. If you wanted to give them more stability, you could fit them with steel or wooden brackets. The table comes to my waist and the plants that sit on top have enough height to grow.
An Easy and Practical DIY
I’m over the moon with my new pallet potting bench! I actually love how rustic it looks and the fact that we’ve recycled materials to build it. It’s come at a good time too since seed sowing will soon be on us. Keeping seedlings off the ground will protect them from any slugs and beasties that invite themselves into the greenhouse.
Until then, I have pots of succulents, and trays of Sweet Williams and garlic spread across the top and two geraniums underneath. It’s amazing how useful and attractive a ‘hack’ can be.
Original article and pictures take lovelygreens.com site
Would you like to start a secret garden? Good news! This project may look complicated but it’s really not. It’s an illusion! I have a super simple tip (below) that makes it really easy to turn any rectangular mirror into cool, optical illusion garden art and you will not need to do any special measurements or calculations.
While you could make this project without power tools, it is preferable that you have an electric saw that does miter cuts, although you could use a hand saw instead. The electric saw will just make the cutting faster and easier.
If a fear of power tools is holding you back, this might help.
Make Your Own Optical Illusion Garden Mirror. There's a simple trick that makes this project much easier than it looks!
I may receive a commission if you purchase something mentioned in a link on this post for sites including Amazon.com. Other links may go to websites where I have been paid to write a blog or article. See the entire disclosure here.
This One Cost $12
I’ve been admiring these mirrors for years and, after seeing one priced at $290, decided I probably could make my own. Nothing like inflated prices to make you feel like you can do it yourself!
As it turns out, it was much easier (and faster) than I expected. In fact, you could probably make your own (other than waiting for the paint to dry) in less time than it will take me to write these instructions.
This project cost me a whopping $12 to make with the purchase of a mirror, wood, and hardware at the thrift store. I used leftover paint from my garden shed makeover.
Related: DIY garden art hose guards
Optical Illusion Design Ideas
There are so many possibilities for these mirrors but they all have the same basic design.
Look at the images below.
Every mirror has an outer frame and an inner frame, which is the section that creates the illusion.
Here’s the same design with window grilles: This next one is simply doubled to look like two open windows: And here’s another variation made to look like an open garden gate.
This can be really cool when placed on the ground against a garden fence.
Design ideas for making your own optical illusion garden mirror. There's a simple trick that makes this project much easier than it looks!
To create my optical illusion mirror, I used the design with window grilles but simplified it so there were fewer wood cuts required.
You could also make a miniature version first to test out your design. This one is 3-inches tall:
How to make magical mini fairy doors for little gardens
Super Simple Construction Tip
I mentioned this project can be done without any special measurements or calculations and here’s how.
Make a paper version first.
By creating a paper template, you will know exactly how much wood you need, you”ll have a template for each wood cut, and you’ll be able to double check the design before ever cutting the wood.
And, if you can draw it, you can cut it out and make it! It doesn’t have to be like mine. Draw some samples. Experiment. See which one you like best and make it!
I’ll walk you through the steps below to show how to create your design.
How to make your own optical illusion garden mirror. There's a simple trick that makes this project much easier than it looks! Basic Steps
Get materials and tools ready (list below).
Make paper template for the wood cuts.
Cut wood.
Assemble.
Prime and paint (or stain) all sides of wood.
Attach hinges and handle.
Secure mirror to back of frame.
Attach wood pieces to front of mirror.
Add hanging hardware.
Hang it up in the garden and amaze your friends.
How to make your own optical illusion garden mirror. There's a simple trick that makes this project much easier than it looks! Make the Paper Template
I put the mirror on a table and then created my template on top of it.
You could either cut out strips of paper using the wood as a template (for the width of the paper strips) or simply draw the whole thing on a large piece of paper and cut out the pattern pieces.
Have a look at the diagram (above) for guidance.
Many of you will probably be able to make the project simply by seeing the diagram and making the template.
If written instructions help, keep going. Otherwise, draw a design you like on paper, cut out the wood, and go for it!
Outer Frame Parts A and B – 2 of each
Decide whether you want to make mitered or butted corners.
I made mitered corners and created an outer frame that is larger than the mirror by 1″ on each side (2″ total) to allow room for attaching the mirror to the back of the frame.
Inner Frame Parts C (2), E, F, G, H, I
The inner frame has 4 sides plus the inner wood pieces forming a cross.
Create your paper template in this order:
E- Fits the inside space next to A.
G- is parallel to A (the outer frame) and placed equal distance from the top and bottom B pieces.
There’s also a gap between G and the nearest A (which helps create the illusion of the window being open).
First determine the desired location of G but hold off with the length for now.
G has two angled cuts but you need the C pieces first.
C – These two pieces are the same (you just turn one over after cutting it out).
The C pieces have two angled cuts (labelled 1 & 2, and 5&6). With G and E in place, cut out the C pieces to fit nicely against them.
See how cuts 3 & 4 on the G piece line up with the outer edges of the C pieces? Trim G at the top and bottom using the outer edges of the C pieces as your guide.
Make the Inner Cross
With E, G, and the two C pieces taped in place, make the inner cross pieces.
F is placed parallel to E and G, and slightly closer to G than E.
F has two angled cuts (7&8).
Make H and I
With F also taped in place, create H and I.
H will be slightly longer than I (because F is slightly closer to G than E).
If it looks good, you’re ready to cut the wood.
Cut the Wood
Label each pattern piece and trace them onto the wood.
Cut out the wood.
Sand any rough edges.
You can either prime and paint (or stain) first or after assembly.
Here’s a close-up of the lower left corner:
How to make your own optical illusion garden mirror. There's a simple trick that makes this project much easier than it looks!
Here’s the project before I stained primed and painted it:
How to make your own optical illusion garden mirror. There's a simple trick that makes this project much easier than it looks!
I assembled mine with metal mending plates and small wood screws (on the back) and wood glue to connect the wood pieces.
I held everything in place with clamps while the wood glue was drying.
How to make your own optical illusion garden mirror. There's a simple trick that makes this project much easier than it looks!
I painted the outside and edges blue and the back side black.
How to make your own optical illusion garden mirror. There's a simple trick that makes this project much easier than it looks!
The wood is attached to mirror using adhesive. I used GE II silicone sealant. Some people like to use construction adhesive but I have not tested it myself in this application.
Whatever you use, make sure it’s suitable for glass/mirrors and wood, and do not apply it near the edges where it will be reflected by the mirror.
Secure the mirror to the back of the frame. I used mirror clips.
In these next pictures you can see how the black paint on the back adds a neat effect:
How to make your own optical illusion garden mirror. There's a simple trick that makes this project much easier than it looks! How to make your own optical illusion garden mirror. There's a simple trick that makes this project much easier than it looks!
The hinges and handle came from the thrift shop and were mismatched so I spray painted them with a copper colour to unify the look.
How to make your own optical illusion garden mirror. There's a simple trick that makes this project much easier than it looks!
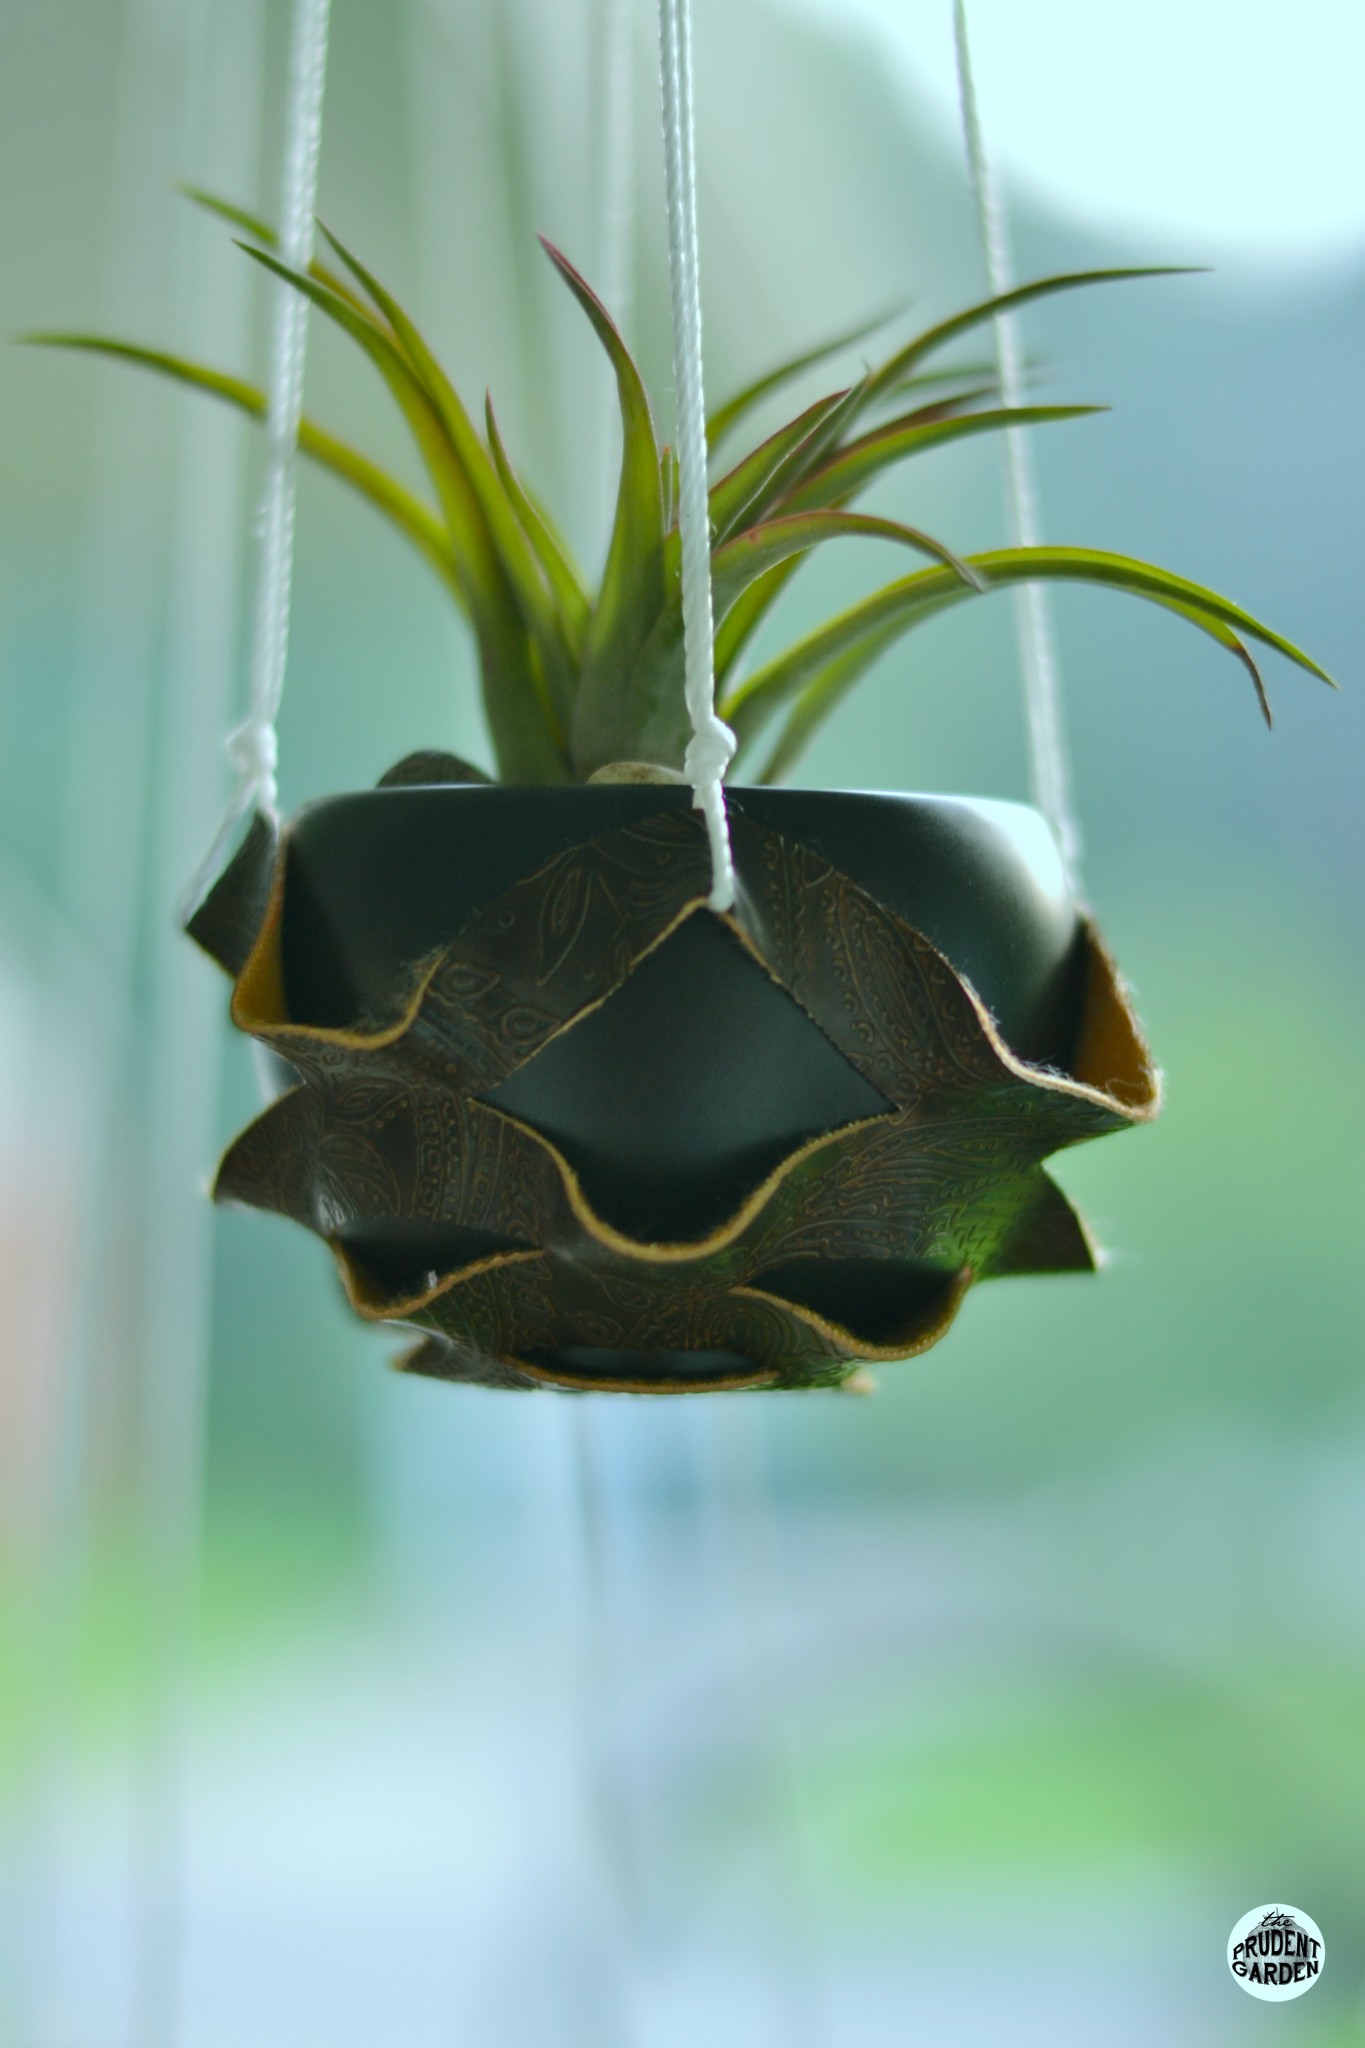
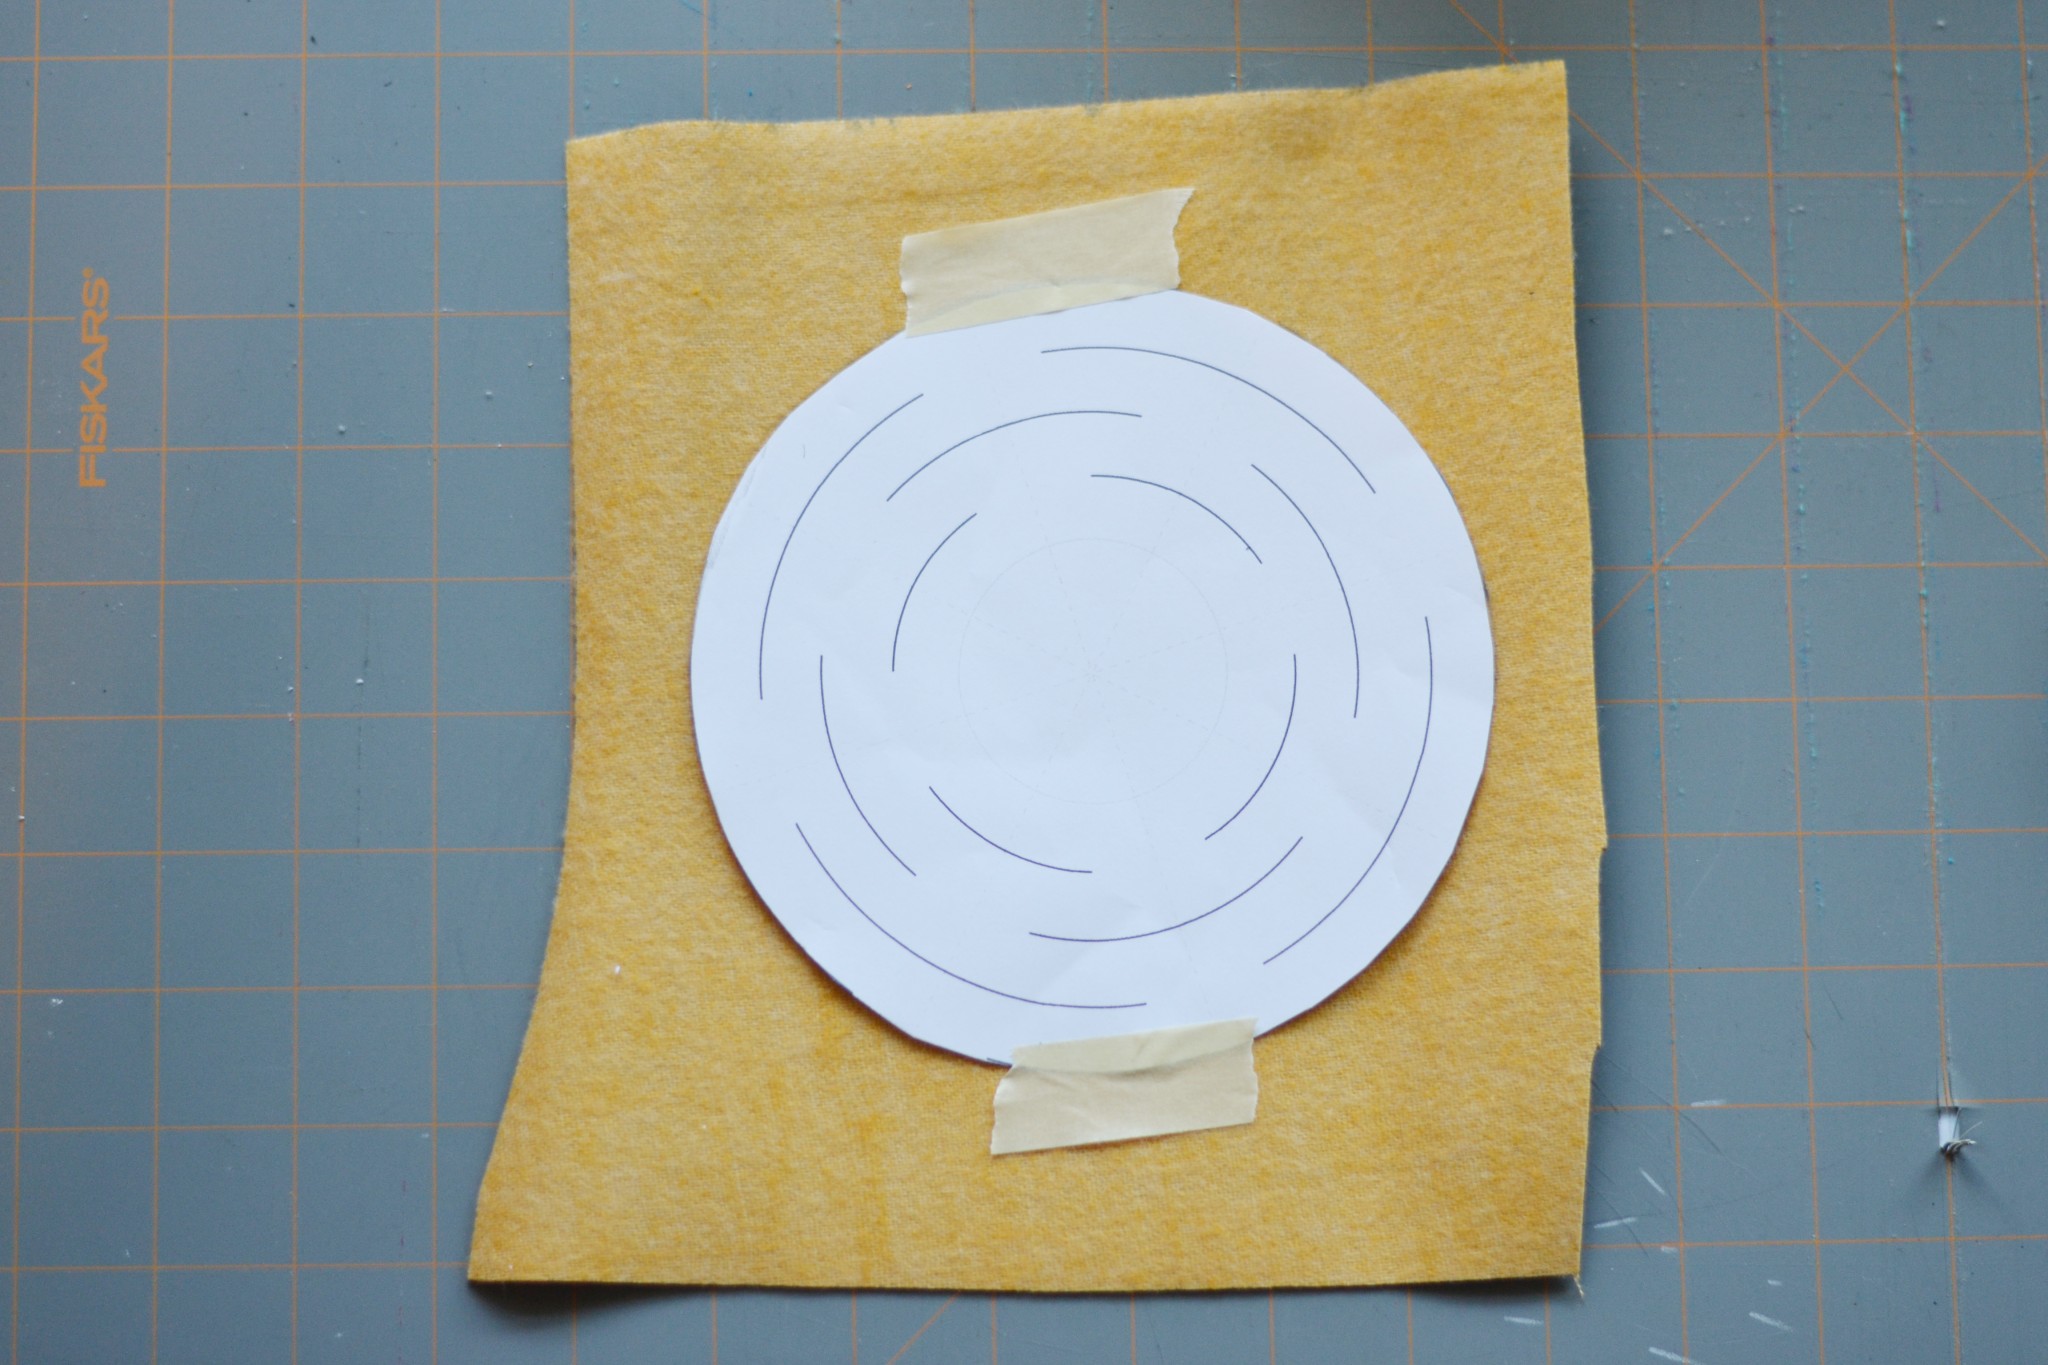
I originally came across this style of plant hanger on Pinterest and knew I was going to make it! The planter is based on the art of Kirigami, which is a variation of origami that includes cutting of paper. It’s similar to cutting paper snowflakes; fold a piece of paper in 6 ths and make specific cuts to produce a design. But since we are dealing with a sturdier medium like leather, folding is not an option.
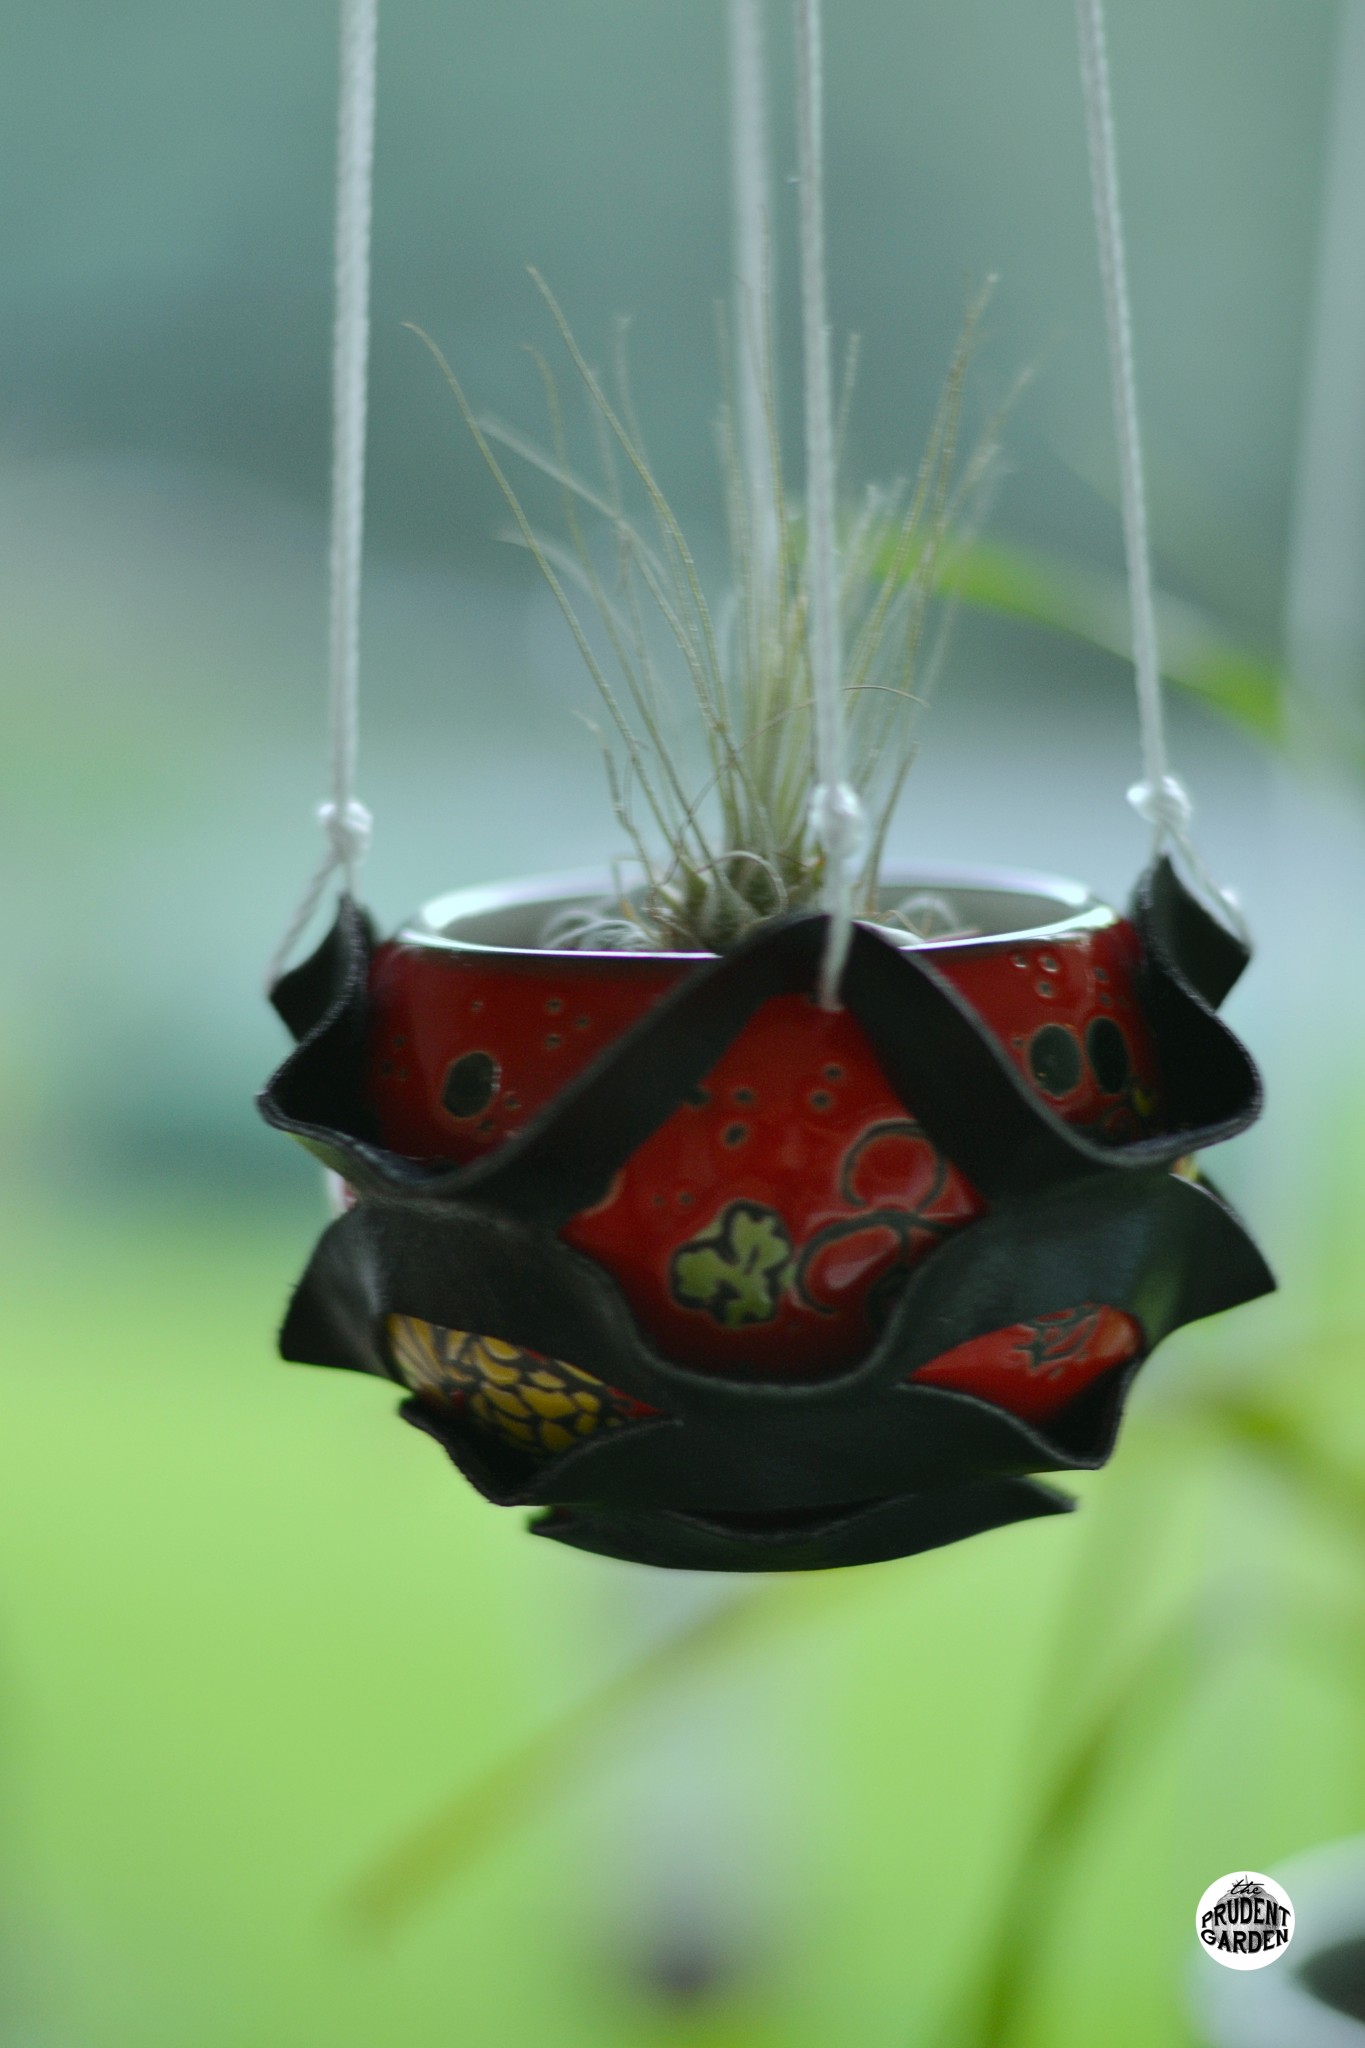
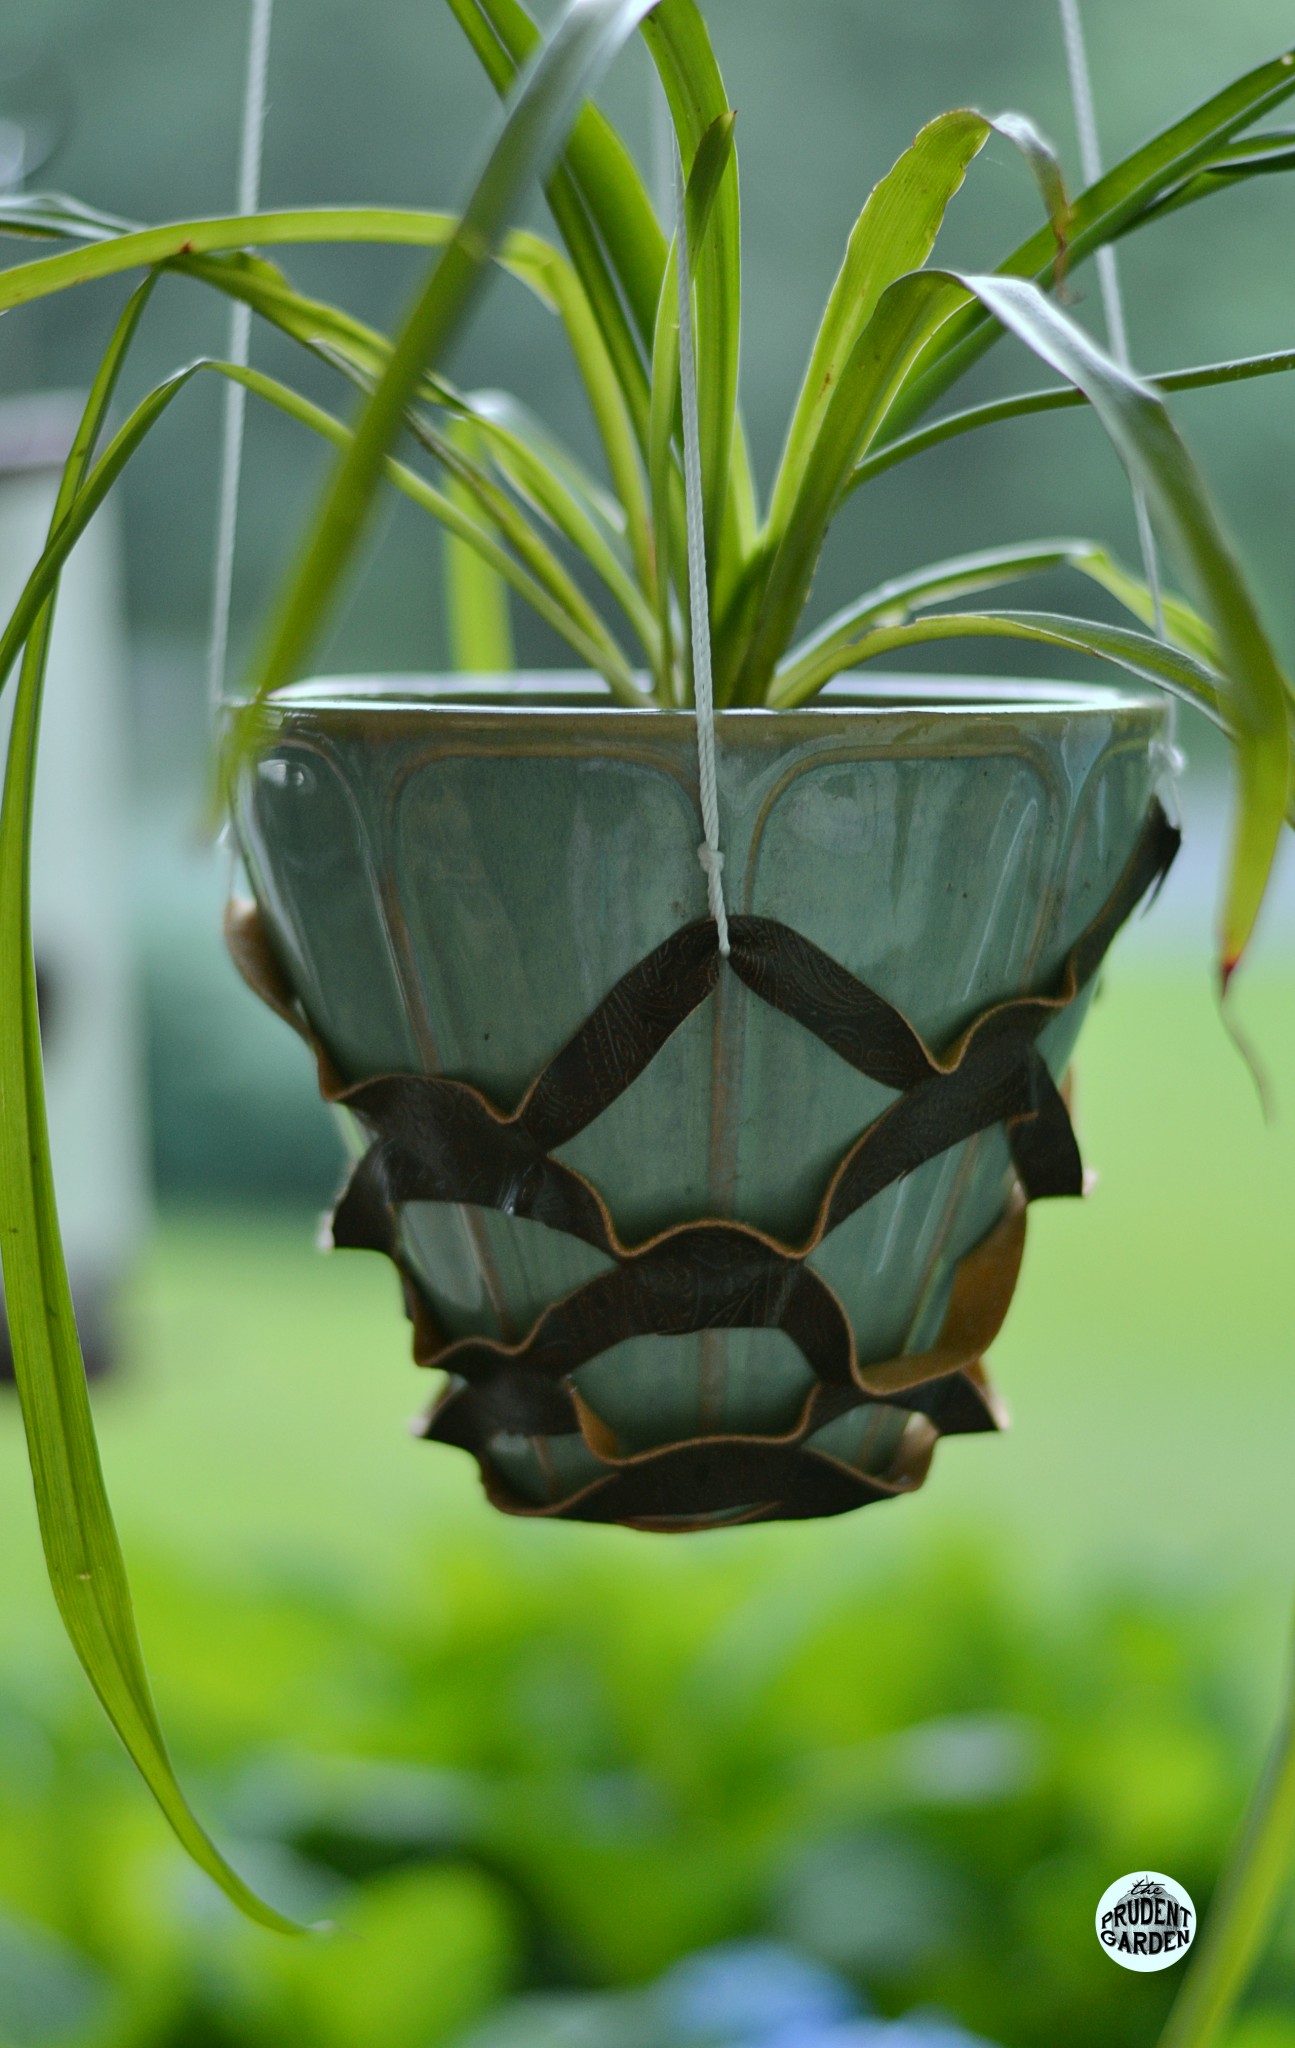
My hanger is based off of a tutorial I found on Design Sponge. The tutorial is done by a master leather craftsman and his planter is GORGEOUS! I wanted to make a simple version of the hanger using recycled materials I had. Using this template, here are the hanging leather planters I made:
Supplies:
The container you plan to use (So, you can tweak the template to accommodate)
A surface to cut on ( like a self-healing mat)
Leather or Pleather (artificial leather)
Utility Knife, Box cutter, or X-Acto knife
Scissors
Pencil
Twine, leather rope, twisted mason line, or any type of string you have
In my project I used the leather (the black one) from an old jacket my sister picked up from a thrift store in Baltimore for $5! It was a real black leather jacket, but ugly as all get out. I hacked it up into various pieces. The brown paisley pleather is a remnant for an upholstery job my mom had left over. Be creative when seeking out materials for this project. Don’t be afraid to eye up an old chair at the thrift store. I have recycled fabric for upholstery before. Also, if you plan to buy the fabric, check out Hancocks, Joanns, Walmart or Hobby Lobby’s fabric section. I wouldn’t bother purchasing a 12×12 piece of real craft leather at a hobby shop. It’s expensive. You’ll save money purchasing by the yard at a fabric store.
Step 1
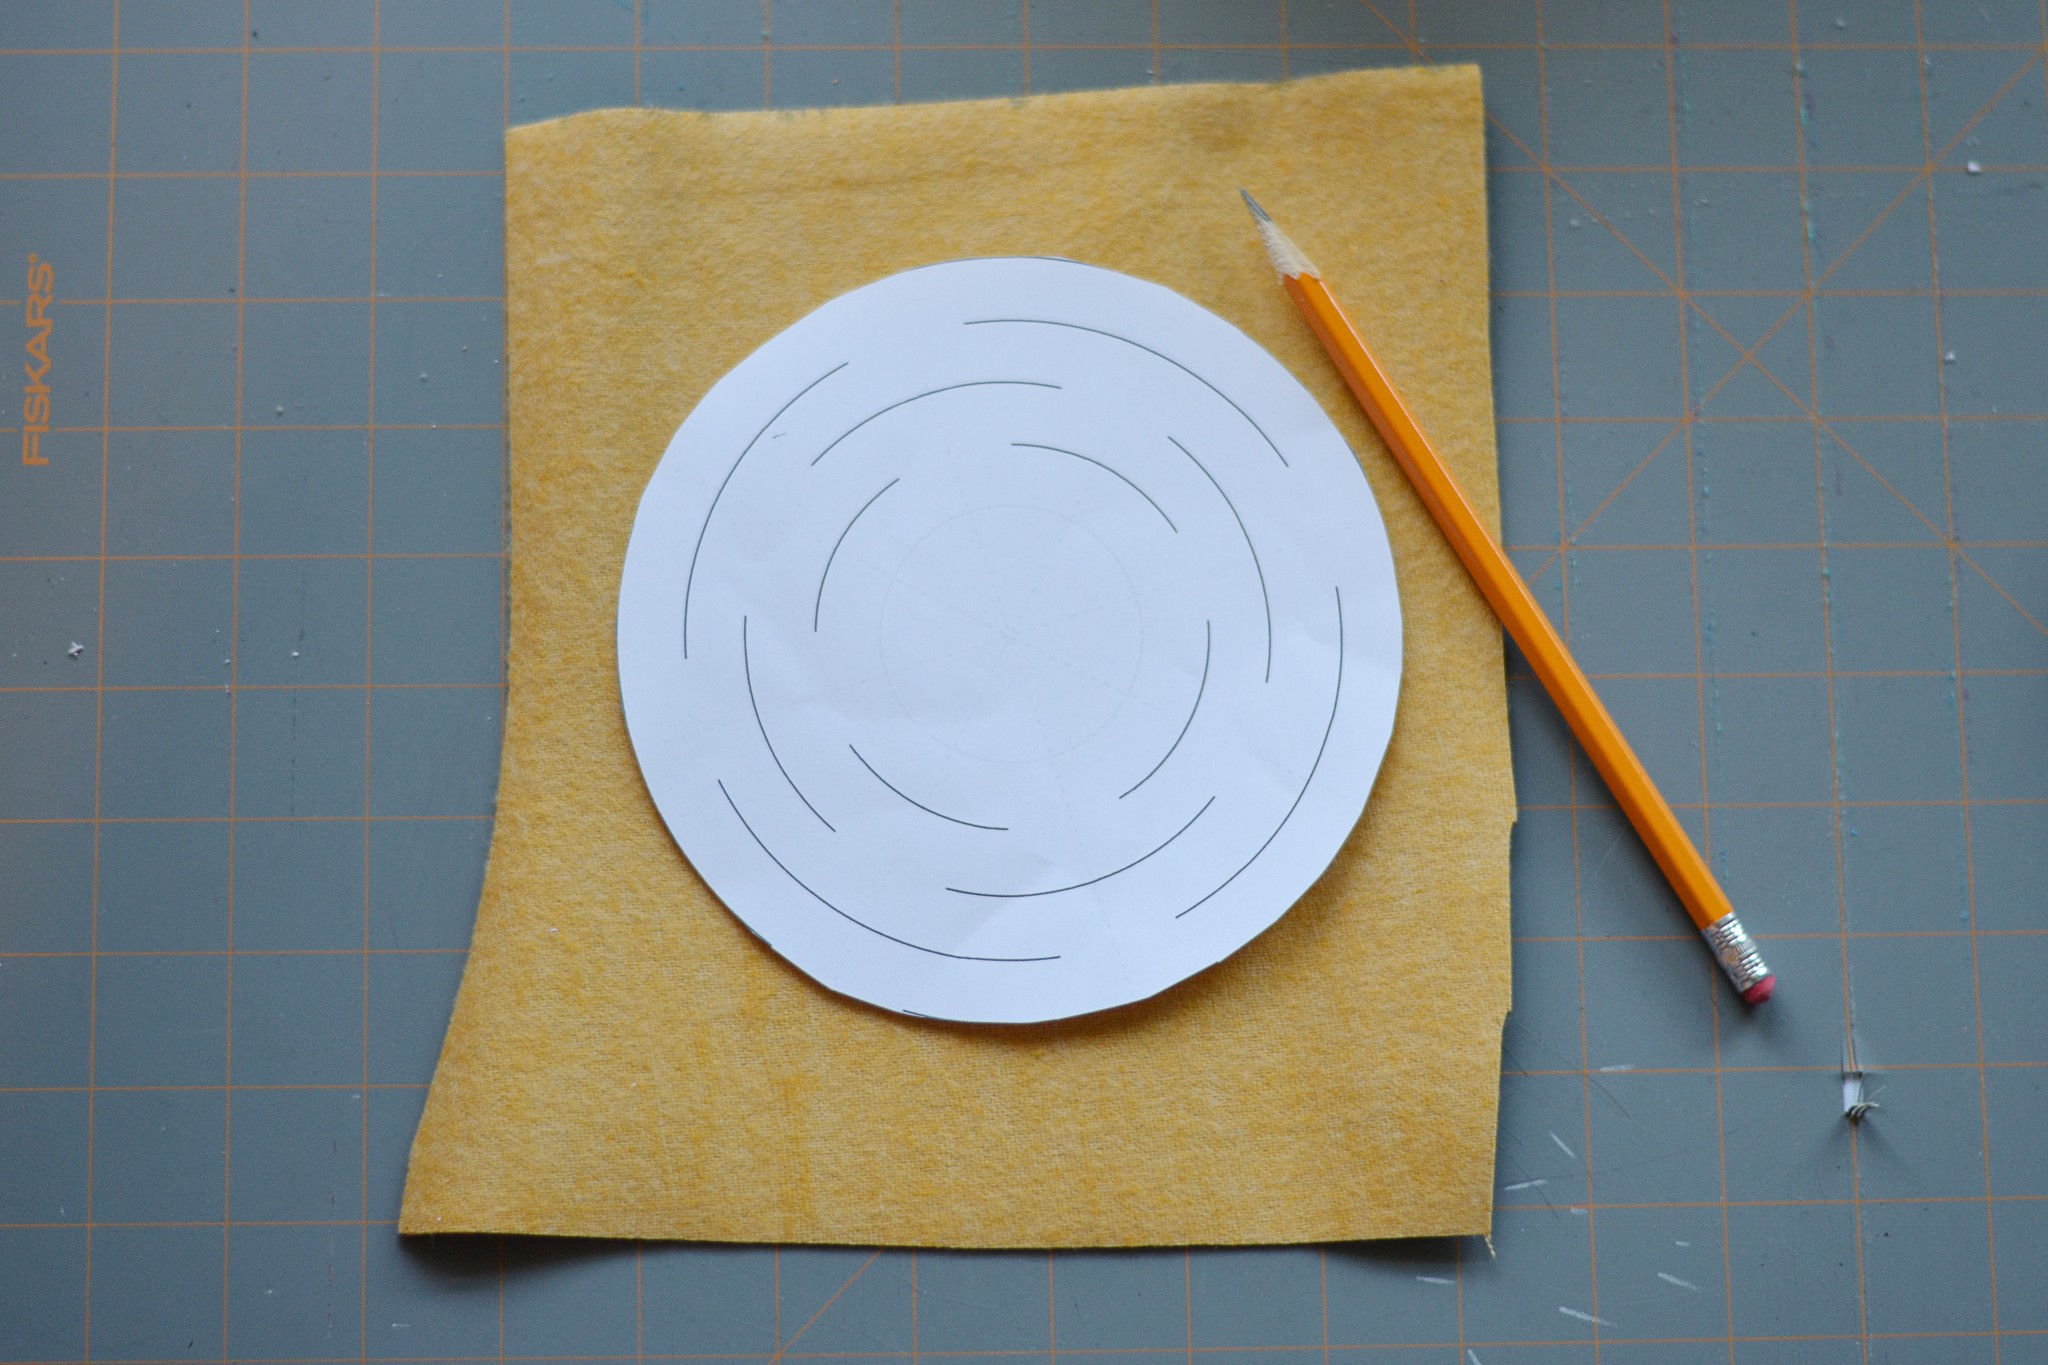
Cut out the template. I had to cut down the original template so the “basket” would fit around my tea cups that I used for my air plants. Lay the template on to the back side of the leather (pretty side down). Trace around the template with a pencil.
Step 2
Tape the template down onto the piece of leather. This will hold the template in place while you cut.
Step 3
Cut along the lines of the template. Go slow. I had to slice through the paper first and then do a second pass to cut through the leather. Also, I added a section in the middle of the template to accommodate the base my small tea cup.
Step 4
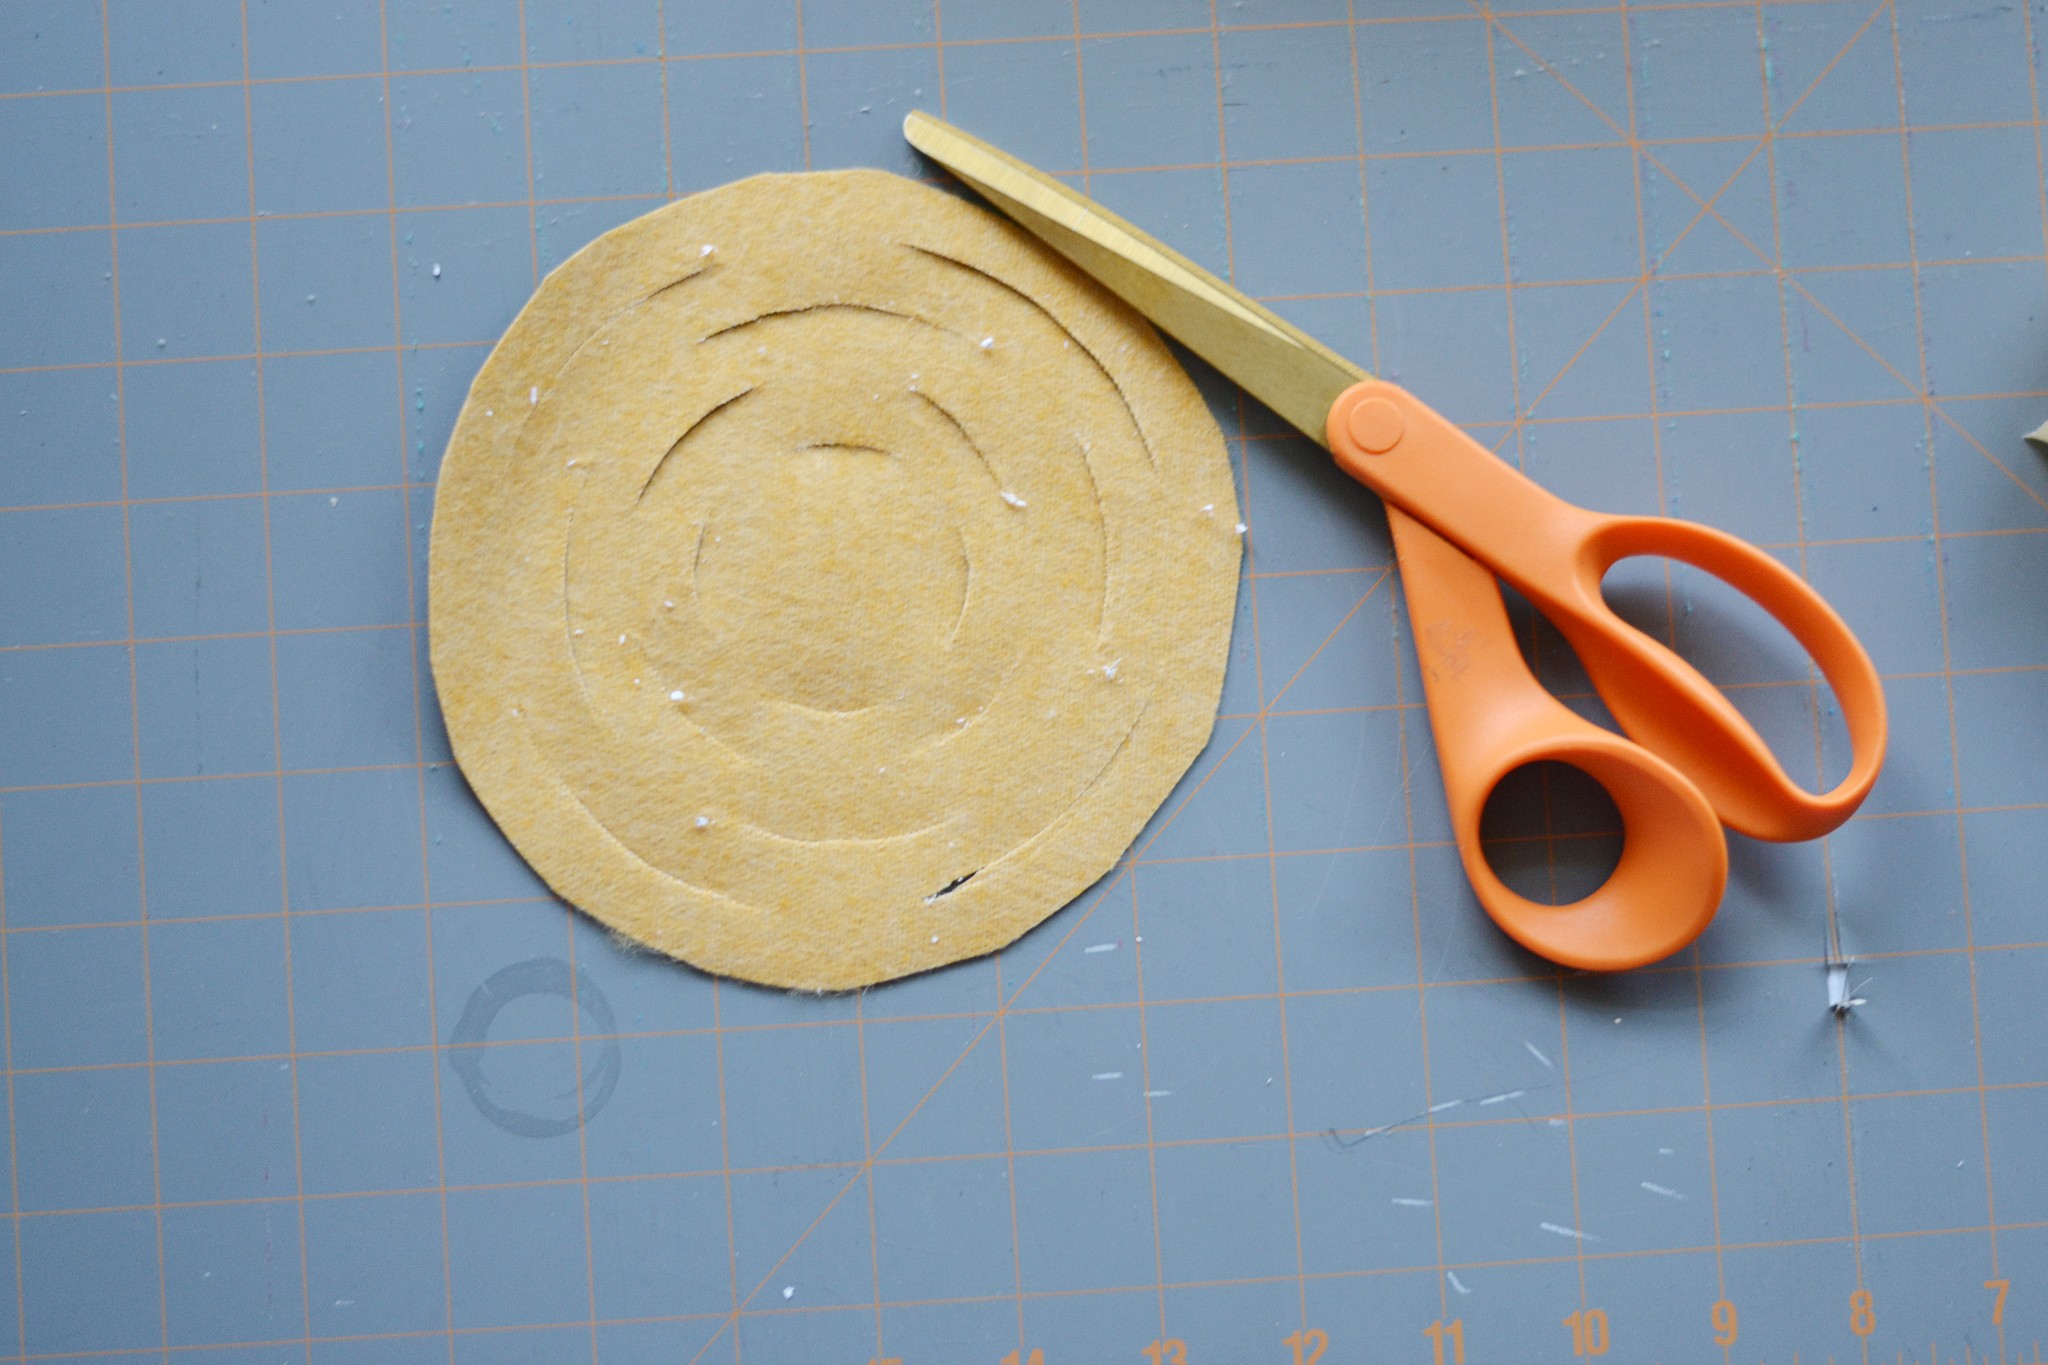
Remove the template and make sure that all the “lines” have been cut through.
Step 5
Cut around the circle you traced in step 1.
Step 6
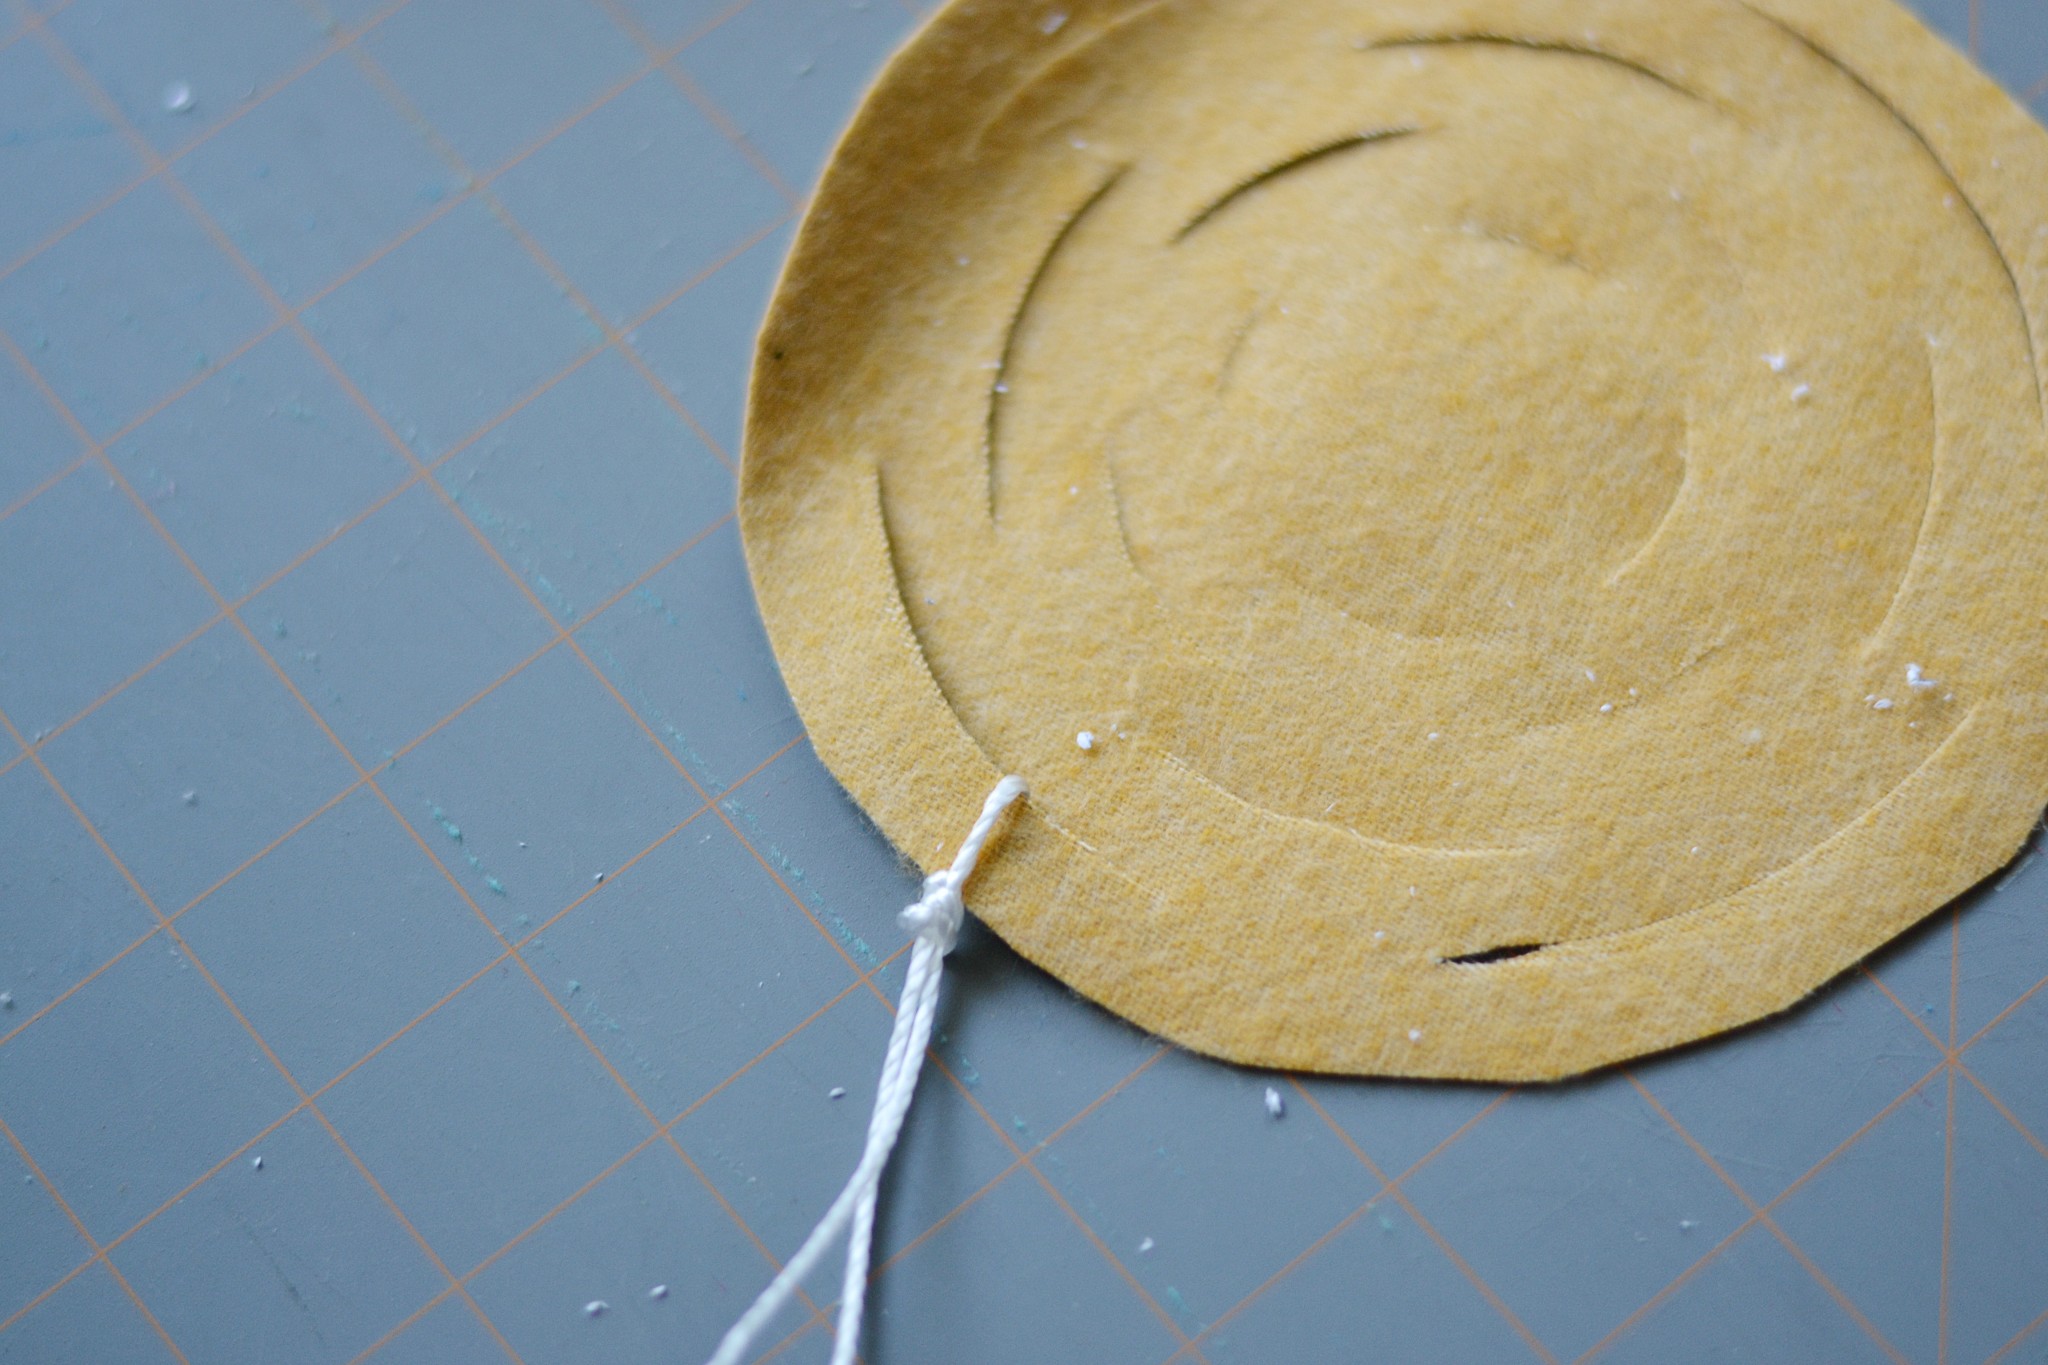
Cut 4 equal lengths of string. Thread the first piece of string through on of the “lines” you cut on the outer rim of the circle. Tie an overhand knot. Do this on all four sides.
Step 7
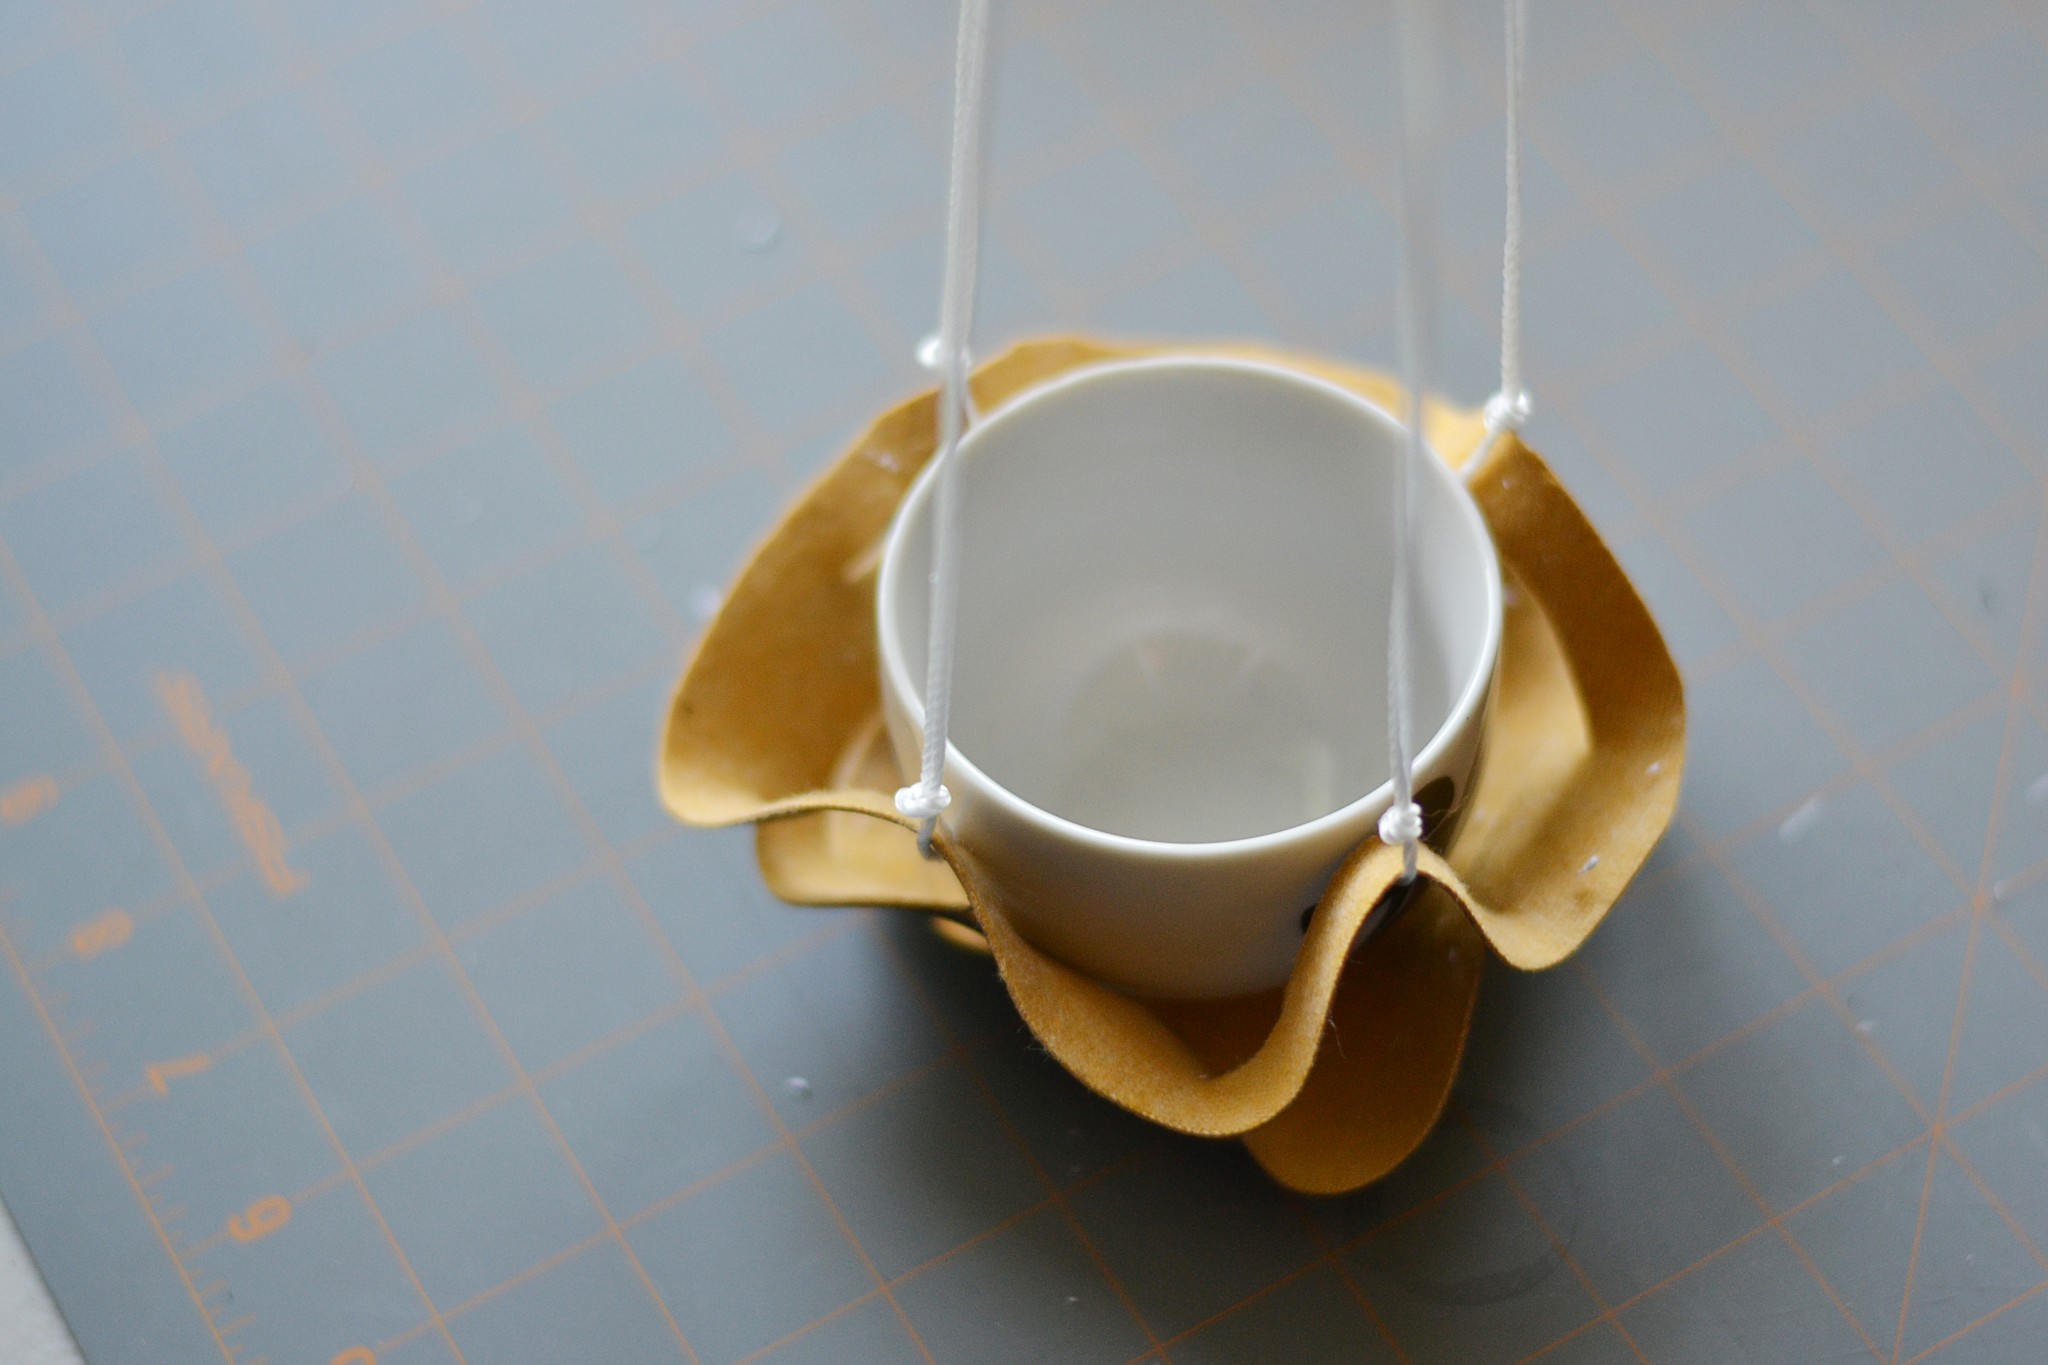
Add in your container. Gather all 4 strings and lift. Adjust the strings for balance if necessary.
Step 8
Once you have the length and balance set, secure the top end with a knot. I just looped the ends over and tied a simple knot. Since I used twisted mason line (which tends to be slippery) I tied two more knots underneath the main knot.
You can attach the rope by whatever method you prefer. I decided to tie the overhand knots so I can easily adjust the balance of my planters.
Notes:
Real leather stretches more than pleather. Keep that in mind when you decide how long you want your planter to hang.
Make sure your hanger can hold the weight of your FILLED planter before you hang it up.
Enjoy!
Original article and pictures take theprudentgarden.com site
Create a giant, garden art coneflower (echinacea) for your backyard using repurposed kitchen pans.
I may receive a commission if you purchase something mentioned in a link on this post for sites including Amazon.com. Other links may go to websites where I have been paid to write a blog or article. See the entire disclosure here.
Make a Giant Garden Art Coneflower
Create a giant, garden art coneflower (echinacea) for your backyard using repurposed kitchen pans.
I have been wanting to make this project for ages. Years ago, I saw a giant (gorgeous) coneflower birdfeeder in a shop. It was way over my budget (or spending conscience), but, it left me determined, as a non-welder, to figure out a way to make something simpler but similar. This one by no means lives up to the one I saw, but I think it’s really sweet in the garden, acting as the Mama of the Coneflowers (I have a lot of them).
I’ll walk you through how I made this one and offer alternate ideas for materials and assembly. Instead of struggling to find materials like mine, I encourage you to work with what you find and use your creative Spidey sense. You might just come up with something you like better!
The most important part is to make sure your pans fit together nicely, allowing some extra room for the tops of the metal flower petals. The snug fit is the key to it all holding together in the garden.
Coneflowers come in lots of colours. I made the classic, old-style coneflower, but there’s no reason you couldn’t either leave the metal plain or paint everything in other colours.
Overview
Unlike a welded garden art flower, this project is not going to last dozens of years. The coneflower shown here is fairly secure but do note it is simply holding in place because the top cake pan fits snugly over the upside-down pie plate. Before you decide on your pieces, test them out. The metal flower petals will need to fit in between the pans where they join, so make sure there’s a little extra room for this.
If you’re looking for a project that can stand up to wild winds, or grandchildren and pets knocking it about, this is not for you. Mine is subject to heavy rains and some wind, and birds landing on it, and it does fine.
Supplies & Materials
(8″ diameters) – be sure the cake pan fits nicely over the upside-down pie plate, sitting on the lip. My cake pan is 8″-wide, fitting nicely over the 8″-wide base of the pie plate.
Metal pie plate and cake pan
Aluminum flashing (14″x42″)- this is a thin metal, sold in small rolls, intended for patching roof leaks (under shingles). It is almost exactly like the metal of soda pop cans. If you want to be really frugal or like to reuse stuff, you could make smaller flowers and use cans instead. I used a roll that is 14″ wide and needed 42″ in length (for 14 3-inch wide flower petals).
Metal Spray Paint (light pink for flower petals, orange for pans) In the photo, I show acrylic craft paint, because I used it to add colour on top of the metal paint, but you should use all-purpose, exterior spray paint suitable for metal surfaces as your base coat. Other paints will wear off. If this is not a concern, follow your muse.
Acrylic Craft Paints – In the video you will see that I painted the pie and cake pans orange (with metal spray paint) as a base coat. I then added brown and orange details with acrylic craft paint to resemble (ish) the top of a coneflower.
Glue – I use GE Silicone II Sealant for gutters and flashing. It’s way cheaper in a big tube that fits in a caulking gun, but much easier to dispense in the little hand-held tubes. Your choice! If I don’t need much, I use the little tubes.
Glass gems – available at most dollar stores, clear glass gems work perfectly here, to give the cone-like texture but show the paint colours underneath.
Wire (16-gauge or similar – approximately 18″) to hold flower petals in place.
Wood stem – I used a 2×2 piece of wood for the flower stem. It could be painted but I left mine natural.
Hole puncher – the kind used for paper, used to punch holes in each flower petal.
Scissors – for cutting flower petals.
Brass fasteners (14 total: 1 for each flower petal)- available in school supply shops.
You may also need a 1″ wood screw, pliers, and a screwdriver; paper and pen for making a paper flower petal pattern.
1 Make Flower Petals
Make a flower petal pattern with a piece of paper to suit the size of your aluminum flashing. The roll I got is 14″ wide. For the 8″ pans, I needed a total of 14 petals, each 3-inches wide.
The aluminum flashing is thin and easy to cut with a good pair of scissors. Look at a photo of a coneflower to see the basic leaf shape. They are long and narrow with a slight curve at the tips and tops.
Make a flower petal pattern with a piece of paper, sizing it to fit the size of your aluminum flashing. The roll I got is 14″ wide.
NOT SHOWN IN PHOTOS: The tops of the flower petals should be trimmed to a narrow point, not full width as pictured. See the photo in section 5 for examples of how they should be.
TIP I found it easiest to cut out strips of aluminum, and then cut out the details of each petal.
Create a giant, garden art coneflower (echinacea) for your backyard using repurposed kitchen pans.
Spray paint the petals (both sides) in the desired colour. I used a light pink metal spray paint and then added darker pink acrylic craft paint with a dry brush. You might want a more blended look. I wanted the contrasted colours.
Always allow paint to dry thoroughly before adding more or handling the pieces.
2 Paint the Pie and Cake Pans
Paint the pie and cake pans orange with metal spray paint. Only the lip of the pie plate will show, so that’s the only part you need to add colour to.
When dry, add dabs of brown and orange paint (if you like) to make it coneflower-ish.
4 Attach Glass Gems
Attach glass gems to the cake pan using GE II Silicone Sealant for gutters and flashing. Keep the pan upside-down and work from the lip up, letting the gems dry in place and lean on the ones below as needed.
Create a giant, garden art coneflower (echinacea) for your backyard using repurposed kitchen pans. 5 Assemble the Flower Petals
To secure the petals to the flower, use a hand punch to create a hole near the top of each flower petal.
Create a giant, garden art coneflower (echinacea) for your backyard using repurposed kitchen pans.
Next, sit the pie plate on something to hold it about 18″ off the table, and place a ring of wire around the plate, above the lip. Don’t fit it tightly as you want room to tuck in the metal flower petals.
Fold over the top 1/2″ of each flower petal and punch a second hole that lines up with the first one. Sit the folded tops over the wire and secure in place with brass fasteners.
If you are concerned about things flapping around (I’m not), you could run a thick bead of silicone sealant around the wire to help hold it in place with the pie plate.
Create a giant, garden art coneflower (echinacea) for your backyard using repurposed kitchen pans.
To attach the coneflower to a stem, there are a few options. I drilled a hole through the middle of the pie plate, and used a wood screw, securing it to the 2×2 wood post.
My metal cake pan (with the glass gems) fit snugly over the tops of the flower petals (where the brass fasteners are) and did not need further reinforcements. Again, AFTER securing the pie plate to the wood post, you could add another thick bead of silicone sealant around the tops of the flower petals/pie plate wire and then secure the cake pan in place.
Here’s the finished coneflower. I think it looks quite grand in the garden. If you make some, please share your photos on the Empress of Dirt Facebook page.
Create a giant, garden art coneflower (echinacea) for your backyard using repurposed kitchen pans. Create a giant, garden art coneflower (echinacea) for your backyard using repurposed kitchen pans. Original article and pictures take empressofdirt.net site
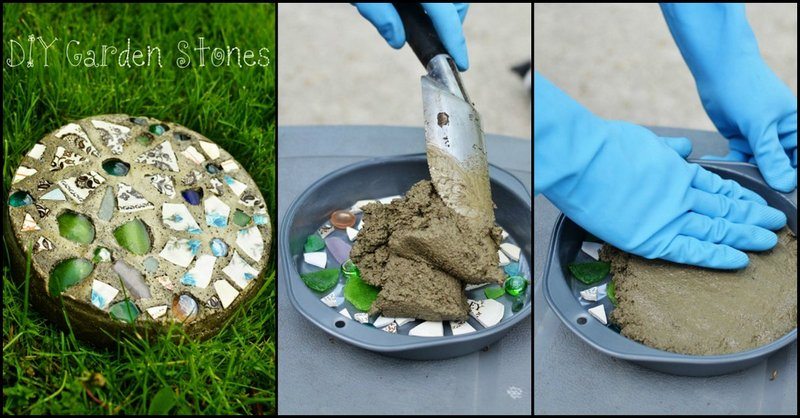
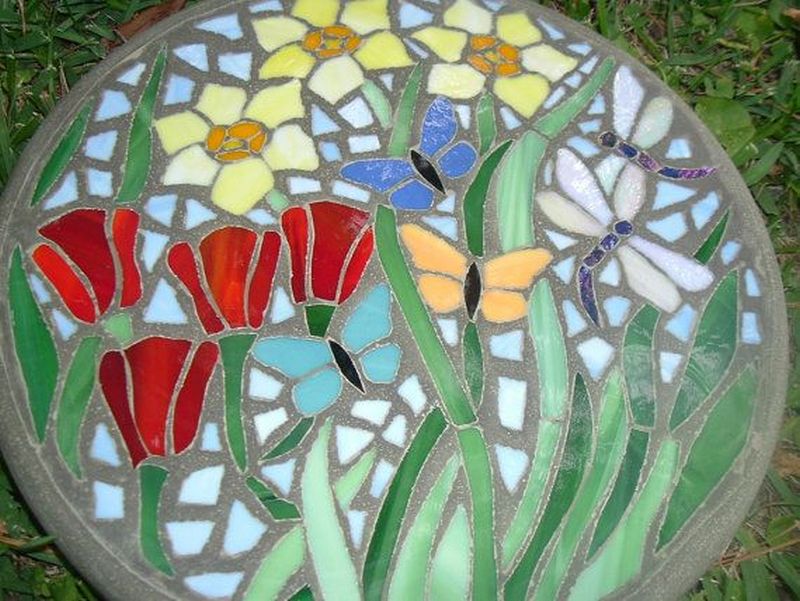
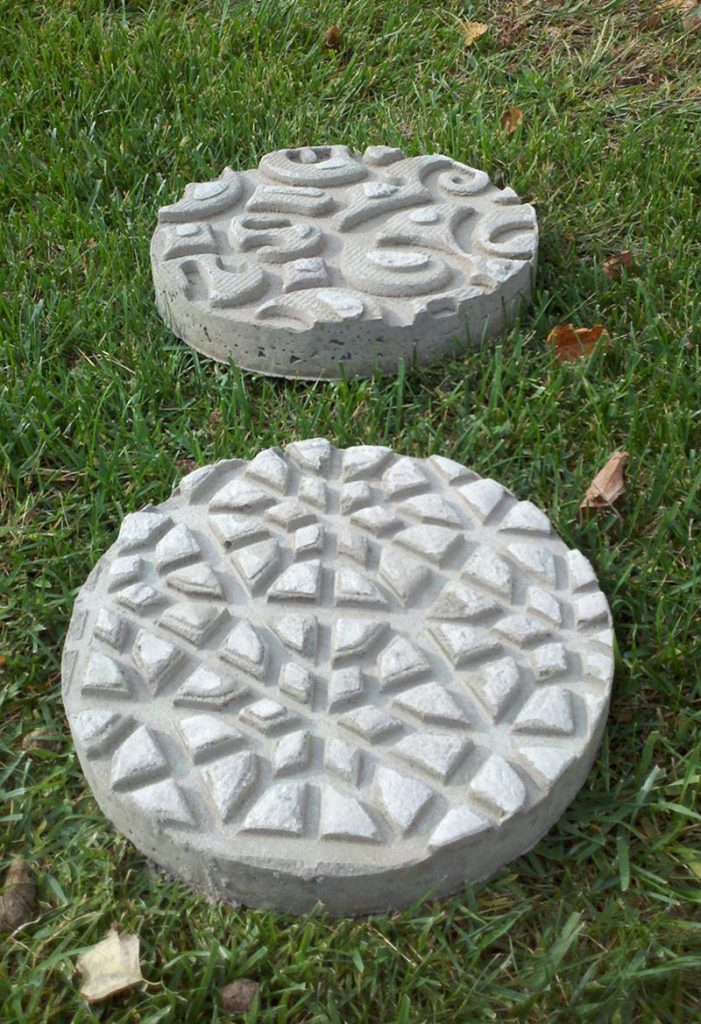
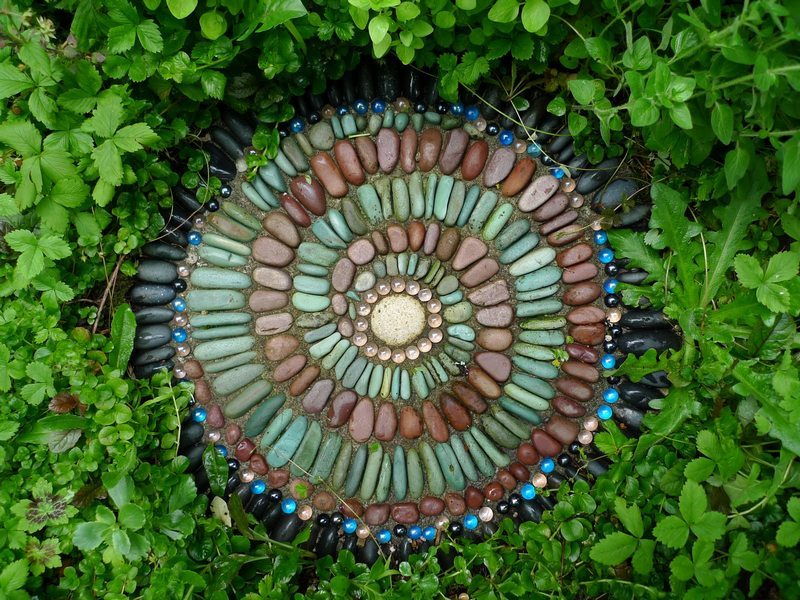
DIY Garden Stepping Stones Thinking of buying stepping stones for your yard? Why not create your own!
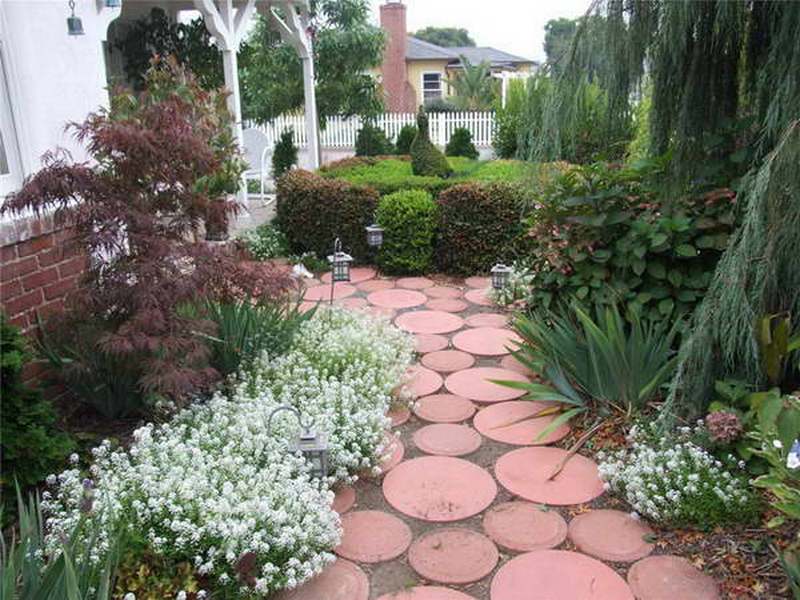
Wear patterns created by foot traffic is a common backyard problem. This issue becomes more evident when it rains. Erosion results into bare patches that turn into mud when wet.
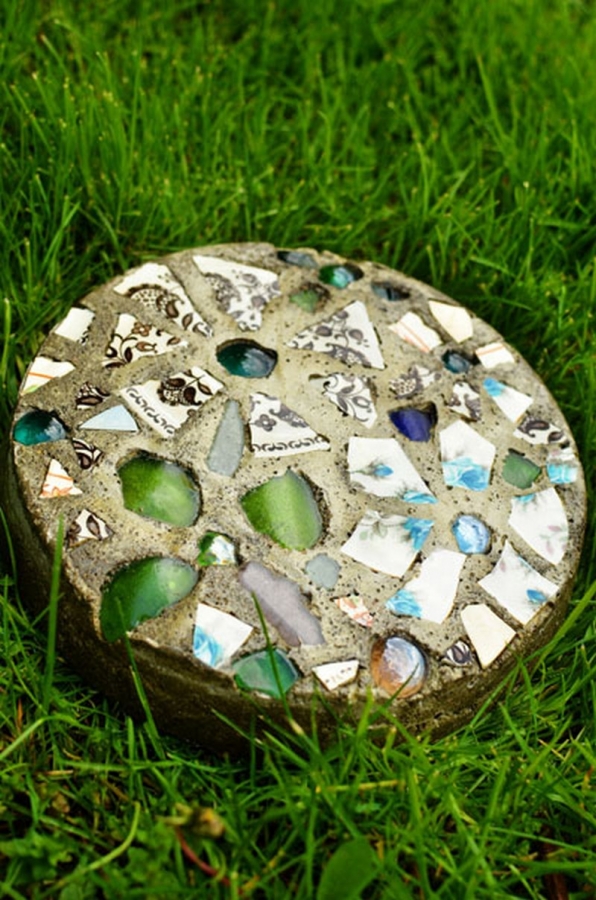
Making your own stepping stones is an easy and inexpensive solution. It protects your lawn from erosion caused by foot traffic. And it’s decorative too!
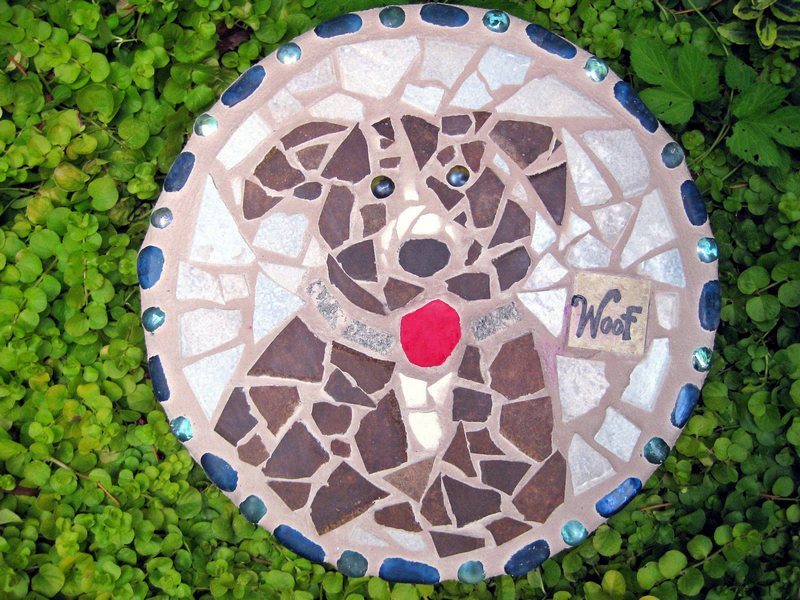
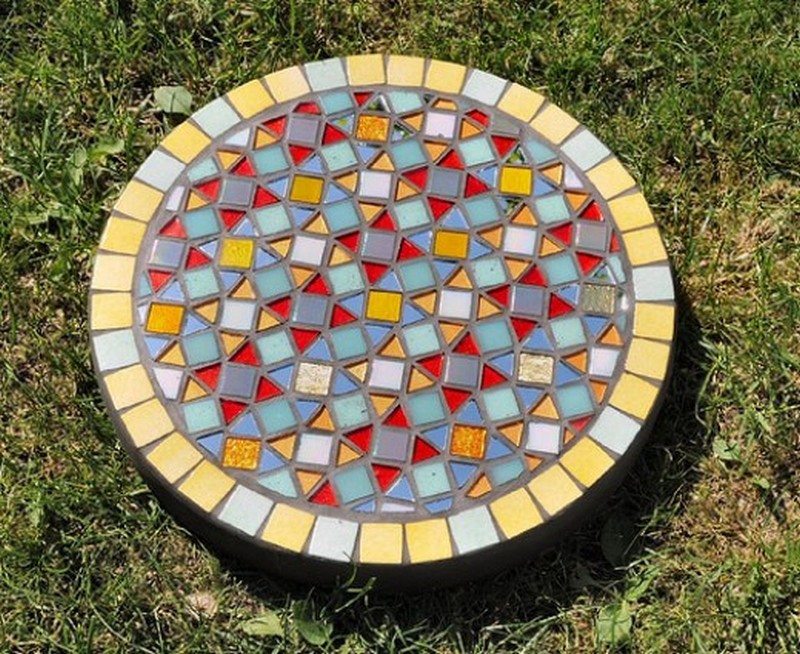
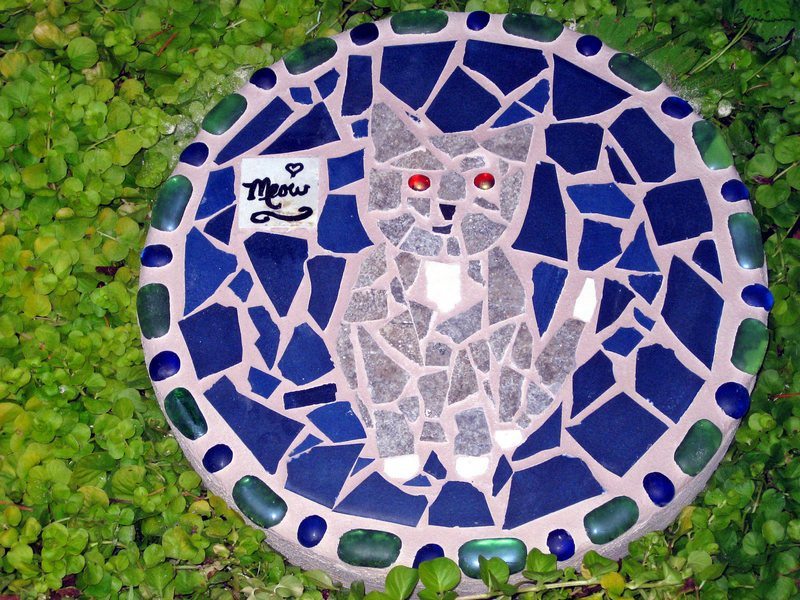
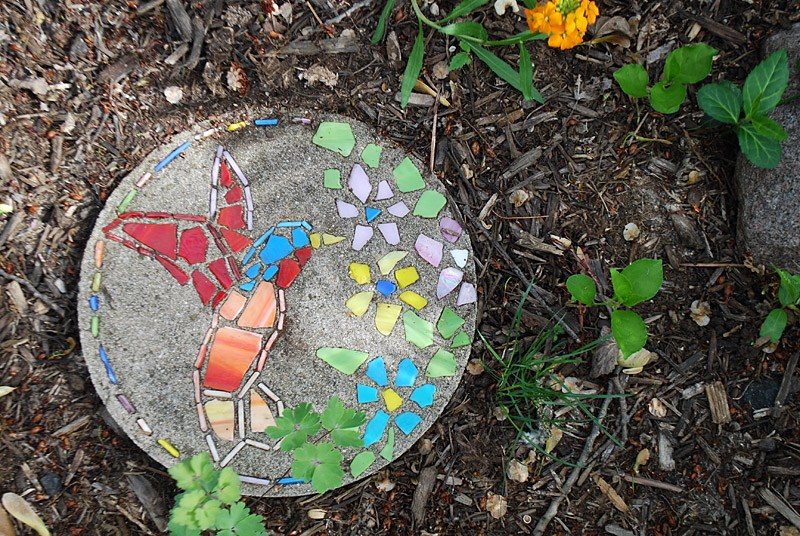
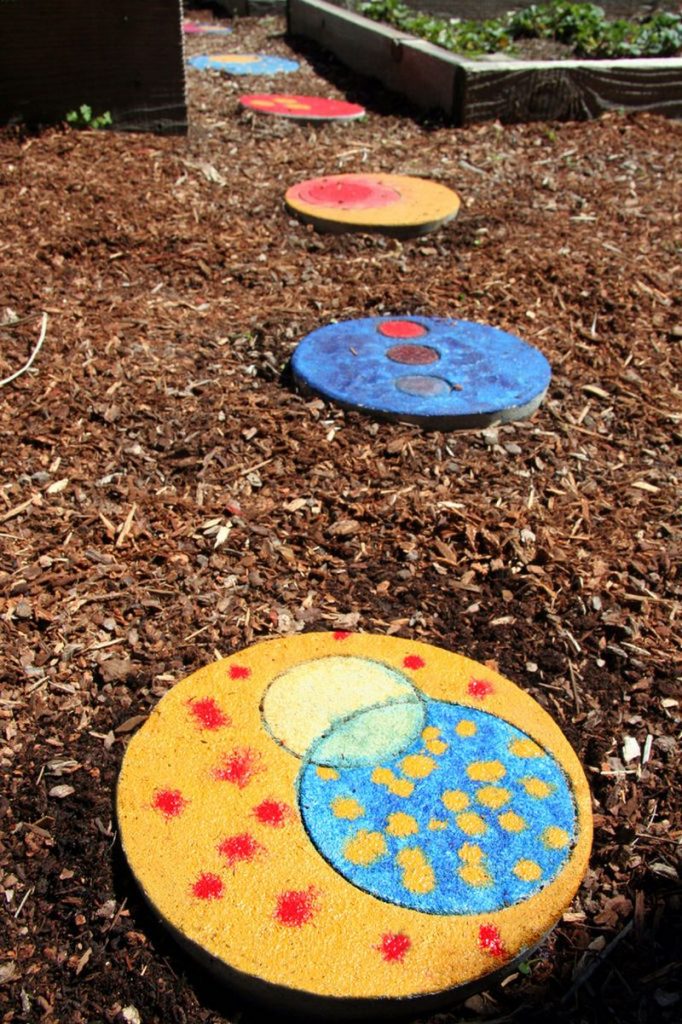
Stepping stones are not only functional. This simple project allows you to create unique stepping stones to match your personality, home, or garden.
You can even get the kids involved with this project. The steps in making stepping stones are very simple that even kids can participate, making their own personalized stepping stones that come in the shapes and colors they desire.
Could your yard use a couple of personalized stepping stones?
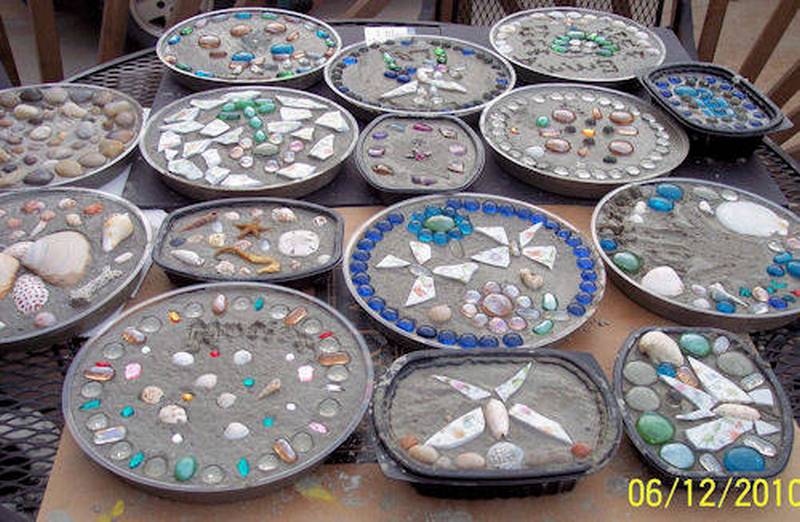
You’ll need these materials:
Round Non-Stick Cake Pan
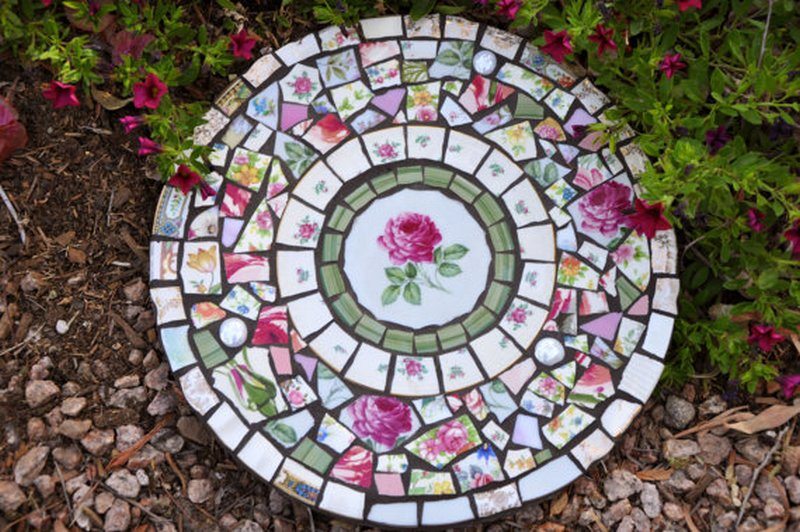
Glass Gems
Sea Glass – optional
Concrete
Vaseline
Contact Paper
Old Plates/Saucers not in use
Old Towel/Cloth
Marine Varnish
Chicken Wire
Bucket
Water
Safety Glasses
Dust Mask
Rubber Gloves
And these tools:
Hammer
Trowel
Wire Cutter
Paint Brush
Click on any image to start lightbox display.Use your Esc key to close the lightbox. You can also view the images as a slideshow if you prefer