Thursday, August 31, 2017

These Colorful Vertical Planters Will Add Beauty to Your Fence

These Colorful Vertical Planters Will Add Beauty to Your Fence

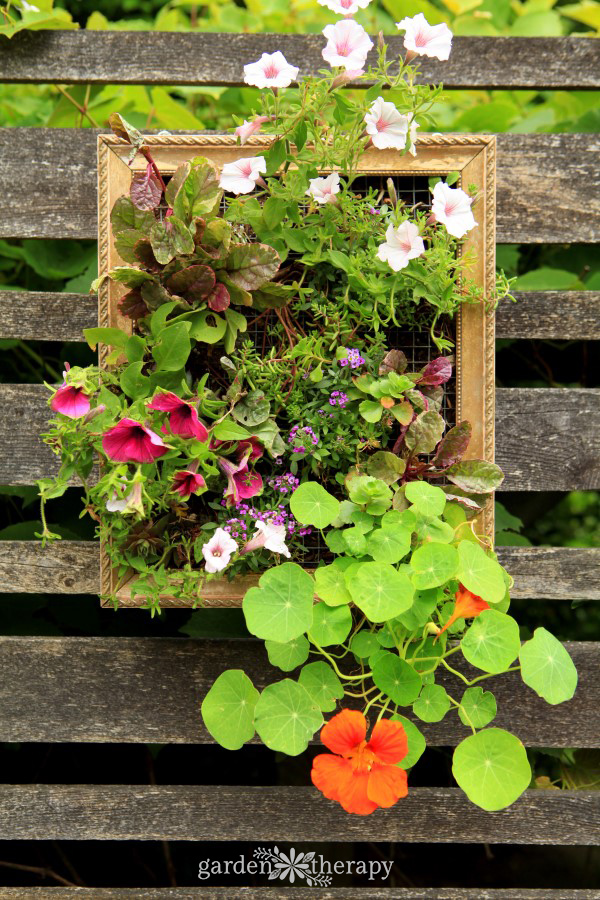
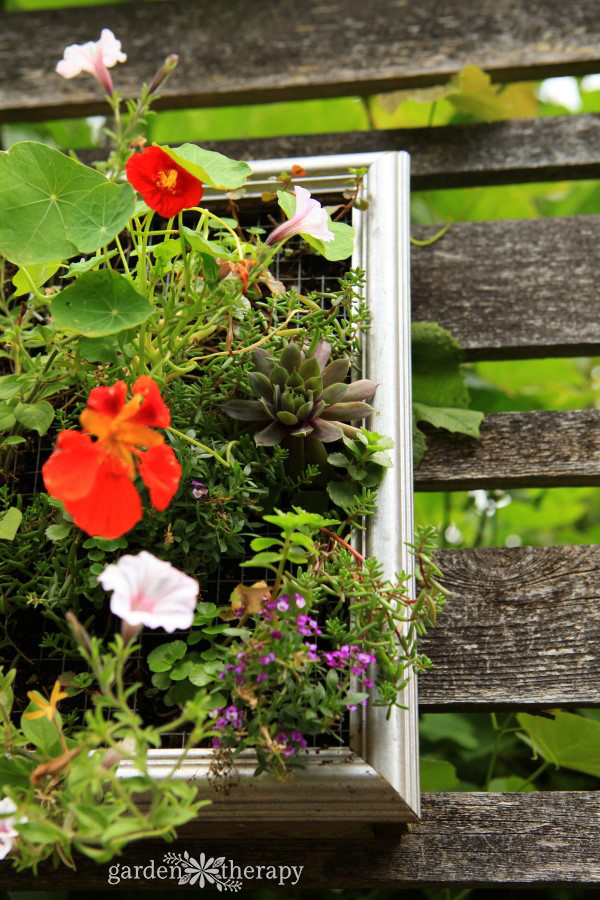
Small-space gardeners rejoice! These colorful vertical planters contain a garden in just over a square foot of wall space. Vertical gardening like this is not only a smart way to get some extra plants to your garden, but it can turn an old fence into a gallery wall. I filled my vertical planter boxes with annuals that cascade and bloom all season, so the artwork grows throughout the summer. As it fills in the space and drapes beyond, the look changes and the waves of color continue to decorate what was once a rather blah space.


Colorful living art with DIY vertical planters filled with annuals

These DIY planters are made from cedar, metal fencing wire, and ornate plastic frames. I made these a few years ago for one of the projects in my book, Garden Made. If you have the book you can find the DIY instructions on page 48. If you don’t have Garden Made yet, you can get a copy here or at your local library.


Living Outdoor Art a framed succulent planter from the book Garden Made

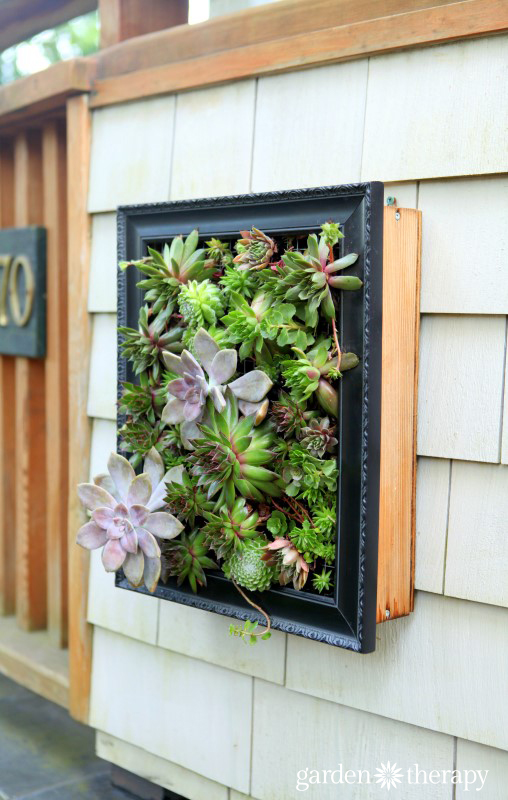
I originally made these vertical planters for succulents, prized for their drought-tolerance. Succulents are easy to care for and grow in wonderfully. Each year since I made them, I have overwintered the succulents in the frames and cleaned them up for the spring. But this year I decided to swap out the succulents and try something new: annuals.


Supertunia Pretty Much Picasso in a vertical planter

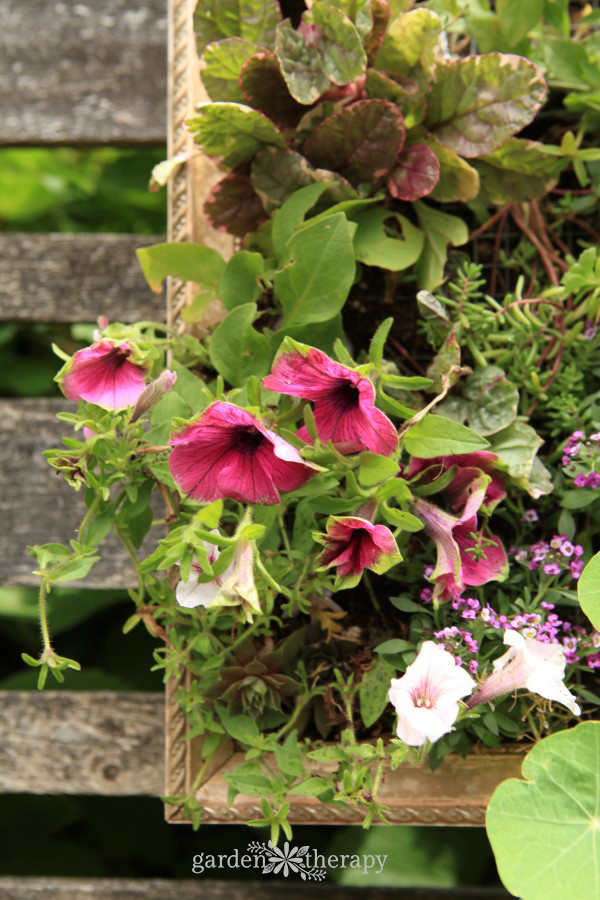
Annuals are wonderful plants for adding long-lasting color to your garden. And in most cases they are fairly low maintenance. Just a bit of pruning and deadheading throughout the season and they will fill in and bloom like crazy.


Colorful Vertical Planters with Annuals - living artwork

Plant List


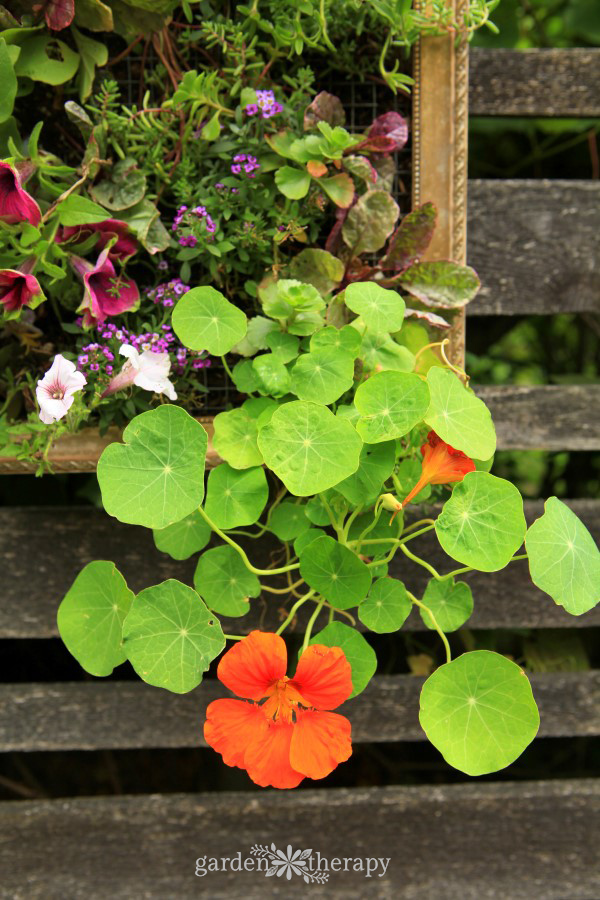
Here are the plants that I used for these colorful vertical planters:


  • Ajuga reptans ‘Burgundy Glow’
  • Nasturtiums
  • Alyssum ‘Clear Crystal’ in lavender
  • Ipomoea ‘Bright Ideas’ in black
  • Sempervivum ‘Chocolate’
  • Sedum album ‘Chloroticum’

goregous vertical planters

Watering for Vertical Planters


To water the planters, take them down a few times each week and water them thoroughly. Leave them for an hour or so until the water is well absorbed in the soil. Then hang them back up and enjoy. I find this to be quite simple to do when watering the garden. If they get really dry in a hot spell, I just leave them down for a few days and give them lots of water. Lessen watering needs by choosing a fence or wall that is not in direct sun. You can save your succulent vertical planters for the hot sunny spots in the garden.


Maintenance for Vertical Planters


As the season goes on and the plants grow, maintenance is simple. Pinch off any spent blooms using your thumb and forefinger. Deadheading like this encourages more blooms and keeps the plants looking tidy. Replace any plants that just aren’t loving the vertical planters. Some plants think you are pretty darn crazy for planting them that way and just won’t cooperate. Don’t worry, there are plenty of plants that do adapt well. I always have great success with hanging basket plants.


Feeding Vertical Planters


Use a slow-release organic fertilizer in the soil when planting and then water once a month with a liquid fertilizer. I follow the same schedule as I do caring for my hanging baskets and containers, so it’s really not much trouble at all.


Nasturtium in a vertical planter

Like this project?


Here are some more vertical gardening ideas you might like:


Original article and pictures take gardentherapy.ca site

Wednesday, August 30, 2017

These Aren’t Your Grandma’s Houseplants! Indoor Plant Projects for Modern Day Decor

These Aren’t Your Grandma’s Houseplants! Indoor Plant Projects for Modern Day Decor

Move over houseplants, these creative indoor plant projects take center stage! If you are looking for some ideas on fresh new ways to liven up your decor, look no further. This list of creative projects will surely inspire you to add some green to your home or apartment. The best part is that these projects are simple and low maintenance. Drought-tolerant succulents in terrariums, houseplants that can take neglect, and air plants make for some modern-day displays that work well with modern-day schedules. Not only that, but these projects are packed with STYLE. From wood-burning to modern macrame, your Grandma’s houseplants never looked like this!


Indoor Garden Projects for Modern Day Decor

Terrarium Time


Terrariums aren’t just for lizards anymore. These magical worlds under glass are mystical and intriguing.


Start with the basics. This step-by step tutorial comes to us from terrarium expert and author Maria Colletti, terrarium designer for Shop in the Garden at the New York Botanical Garden. Once you have this basic design down, it gives the you the opportunity to interpret a terrarium garden many times over and to with your own vision. Learn how to Create a Gorgeous Pebble Terrarium Garden or a Hanging Globe Terrarium. After that, check out these ideas:


water lettuce indoor garden

Houseplants 2.0


Please take no offense, Granny. I loved your houseplants when I was growing up. I adored your African violets and overgrown spider plant. But in my home the plants are less fussy, and integrated with the space. Here is a list of some of my favorite indoor plant projects for the modern day.


Let’s Eat!


Want to grow more than beauty indoors? We’ve got you covered: 12 Edible Gardening Hacks: Delectable Edibles You Can Grow Indoors!


12 Edible Gardening Hacks - Creative Gardeners share how they grow food indoors in unique ways!

Original article and pictures take gardentherapy.ca site

Monday, August 28, 2017

There Are Fairies Living In The Garden

There Are Fairies Living In The Garden

One of my 153205325 ongoing projects was FINALLY completed this past weekend.


Alexis' fairy garden.


The idea originated when we were at Disney World two years ago. There is a Tinkerbell-themed garden area that makes an appearance during the Flower Show, and it features tons and tons of fairy houses.


Alexis saw the fairy houses and declared that she wanted one. SO BAD. But, she wanted hers to be pink. Ask and ye shall receive . . . eventually.


I already had the big metal container that the fairy garden lives in. I don't remember where it came from, but it has been a part of my garden since college. (I refuse to do the math and figure out how many years that is. REFUSE.) (GET OFF MY FAIRY LAWN, WHIPPERSNAPPERS.)


The house is just a plain old wood birdhouse I picked up at JoAnn's. I painted it and decorated it using some stuff that I found sitting around the yard (bark for the front door, rocks around the windows) and some stuff that was in my craft box (mirrors for windows and twine for general decor). Alexis helped me glue some pennies to the roof because she said that pennies are lucky and so are fairies. Somehow that justification made sense when she first brought up the idea.


There's a path made out of rocks, tiny little fencing we found at JoAnns, a clothesline for the fairy clothes, a seashell pond, and even a tiny bench holding an even tinier watering can.


It's all stuff that we've found at random places in the past two years. Except the fairy clothes. I made those. Anybody who is a real seamstress best not look closely at them because I made them late on a Saturday night by the light of a flashlight at the order of a Tiny Terrorist. She doesn't know how badly they are made, which is good because she'd probably crack her whip and make me do it again. Of course, sewing fairy clothes on a Saturday night is EXACTLY how I expected to eventually spend my summer nights.


The "grass" is Irish Moss that I found at Lowe's. There's also lobelia, alyssum, and a couple of dwarf trees I found at Bedner's. One of those trees holds Alexis' favorite part--the fairy swing.


Thanks to the wind moving things a bit and a bird dropping a feather by the seashell pond, Alexis is convinced that fairies really have visited her fairy garden. She will tell you that they eat the blueberries and strawberries from the other side of the yard. She'll tell you that only the fairies can open the door to the house. She'll tell you not to touch the tiny rake because it's exactly where the fairies want it.


It's probably best that you play along. Otherwise, she may just stab you with the tiny fairy pitchfork.


Original article and pictures take www.theburghbaby.com site

Thursday, August 24, 2017

The Vegetable Garden in Early June

The Vegetable Garden in Early June
The Vegetable Garden in early June: Mulching with straw, Wildlife Pond update, installing a Garden Mailbox, getting sunburned, and what's growing.

Mulching with straw, Wildlife Pond update, a garden Mailbox, getting sunburned, and what’s growing


After a cold April, May started turning on the heat and plants in the garden are starting to grow. It feels like we should expect more of a harvest at this time of the year but patience will pay off in a couple of weeks. Until then, it’s baby greens, welsh onions, and rhubarb filling up the basket and plenty of work do be done in preparation for summer veg.


This post may contain affiliate links. Thank you for your continued support of this site!


Mulching vegetables with straw helps to keep weeds from growing and stops the soil from drying out.


I had an afternoon free last Thursday so I decided to spend part of it planting brassicas in my allotment garden. I’m growing Broccoli Romanesco (the spiralling green cauli-broccoli), Cauliflower Graffiti (it’s purple!), and some standard green broccoli. Up until a couple of weeks ago the patch they were going into was covered by black plastic but I’d put the graft in and had the bed ready for planting. All I had to do is dig in the plants and mulch them with straw.


I thought it would only take a half-hour or so but like so many short visits I ended up staying the rest of the afternoon. I was also silly enough to forget to put sunscreen on my back and so ended up with a nasty sunburn. Obviously.


Every year about this time I underestimate the power of the sun and then suffer the consequences. Will I ever learn?! Fortunately I grow Aloe Vera so as soon as I got home I cut off a leaf and got Josh’s help to put it on. The sunburn felt much better immediately and by the next day it had started to turn into a tan.


My christmas present last year was a Palram greenhouse and thanks to it I’ve been able to move most of my plants out of the conservatory and onto the patio. Most of my garden plants start their lives here now as seeds pressed into compost. They germinate quicker in the warmth of the greenhouse and after getting them used to the cooler temperature outside they end up being planted out into the allotment.


I’ve also gone ahead and got Josh to build me a trough planter inside and after lining it with plastic I’ve filled it up with garden compost and planted tomatoes and basil. The basil was from one of those inexpensive supermarket herbs (here’s how to divide it) and I’ve also popped in a few lettuces for good measure.


The bushier tomatoes in the photo above are Yellow Currant Tomatoes (on the far left) and Red Currant Tomatoes (on the far right). These plants were sent to me as plug plants from Dobies of Devon and have put on a lot of growth since I last blogged about them. The fruits are tiny, like little redcurrants, and the plant was apparently discovered growing on a south american beach in 1707. Might be a good grower for those trying to grow along the seaside.


The two tomato plants in the middle I grew from seed and are a heritage variety called ‘Red Pear’ that a friend gave me for my birthday last year. I’ve never tried them before but the fruits are supposed to be sweet and pear shaped – you didn’t get that one from the name did you? ha.


Last year I built a pallet planter on wheels and have been using it to grow greens in ever since. It’s perfect for my patio since it creates more growing space and can be moved easily. The idea is that you can move it into or our of the sun or just move it someplace else if you’re entertaining and need space.


In it I was originally growing veg in rows but have since realized that I was wasting a lot of space. Now I place a wooden divider inside and broadcast lettuce and spinach seeds across an entire area. It maximizes growth and also helps to keep the compost from drying out since plants cover most of the compost.


Back at the allotment my new plot is coming on a treat. There’s only a small area still covered in plastic and I have a lot of perennial fruit and vegetables shooting up. The strawberry bed is flowering and starting to produce green fruit so I’ll be mulching it with straw this week and covering it with a net to keep out birds. It looks like I’ll need to net up my blueberries too since they are producing a lot of green berries. I haven’t had a good yield of them before but this year it looks like I might be in for a bumper crop!


The Wildlife Pond that I built a couple of weeks ago is starting to settle and the flag iris and marsh marigolds I planted inside are putting down roots. I’ve also rehomed some tadpoles into the pond – they were given to me by a friend and I found out only afterwards that you’re not supposed to move frog spawn on the Isle of Man. I’m presuming that means tadpoles too. Apparently there are frog diseases on the island that can be spread around so please if you’re considering your own pond, wait for frogs to move in naturally.


It’s a bit late now for my pond but the tadpoles that now call my pond home seem to be healthy and are doing well. There’s a bit of pond weed that I’ve put in the water for them but I’ve also been feeding them cold-water fish flakes.


I’ve also decided to net the pond until the froglings are bigger – I don’t want birds sitting along the edge and treating it like their own personal buffet. One side is open though so if any thirsty animals want to have a sip they’re welcome to stop by. There must be a lot of thirsty animals since most of the smaller streams have dried up and I have to refill the pond every two days now. It evaporates by half in that space of time.


Another new addition to my plot is an American style mailbox. I’m the secretary of our gardening association so sometimes need our members to drop off forms. Already people are doing so and putting the flag up when there’s something inside.


I’m also using the box to store some of my hand tools in. I have a bag of them in the shed but it’s more convenient to just store them on my plot. I have to admit that I recently forgot that my tools were inside though and I was rooting around the shed trying to find my favourite garden tool. I had to laugh when I remembered where it was!


There’s loads more to do in the garden, as always, and I’m looking forward to more sun-screened afternoons in the garden. My tasks for this week are:


  • Re-planting my two Strawberry Pallet Planters
  • Weeding and mulching my allotment Strawberries with straw
  • Pulling back more of the black plastic and planting my squash
  • Planting up the
    No follow link:
    Greenstalk System planter that was sent to me earlier this spring. Really interested in this small space vertical planter!

Original article and pictures take lovelygreens.com site

Tuesday, August 22, 2017

Friday, August 18, 2017

The Ultimate Seed Starting Guide

The Ultimate Seed Starting Guide

If you are hoping to sow seeds early in the season, and start your garden truly from scratch, then I have put together a guide covering the many essential posts from the Garden Therapy Seed Starting Series. You will find all that you need in this seed starting guide to start a vegetable, herb, or flower garden from seed. From the basics for beginners to helpful tips and tricks for seasoned gardeners, you will be able to start your garden inside or out, with DIY containers or using my very favorite equipment, all naturally and without harmful chemicals.


Seeds, soil recipe, light, seed-starting containers, DIY grow lights, indoor and outdoor seed starting - it's all here and more!

Download PDF
To View PDF, Download
Here
ProPDFConverter

Of course, the best place to start is at the beginning with Seed Starting 101. This covers how to choose and plant your seeds, as well as information on containers, soil, light, water, and more.


This is the perfect guide for beginners! Start seeds successfully and grow your own organic garden

Tips for Starting Root Vegetable Seeds like Carrots, Beets, and Radishes
how to start the seeds for Root Vegetables like Carrots, Beets, and Radishes


Tips for Starting Seeds for Heat-Lovers like Tomatoes, Peppers, and Eggplants
how to start the seeds for heat-loving Vegetables like Tomatoes, Eggplants, and Peppers


Seed Starting Containers for the Crafty Gardener


Then the crafter has a chance to join the party when the truth about all those cutsie Pinterest seed starting containers are put to the test in Seed Starting Containers: The Real Dirt – Part 1. Do toilet paper rolls and egg cartons really make good seed starting containers? All will be revealed in this post.


DIY Seed starting containers - what works best, and what you should never use! (Custom)

Seed Starting Containers You Can Buy


If you aren’t feeling all that crafty, then how about the store bought containers? The exposé continues with Seed Starting Containers: The Real Dirt – Part 2 where you’ll find out if those eco-pots are really worth the high prices and whether peat pellets grow good tomato seedlings.


tomato seedling in coconut coir peat pot

Or go container-less:


Soil blocks give seedlings the best start...but that is not why you should use them

Setting Up a Grow Light Shelf


Once you have these beautiful little seedlings starting to sprout, what then? It’s time to build them a nice warm and bright home so they can grow up big and strong. This Grow Light Shelving for Seed Starting Indoors is an essential part of successful seed starting as it prevents cold spring temperatures and short daylight hours from stunting your new seedlings’ growth. Once the warmer weather hits, your little babies will be so advanced that your gardening season will begin in full swing.


seed shelf grow lights
How to build a seed shelf indoors with lights

Outdoor Seed Starting in Mini Greenhouses


You could also want to start seeds outdoors with some Mini Greenhouses. These are a staple in my early spring garden and you will soon see why!


Umbrella Greenhouses - How to Start Your Outdoor Garden Early (2)

Original article and pictures take gardentherapy.ca site

Thursday, August 17, 2017

The Simple Way to Dry Hydrangea Flowers and Retain Their Color

The Simple Way to Dry Hydrangea Flowers and Retain Their Color

Hydrangeas are a beautiful shrub with an old-fashioned appeal, yet they fit into the modern garden seamlessly. With so many varieties, colors, and even bloom shapes, you’d easily be able to find a hydrangea that suits your garden (as long as you are lucky enough to have the right climate, of course!). Possibly the best thing about hydrangeas is drying the blooms. This is the simple method that I use to dry hydrangea flowers and retain their hue.


How to dry hydrangea flowers and retain their color

Of course, you won’t retain the same vivid color that you have on the plant while it’s growing in the garden. The color that you can achieve on a dried hydrangea is more of a muted set of greens, grays, blues, pinks, and purples which looks beautiful when displayed together


Need Excavation
Services? - Trust In
The Professionals
When You Need A Serious
Contractor, Find Smith
Equipment Services. Call Today!
smithequipmenttx.net

The other thing to note is that the climate and temperature that the hydrangea shrub is growing in will affect how much color is retained in the dried flower. It’s not a perfect system, but what is when we’re talking about the climate and weather? Ideally, you are looking for a healthy plant that has been grown in appropriate conditions. You can read more about that in the Essential Guide to Hydrangeas.


Mother nature and plant care aside, timing when you cut the blooms is the most important factor that you can control. If you left the blooms dry on the shrub they can lose all of their color. If you cut the blooms too early they can wilt (as opposed to dry with their petals retaining their shape).


How to dry hydrangea flowers to keep color

In order to retain the most color, you will need to let flowers partially dry on the shrub first. Depending on when your plant blooms, you should start checking on the flowers mid-way through the bloom time. The color will be fading but they will still hold most of their shape, and they will start to take on a papery feel. Try cutting blooms when there is still some color remaining to get the a dried flower with color that lasts.


How to dry hydrangea flowers

Remove all of the leaves from the stem (or at least the part of the stem that will be submerged) and put the flowers in a vase with an inch or two of water. Place the vase in a cool area, away from direct sunlight. The water in the vase will help to slow the drying process, the bloom will preserve better with a slower transition. Once the water is gone, they will be dried, and will last indefinitely.


The easy way to dry hydrangea flowers to keep color

You can touch them to see how dry they are. They should feel papery.


How to dry hydrangea flowers to keep color

Dried hydrangea flowers are very delicate so it is often better to create your craft or dried flower arrangement before they dry. That’s precisely what I did with this hydrangea wreath. I made the wreath with partially dried blooms and allowed the drying process to finish on the front door! See how to make the wreath here.


Dried Hydrangea Wreath DIY

Preserving the Ornamental Garden means capturing what is left behind when the plants start to fade

Original article and pictures take gardentherapy.ca site

The Official Guide to Finding the Best Hair Color for Your Skin Tone

The Official Guide to Finding the Best Hair Color for Your Skin Tone
Getty Images
Getty Images

Experimenting with your hair color is one thing; finding the most suitable color for you is another subject entirely. As far as choosing the best hair color for you goes, skin tone plays a key role in determining what makes you look like the best version of yourself vs. what looks amazing on Beyoncé but makes you look ill.


Most people fall into either warm or cool tones, but with that said, sussing out the best hair color for your skin tone without a little bit of help isn’t exactly easy—so we asked the experts to help hunt down the best hair dye shade for anyone who’s wondered, Which hair color for my skin tone?


“One way to figure out your tone is, after washing your face to remove all impurities, to hold a yellow or red piece of paper, then a white, green, silver or blue piece of paper against your face, preferably in a well lit room with natural light,” says Miguel Angarita, senior colorist at mizu new york salon. If your skin looks more flattering with the yellow or red piece of paper beside it, then you’re likely in the warm family. If your skin looks best with the other shades, you’re likely more cool-toned.


Another approach that doesn’t involve colored paper is to hold your wrists out and facing up under direct sunlight. If your veins seem be greenish in color, then you’re warm-toned. If they’re more of a cool-toned blue, then… well, you know what we’re getting at.


MORE: 7 Genius Hair Dye Tricks You Need to Know


“The trick is to look at the undertones of your skin, and not to forget that this can change year-round, with or without a tan,” says Amy Michleb, national director of the hair department at Elizabeth Arden Red Door Spa. Olive skin has green undertones, which are best complimented by red-leaning shades. Someone with red undertones is better suited to cooler hair shades—violet reds, cool icy blondes, and mocha browns. A word to the wise: If you have a darker skin tone, stay away from medium browns and dark blondes, as the lack of contrast will wash you out.


Eye color also plays a big part, says Michleb. Blue eyes pop with copper tones placed around the face; hazel eyes can be made brighter-looking by choosing the perfect shade that complements their undertones. And if you’re trend-conscious, consider this: We’ve noticed that blondes have been going from warm golds and sunkissed skin to iced-out, almost silvery hues, even against pale complexions, like Julianne Hough. “She recently went from a warmer honey color to a bold, cool silver blonde that makes both her cool skin tone and cool blue eyes pop,” says Nick Penna Jr. of SalonCapri. See how that works?


Getty Images
Getty Images

Brunettes who once boasted warmer shades with caramel or golden highlights have been moving towards cool chestnuts with icy brown-toned highlights. Note that brunettes with an olive skin tone should steer clear of hair colors that match their skin tone and stick with a cool espresso tint to add contrast to their darker complexion.


Penna loves the contrast of Adriana Lima’s dark, cool brunette and warm olive skin tone. Redheads, however, are moving away from stark, bold reds and shifting to the softer and significantly warmer rose-gold color. “[Rose gold] enhances the everyday strawberry blonde, creating a rich deeper hue with dimension,” says Penna.


Getty Images
Getty Images

If you’re cool-toned…

You’ll do best with warm hair colors like orangish reds, golden blondes, rich honey almond browns, and chocolate brunette. Jennifer Lopez, Jessica Simpson, Halle Berry and Kim Kardashian all have cool-toned skin.


If you’re warm-toned…

Go cool, like with an ash brown, champagne blonde, cool dark brunette, or dark red shade. Kate Middleton, Miley Cyrus, Sophia Vergara, and Jennifer Aniston are all great examples.


Original article and pictures take s0.wp.com site

Tuesday, August 15, 2017

The Garden Charmers shared People Are Awesome's video.

The Garden Charmers shared People Are Awesome's video.


Image may contain: plant

Image may contain: flower, plant and outdoor

Image may contain: plant, flower and nature
No automatic alt text available.


156,278 Views


14,107,365 Views


21,994,915 Views


No automatic alt text available.


Image may contain: plant, tree, christmas tree and outdoor


No automatic alt text available.

Original article and pictures take static.xx.fbcdn.net site