Thursday, October 29, 2015

diy restoration hardware garden spheres...

diy restoration hardware garden spheres...

Restoration Hard(to swallow these prices)ware's Stone Garden Spheres are a great accent in


gardens, or on decks and patios, they add interest in a classic, serene style. I love outdoor accessories or yard art, but too much of a good thing can take your space from classic to


cluttered and cutesy in no time. These were quick, easy and inexpensive to make!


The beauty of this project is any form works,


leaving you free to be creative and chose anything that fits your style.


Notice my weak attempt at being creative on the left. :)


currently reduced to $140 - $315


constructed of resin, withstands freezing temps, no two are alike


Restoration Hardware

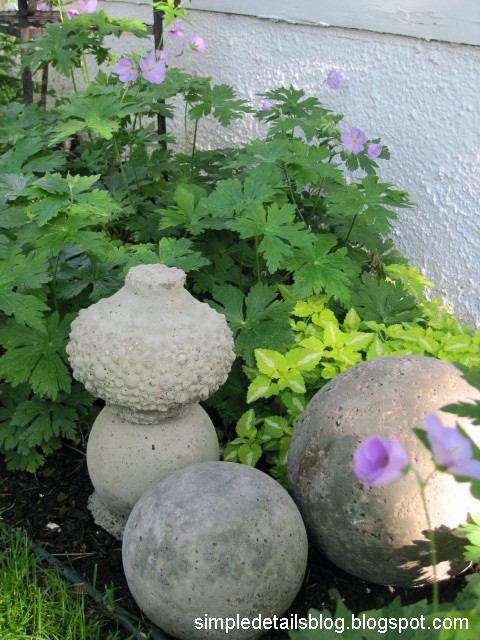
My DIY Concrete Garden Sphere


8", 10" diameter - smaller than RH


$10 for all 5 (three round, two quirky)


constructed of concrete, withstands freezing temps, no two are alike :)


Supplies:


Lighting globes, Habitat for Humanity Re-Store sells them for $2 each,


the day I went they were 20% off, any size or variety you like works.


Easy to find at thrift stores, as well.


Quikrete Concrete Mix - $4 for 80 lb. bag, I used half.


Two of the globes I chose had holes in the bottom, I covered them with duct tape, then


nestled my globes in a box with newspaper to help stabilize them while filling with


the mixed concrete. Mix should resemble peanut butter, I slowly added water, mixing


until it reached the desired consistency.


Use a stir stick and shake gently to be sure any air bubbles are eliminated.


Let dry 24 hours.


While wearing heavy gloves, one at a time, I placed the globes in a heavy duty garbage


bag in a box, and lightly tapped the outside with a hammer to break up and release the glass.


Be careful as the cut glass may pierce the plastic.


When the glass has broken free from the concrete remove the sphere.


Continue with the remaining spheres. I carefully disposed of the box and bag in


Here are some ideas from our garden...I like them nestled in with the herbs


and perennials. I think I need a few more!


I was inspired by these clever bloggers, stop by and check out their spheres:


Join me for more inspiration at:


The Inspiration Gallery here


Original article and pictures take simpledetailsblog.blogspot.com site

Tuesday, October 27, 2015

DIY Recycled Succulent Planter

DIY Recycled Succulent Planter
A tour of my garden after a 5-week vacation: succulent planter

Transform an Oil Tin into a Cute Planter


There’s a lot of trash that can be converted into lovely planters — large metal tins are one of them. To build this vertical succulent planter all you need is the can, a few tools, spray paint, and the plants to fill it up with. It’s a great project for giving old containers new life and looks great – especially when the sun hits the metallic surface!


The idea for this project came to me after my recent trip to Romania. I’ve started bringing plants home as souvenirs and this time I found a small succulent that fit into my hand luggage – depending on where you are and where you’re traveling to it’s perfectly fine to bring plants on planes.


I also had two metal oil containers knocking around so I came up with the idea of using them to display small clumps of many of the succulents I have growing around the house. They’ll grow in the planter over time and the ‘babies’ will need replanting but it shouldn’t be too much work. The instructions on how I made this planter are below.


*Many restaurants buy oils and other liquid foods in large metal containers. They can come in 5L (1 gallon) sizes like the one in this project or even larger or in different shapes. You can often get these tins for free if you ask but you can also get a hold of them from a recycling centre or a food wholesaler. They’re not worth anything once the contents are gone so using them in projects like this gives them a second life!


**Succulents are best known by their ambassador, ‘Hen & Chicks’, or Houseleeks or Sempervivum as they’re called in the UK. They are a wide and varied group of plants that seem to thrive pretty much anywhere they’re thrown. Some of mine grow on rock walls or in the cracks between paving stones. Yet when I plant them in decent soil they do even better. If you don’t have succulents at home, you can get them from friends, a garden centre, or buy a collection of them online.


Step 1: Make the cuts

The top of the can will be easy to remove with an ordinary can opener – keep the top for use in step 5. Making the holes in the front of the planter are more involved. There will be other ways to make the holes no doubt but this is how I did it. First mark where you’d like the holes with a marker along the front of your container. Next drill holes all around the hole you’ve marked and then snip the metal disc out with the tin snippers. My holes are mainly about two inches in diameter.


If you have good enough tin snippers (like these ones) then you could probably snip the entire hole out once you’ve made the first hole or two with the drill.


There are round hole cutters that can attach to your electric drill to create perfect holes but the ones I have are only for wood. If you’d like to invest in metal hole cutters you can find them on Amazon in the USA or the UK.


Step 2: Make drainage holes

While you’re drilling, make sure to make holes in the bottom of your planter for drainage. Ten or so holes should be fine.


Step 3: Smooth the rough edges of the holes

If your holes have jagged edges then it’s probably best to smooth them down and inwards with a metal file. Wear gloves!


Step 4: Paint the Planter

This step could be optional but really that metallic sheen looks lovely! Just turn the planter upside down on a disposable surface and spray as directed on the can of paint. Leave to dry completely before moving on to the next step.


Step 5: Fill the planter with Compost

Fill the bottom with about an inch of gravel, stones, or broken crockery and then fill the rest up with moist multi-purpose compost. The compost will want to come out of the holes in the front but keeping the planter at an angle will help.


Press the compost down from the top of the planter and next put a piece of wood (or the removed top of the container) over the top opening of the planter. Secure it with sturdy string so that it won’t come off when you lie the planter on its back. Note: I foolishly used tape for this step and then had to re-paint the sides where the tape took the paint off. A minor error but still an inconvenience.


Step 6: Plant up the Planter

With the planter on its side, fill the holes in with succulent plants. Press them in gently and add more compost to tuck them in. Water them through the holes and now let the plants grow for at least a week, if not two, keeping them moist and in a warm and sheltered place. If you give them that time then they’ll anchor themselves in with roots and won’t fall out when you turn the planter upright.


Step 7: Finish the Planting

After the 7-14 days are up, gently turn your planter upright and remove the covering from the top. Plant it up with more succulents and then place your recycled piece of living art somewhere that everyone can enjoy it. Mine brings a smile to my face each time I see it shining in the sun!


No doubt the metal will rust over time but I look forward to the visual effect. Eventually the container will need to be replaced but I expect for this one to last at least a couple of years.


If you end up making one of your own, I’d love to see it and perhaps share it on my Facebook page and Instagram! Do PM me or send me an email.


Original article and pictures take lovelygreens.com site

Monday, October 26, 2015

DIY Pumpkin Flower Arrangements

DIY Pumpkin Flower Arrangements

I keep seeing these gorgeous pumpkin flower arrangements at florists, farmers markets, and online. A collection of blooms tightly packed into a bright orange pumpkin just screams “fall.” It’s an elegant take on fall decorating: setting the table for Thanksgiving dinner, adorning the mantle for the season change, or even to give as gifts. I know I would love to receive one of these gorgeous pumpkins, and they will be just as rewarding to give!


Pumpkin Floral Arrangements

With flower arranging, the artistry is in the design and it’s not as easy as it looks. But if you want to take a stab at creating your own pumpkin flower arrangement then here is how to do it.


How to make a fall flower arrangement in a pumpkin

Materials


  • Fresh pumpkin
  • Knife
  • Clear plastic
  • Wet floral foam
  • Flowers, leaves, berries, succulents
  • Scissors

Tailgating Fall Style with planted pumpkins at the farmers market

Make it!

Cut the top off your pumpkin so that you have a fairly wide opening near the center of your pumpkin. Scoop out the guts and make these addictive Roasted Rosemary Pumpkin Seeds.


Line the inside of the pumpkin with a sheet of plastic. This will hold some of the moisture in when you water the floral foam.


Cut a piece a floral foam with the knife to a size that will fit inside the pumpkin. Soak the foam in water while you prepare your flowers.


Choose flowers with strong straight stems that are freshly cut, either from the garden or a purchased bouquet.


Insert the floral foam into the inside of the pumpkin and create your arrangement. Start with flowers, then add leaves, berries, and other embellishments to create a full and interesting arrangement.


Items collected from the garden will shine in a new way when displayed in a pumpkin vase like this one I spotted at Vancouver florist Flowerz.


Fall leaves and berries pumpkin arrangement

You can even pop the top like on this other creative arrangement. Hold it on with a piece of floral wire inserted into the floral foam (also from Flowerz).


Gorgeous pumpkin flower arrangenment

I even made up one with some tender succulents for my garden. As the weather starts to get cooler, the succulents won’t survive outdoors, so why not bring them in, plant them in a pumpkin, and enjoy them for as long as you can? I didn’t use floral foam for the succulents but instead filled the inside of the pumpkin with indoor potting soil. I do this for my outdoor pumpkins every year. You can see a whole bunch of them here.


Stunning succulent pumpkin arrangement

These pumpkins would also look really great on the table with these burlap and fall leaf candle holders which you can learn how to make here. Or with mini pumpkins, succulents, and air plants.


Fall Pumpkin, Air Plant and Succulent Centerpiece

Save


Original article and pictures take gardentherapy.ca site

Friday, October 23, 2015

DIY Project Wood Scrap Scarecrow ~ My Garden Maiden

DIY Project Wood Scrap Scarecrow ~ My Garden Maiden
Wood Scrap Scarecrow http://ourfairfieldhomeandgarden.com/diy-project-wood-scrap-scarecrow-my-garden-maiden/
Wood Scrap Scarecrow

Have you ever made a scarecrow? Basic tools and limited carpentry skills are all you need to build this simple frame for a fun garden accent. So, what are you waiting for? Get out your saw and power drill and let’s get to work!


Scrap lumber was used for the scarecrow’s shoulder section and torso. One 5-foot long garden stake was enough for the upper and lower arms and neck pieces.


Scarecrow Directions http://ourfairfieldhomeandgarden.com/diy-project-wood-scrap-scarecrow-my-garden-maiden/
Scarecrow Frame Directions

Screwing the pieces together and attaching the wing nuts at the shoulders and elbows created the scarecrow frame. Make sure to label upper and lower arm pieces before you drill holes for the joints. You can see I missed one! No big deal, her hands will cover that extra hole.


Scarecrow Frame http://ourfairfieldhomeandgarden.com/diy-project-wood-scrap-scarecrow-my-garden-maiden/
Completed Scarecrow Frame

A Goodwill shirt and floral dress were put on the frame, and the Garden Maiden started to emerge. Then a pair of garden gloves was rubber-banded to her lower arms for hands. Because every gardener needs a hat, the Garden Maiden was given a pretty straw bonnet decorated with silk flowers.


scare crow hands http://ourfairfieldhomeandgarden.com/diy-project-wood-scrap-scarecrow-my-garden-maiden/
Garden Glove Hands!

Wing nuts at the scarecrow’s shoulders and elbows made the shoulders and elbows adjustable. Now she could pose and hold garden items on her arm!


making a scarecrow http://ourfairfieldhomeandgarden.com/diy-project-wood-scrap-scarecrow-my-garden-maiden/
Use wing nuts for adjustable arms & elbows!

Now she was all finished and ready to become a garden accent. Trying to decide on a spot to show herself off, the Garden Maiden first planted herself firmly by the Limelight Hydrangeas. But their many blooms were stealing this diva’s thunder, so she had to move.


pretty scarecrow http://ourfairfieldhomeandgarden.com/diy-project-wood-scrap-scarecrow-my-garden-maiden/
Garden Maiden in the Hydrangea bed.

Next, she tried the flowerbed by the side of the driveway. But it was too hot for this delicate flower.


Pretty Scarecrow http://ourfairfieldhomeandgarden.com/diy-project-wood-scrap-scarecrow-my-garden-maiden/
Garden Maiden

And here is where she settled in, right by the arbor in the Shade Garden. In this location, she will be able to greet passers-by and welcome them to visit our garden. But, she’s a restless one. Who knows where she might pop up next?


Garden Maiden http://ourfairfieldhomeandgarden.com/diy-project-wood-scrap-scarecrow-my-garden-maiden/
Garden Maiden by the Shade Garden arbor.

Help name our woodscrap scarecrow! She’s too pretty not to have one. Leave a comment below this article with your suggestion, please!


Here’s another version of my scarecrow with small pots for hands!


Pretty Scarecrow http://ourfairfieldhomeandgarden.com/diy-project-wood-scrap-scarecrow-my-garden-maiden/
Scarecrow with flowerpot hands

Garden Lady Scarecrow http://ourfairfieldhomeandgarden.com/a-trip-down-memory-lane-my-former-garden/
Click here for more! Garden Lady Scarecrow from our former garden!

* See how to make a birdfeeder for free from Christine at Rustic & Refined!


* Turn a poster into a painting with Cynthia of Feeding Big


* Decorate your garden the thrifty way with Time with Thea


* Heather at New House, New Home, New Life has some great garden decor !


Original article and pictures take ourfairfieldhomeandgarden.com site

Wednesday, October 21, 2015

DIY Project ~ Vermicomposting in a tub in a few easy steps!

DIY Project ~ Vermicomposting in a tub in a few easy steps!
composting with worms in a tub ~ vermicomposting http://ourfairfieldhomeandgarden.com/diy-project-vermicomposting-in-a-tub-in-a-few-easy-steps/
composting with worms in a tub ~ vermicomposting

Hetty Franke, Master Gardener and “Queen of Compost in Delaware” recently held a workshop at TheDCH. Teaching all ages, from school children to senior citizens, Hetty’s mission for many years has been to make people aware that plant matter is also a resource, not trash.


Composting of all kinds was discussed: aerobic composting (compost pile or container), anaerobic (digging a trench and filling it in) and vermicomposting (worm composting).


Here’s a brief overview. Aerobic composting in bins or piles requires aeration for decomposition. This requires turning to keep oxygen levels up for the decomposing microorganisms breaking down the plant matter. Layering of Nitrogen (Green) matter such as kitchen scraps, manure and other green plant material with Carbon (Brown) matter such as shredded leaves, straw, paper and wood chips keep the mix from getting slimy and smelly. But aerobic composting isn’t efficient when you’re continually adding new material to the pile. A pile must have time to decompose, so therefore, it is better to have an active pile and one that is left alone except to aerate it. This requires space, and, in some areas, is not allowed, so check what the regulations in your area are first!


Anaerobic composting is simply digging a hole or trench and filling it with the plant matter, then filling it back in. This can be done under bushes and in flowerbeds in small yards. It is a method I used in my last very small space garden. It does not require oxygen, although it is a slower method of decomposition than aerobic composting.


But, what do you do if you don’t have the space for a compost pile or you don’t want to be constantly running outside? Vermicomposting is the answer and , even better,a worm bin is efficient when you’re continually adding new material. Composting at home in a worm tub is most suitable for smaller families and apartment dwellers, or to be used in combination with an outside composting method. A well-tended worm bin shouldn’t smell, so some people will keep them in a kitchen cupboard if they’re short on space or just want the ultimate convenience for adding their kitchen waste. The garage or basement are also possible locations for your worm bin. (Note: do not add animal waste, bones, fats or meat to your bins or compost piles.)


Follow the easy steps below to set up your own worm bin and begin vermicomposting at home. You will keep plant matter out of the landfill and have the benefits of compost and compost tea for your plants, worms for feeding birds and pet reptiles and going fishing, too!


Materials needed: one plastic storage tub and cover, a shallow tray for underneath and two blocks of wood or bricks to set it on,an electric drill with two bits (one large, one small), a few handfuls of peat moss or garden soil, newspaper, worms and kitchen scraps.


Here’s the link to the University of Delaware’s Cooperative Extension Service site on composting and frequently asked questions.


* red wriggler worm source and information


Use a hand drill to drill smaller holes in the bottom & sides of the tub, larger holes nearer the top
Step 1 ~ Use a hand drill to drill smaller holes in the bottom & sides of the tub, larger holes nearer the top

hole detail on the tub http://ourfairfieldhomeandgarden.com/diy-project-vermicomposting-in-a-tub-in-a-few-easy-steps/
Step 1 Detail ~ hole detail on the tub ~ smaller holes on the bottom and larger near the top

crumple up sheets of newspaper , dip them into water to wet them, wring out and fill the bottom of the tub
Step 2 ~ Crumple up sheets of newspaper , dip them into water to wet them, wring out and fill the bottom of the tub

Red_Wiggler_Worms_In_Compost_
Step 6 ~ Put the tray on the floor, add the two bricks and set the tub on top. Keep the lid on and keep moisture consistent. Then enjoy the compost!

Hetty Franke, Master Gardener and
Hetty Franke, Master Gardener and “Compost Queen of Delaware”

Original article and pictures take ourfairfieldhomeandgarden.com site

Tuesday, October 20, 2015

DIY Project ~ Summer Enchantment in a Jar!

DIY Project ~ Summer Enchantment in a Jar!
Summer enchantment in a jar! http://ourfairfieldhomeandgarden.com/diy-project-summer-enchantment-in-a-jar/
Summer enchantment in a jar!

A dear friend and fellow gardener has her birthday in mid-February when there’s nothing happening in our gardens. Like me, she is longing for better weather and being outdoors with green plants all around. So, this year, I decided to make a tiny jar of summer enchantment to carry her through until spring!


Follow these easy steps to make your own little bit of summer enchantment to chase those winter blues away. When the big garden is sleeping, planting a little one will help keep that gardener’s itch at bay.


http://ourfairfieldhomeandgarden.com/diy-project-summer-enchantment-in-a-jar/ Assemble your materials : pebbles, activated charcoal, potting soil, tiny ivy & fern plants, dried or live moss, a glass container and accents.
Assemble your materials : pebbles, activated charcoal, potting soil, tiny ivy & fern plants, dried or live moss, a glass container and accents. Put the charcoal and pebbles in first to provide drainage.

http://ourfairfieldhomeandgarden.com/diy-project-summer-enchantment-in-a-jar/ Trim the plant roots to about one-third their original size before planting in the terrarium.
Trim the plant roots to about one-third their original size before planting in the terrarium.

http://ourfairfieldhomeandgarden.com/diy-project-summer-enchantment-in-a-jar/ Add dried or fresh moss and little accents like a seated fairy and tiny clay pots.
After planting and watering in your plants, add dried or fresh moss and little accents like a seated fairy and tiny clay pots.

http://ourfairfieldhomeandgarden.com/diy-project-summer-enchantment-in-a-jar/ This tiny fairy and her garden are ready to be a birthday gift for my friend!
This tiny fairy and her garden are ready to be a birthday gift for my friend!

Original article and pictures take ourfairfieldhomeandgarden.com site

Thursday, October 15, 2015

DIY Project ~ Repurposed Rakes

DIY Project ~ Repurposed Rakes

Recycled and repurposed items as garden art, Things that inspire me in the garden


~ Birdhouse Rake ~ http://ourfairfieldhomeandgarden.com/diy-project-repurposed-rakes/
~ Birdhouse Rake ~

At a recent rummage sale I picked up two vintage bamboo rakes. Of course, Len asked me what I was going to do with them. My standard answer is ,”A project”. So here the project is!


A floppy rose needing a trellis and some drain pipes I wanted covered gave me the opportunity to put those rakes to use. The first rake fit nicely into the rose pot and became its trellis. A pretty bird house added with twine gave the whole thing a little pizzazz. To camouflage some of the drain pipe on the other side of the garage, I tied the rake to the front and added another birdhouse.


Voila! I have garden accents that cost only three dollars (I already had the birdhouses) and make a nice display on either side of our garage. It doesn’t get much easier than that!


Birdhouse rake by the garage http://ourfairfieldhomeandgarden.com/diy-project-repurposed-rakes/
Birdhouse rake by the garage

birdhouse rake http://ourfairfieldhomeandgarden.com/diy-project-repurposed-rakes/
birdhouse rake

Rake decor http://ourfairfieldhomeandgarden.com/diy-project-repurposed-rakes/
Rake decor

Original article and pictures take ourfairfieldhomeandgarden.com site

DIY Project ~ Raised Beds for Free!

DIY Project ~ Raised Beds for Free!
Best_of_April0105-3 http://ourfairfieldhomeandgarden.com/diy-project-raised-beds-for-free/
raised beds

Make raised planting beds for free! http://ourfairfieldhomeandgarden.com/diy-project-raised-beds-for-free/
Make raised planting beds for free!

Who says you can’t get something for nothing? I just finished two raised beds made from my neighbor’s old shutters and odds and ends of left over wood, then painted them with surplus deck paint! ZERO COST!! For quite a while, I have admired all sorts of wonderful homemade and commercial raised beds seen on Pinterest and Hometalk. Because I couldn’t justify the cost of buying the lumber and didn’t want to tackle disassembling pallets, raised beds did not seem to be in my future. But then, our neighbors replaced their shutters and were nice enough to give them to me when I asked. They know by now that a repurposing project is about to get underway. You could do other configurations, but I used two shutters on each side and one-half a shutter for the ends. That used up all ten of the free shutters. Odds and ends of lumber stored in the garage rafters came down and became corner, end and middle supports. I even had enough wood screws from another project to use for this one! After the building was complete, we lined the bottom of the raised beds with plastic mulch bags to keep the ivy at bay. Straw that had been in the flower beds and about eight wheelbarrow loads of weeds pulled from another neighbor’s lawn (and still full of great dirt!) went in next. Newspaper and cardboard from our recycling can followed, then a final layer of composted soil on top (about eight inches). Rummaging around in the basement, I found half a can of deck paint and gave both raised beds two coats. Finally it was time for the fun stuff: planting seeds and seedlings in my brand-new, free raised beds. One box is done now in cool crops: radishes, Swiss chard, carrots, cabbage, and several kinds of lettuce. As the weather warms up, I’ll be adding more vegetables and a few flowers to keep it all pretty.


one of the ten shutters I got from my neighbor's trash http://ourfairfieldhomeandgarden.com/diy-project-raised-beds-for-free/
one of the ten shutters I got from my neighbor’s trash

corner detail ~ interior view http://ourfairfieldhomeandgarden.com/diy-project-raised-beds-for-free/
corner detail ~ interior view

corner detail ~ exterior view http://ourfairfieldhomeandgarden.com/diy-project-raised-beds-for-free/
corner detail ~ exterior view

supports were added in the middle and on the ends to keep the shutters straight http://ourfairfieldhomeandgarden.com/diy-project-raised-beds-for-free/
supports were added in the middle and on the ends to keep the shutters straight

http://ourfairfieldhomeandgarden.com/diy-project-raised-beds-for-free/ layers of straw, a neighbor's weeds, newspaper and cardboard topped with good compost
layers of straw, a neighbor’s weeds, newspaper and cardboard topped with good compost

finished and filled, an unpainted raised bed http://ourfairfieldhomeandgarden.com/diy-project-raised-beds-for-free/
finished and filled, an unpainted raised bed

early season seedlings ready to plant http://ourfairfieldhomeandgarden.com/diy-project-raised-beds-for-free/
early season seedlings ready to plant

Dollar Store bird clips hold the seed packets in place http://ourfairfieldhomeandgarden.com/diy-project-raised-beds-for-free/
Dollar Store bird clips hold the seed packets in place

finished raised bed with early season plantings http://ourfairfieldhomeandgarden.com/diy-project-raised-beds-for-free/
finished raised bed with early season plantings

Click the image to see more  ideas!
Click to see more ideas!

Original article and pictures take ourfairfieldhomeandgarden.com site