With the turning of the calendar page I decided it was time to accept the fact that summer was pretty much a thing of the past. Cooler temperatures have arrived along with shorter days. Seems like everyone has been busy getting their homes decorated for fall so decided it was about time I did the same.
As I’ve been cleaning up the garden I’ve picked and saved anything at all that I thought would dry nicely. I dug out a door basket I had bought years ago and went to work to make something festive and fall like for the front door.
Basket of Dried Flowers / Sensible Gardening and Living Basket Frame / Sensible Gardening and Living
I started with the taller stems of yellow yarrow, ornamental grass flower heads and oriental poppy seed heads.
Dried Yarrow and Grass Stems / Sensible Gardening and Living Dried Poppy Seed Heads / Sensible Gardening and Living
Next I added some spiked eryngium and allium seed heads.
Dried Eryingium / Sensible Gardening and Living
For a little colour and fragrance I had lavender stems, echinacea blooms and fluffy white seed heads of gallardia.
Lavender Dried Stems / Sensible Gardening and Living
To fill in the empty spaces I added a few sprigs of white baby’s breath. It looks great and didn’t cost me a penny.
Door Decor / Sensible Gardening and Living
I had also dried tall stems of my pineapple plant (Centaurea macrocephala) which looked good standing in my tin watering can. I gathered up a few other items I had and ended up with an inviting seasonal entrance.
Fall Front Door / Sensible Gardening and Living Ornamental Kale / Sensible Gardening and Living
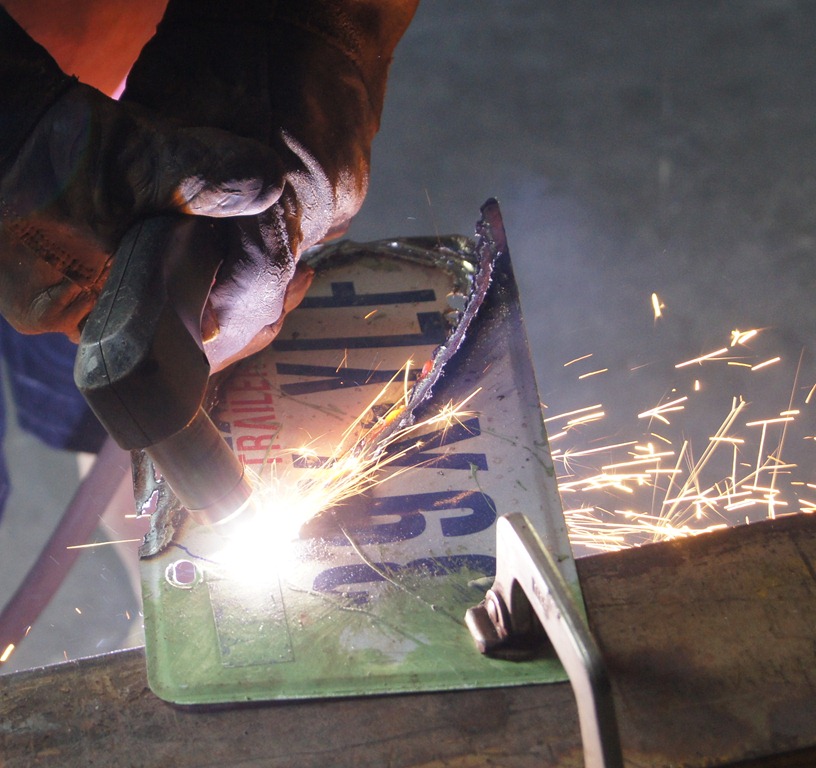
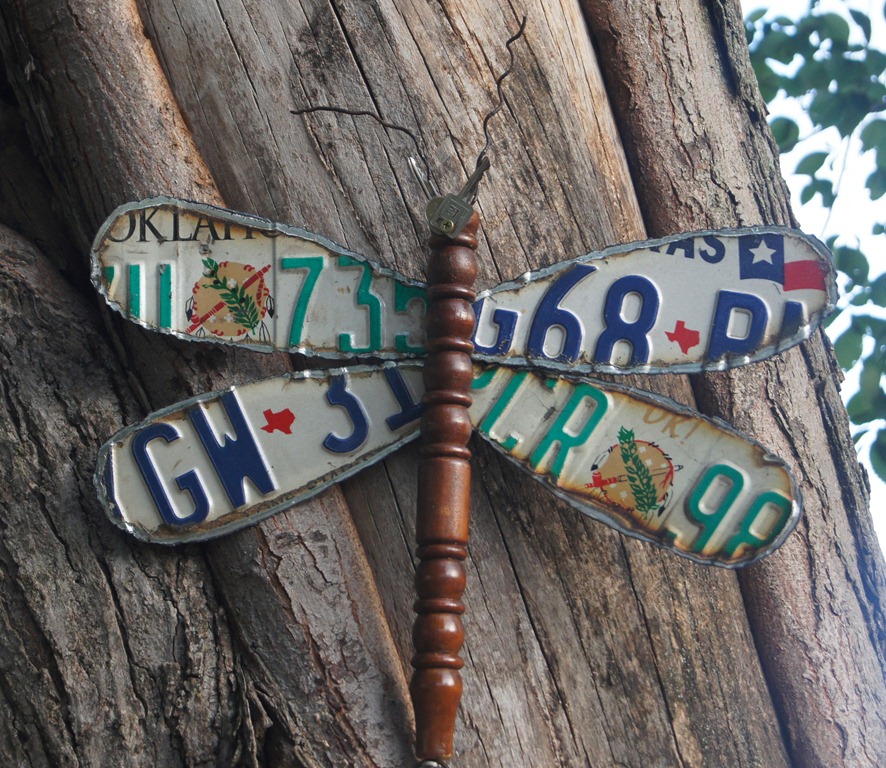
Dragonfly Made From Discarded License Plates Here is how to make a dragonfly from discarded materials.
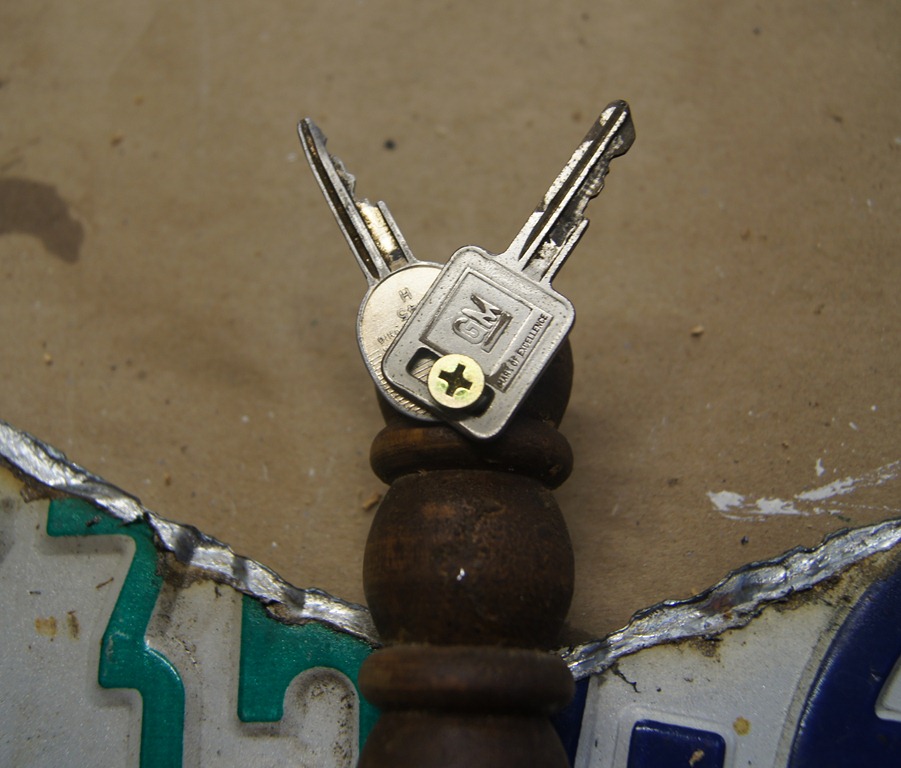
This dragonfly is made from old license plates, chair leg and old keys.
You can even use an old hammer handle for the body.
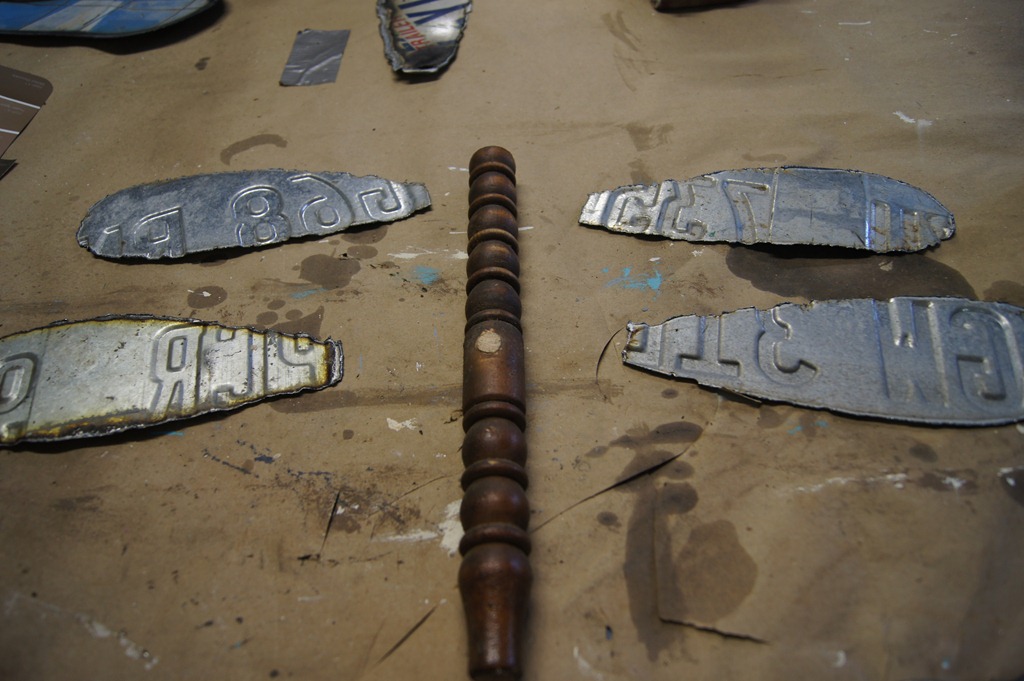
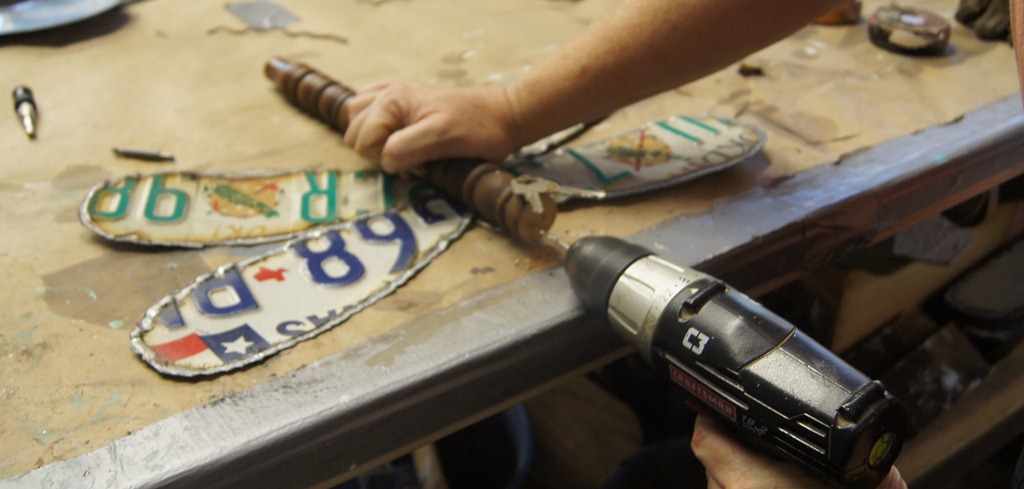
We used a plasma cutter to cut out wings. Next, you will lay the wings out. Once you have the wings positioned,
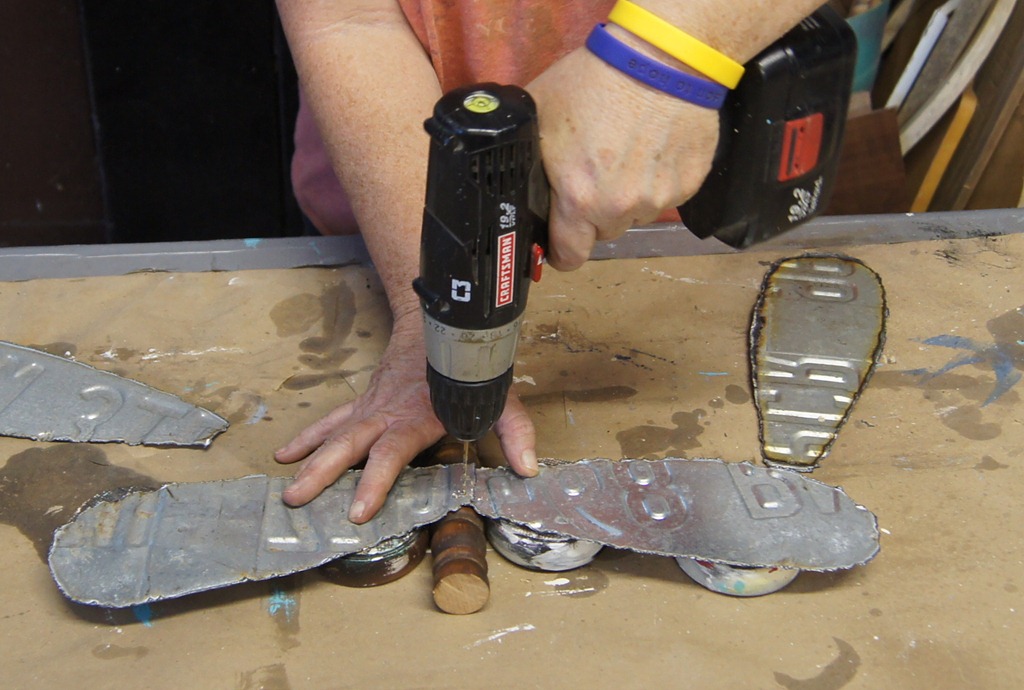
drill holes through wings and part way through the body.
You will use two 1 inch wood screws per wing.
Once you have your holes drilled, you will need 1 inch wood screws to attach the wings to the body.
I attach a picture hanger using the top screw in the wing. I used old keys we had lying around for the eyes. Drill two holes in the top for antennas. I know dragonflies
do not have them but it makes them whimsical
Finished Product Original article and pictures take www.repurposed-life.com site
Create attractive garden edging with free materials
Did you know that if you google ‘use raspberry canes’ or even ‘raspberry canes diy’ that absolutely no ideas come up? Every gardener who grows raspberries goes through the same winter ritual — taking out the old wood. Whether you have autumn or summer fruiting varieties you’ll be left with a bundle of canes that generally gets burned or composted. They seem like such a shame to ‘waste’ though, especially when you consider the other materials that we buy to bring into the garden like willow, hazel, and bamboo.
This winter I kept the canes until I came up with a good idea for how to use them. They lay in a stack for about a month before an idea struck me — they could be used to make edging.
Materials needed for this project
A bundle of pruned raspberry canes
Bamboo cut into 18″ segments
Tools: a hacksaw and a hammer
Recycling in the Garden
I’ve been looking at garden feature ideas and nearly bought pre-fab hazel edging at a local shop. I stayed my hand though thinking that there’s got to be a better DIY solution. Something that isn’t going to cost me anything and look even better. Eureka struck as I stood contemplating the raspberry canes.
There’s only two materials that I used to create my woven ‘Wattle’ edging that you see in this project: a bundle of raspberry canes, and three old bamboo canes. I also use the support from larger wooden stakes that I have driven into the ground but I think that these are optional. They’re more for the support of the new raspberry bushes that will grow again this year.
Pruning Raspberries
The first step is actually pruning your raspberries. Autumn fruiting varieties (like mine) are generally cut down to the ground every year. This is because they mainly fruit on new wood. Summer fruiting varieties fruit on canes that grew the previous summer so for those types you need to selectively prune out the canes that have already fruited. I cut my canes down to about 1-2″ above the ground.
You prune your raspberries in winter, when the plants are dormant. The canes should still be alive even though they look withered and dead. Discard any that are soggy, brittle, or look diseased. In the photo below you can see how many canes I needed for the section of edging I made — it was a decent sized bundle.
Bamboo Cane Supports
When you cut raspberry canes they’re at first flexible and strong. Over time they will harden and lose some of the bendiness and strength. They need good, solid supports to wind themselves around so that they remain in place. Bamboo canes fit the bill. Even when they’re old an beaten up they can still be strong.
The supports for the wattle edging are 18″ segments of bamboo cane that I cut with a hacksaw. Pressed 4 inches into the ground at 12-18″ apart they’ll be your edging’s support. I recommend that you run a piece of string along the area you want to build the edging. Use it as a guide to place your bamboo supports so that they line up straight.
Weaving the Raspberry Canes
Once the bamboo canes are in, begin weaving in the raspberry canes. Begin from one end and weave one cane in and around the pegs and push it all the way to the ground. Take a second cane and weave it along the same pegs but in the opposite direction — the video at the top of this post shows the process better.
Once you have two canes woven in you move to the next section and weave canes in exactly the same manner in that space. All you’re doing is winding the canes in and out of the bamboo pegs and then making sure the cane that follows it is woven in the opposite way around. Simple.
Finishing the Edging
Once you’ve built up the edging to the desired height all you need to do is hammer in the bamboo pegs. More for aesthetic reasons than anything, you bang them in so that the tops are flush with each other and are just above the top of the raspberry canes. I used the back of my hatchet to do this in the video but most would probably use a hammer.
The finished product is strong, attractive, and pretty much free! It’s such a good feeling to transform ‘waste’ into useful things.
Original article and pictures take lovelygreens.com site
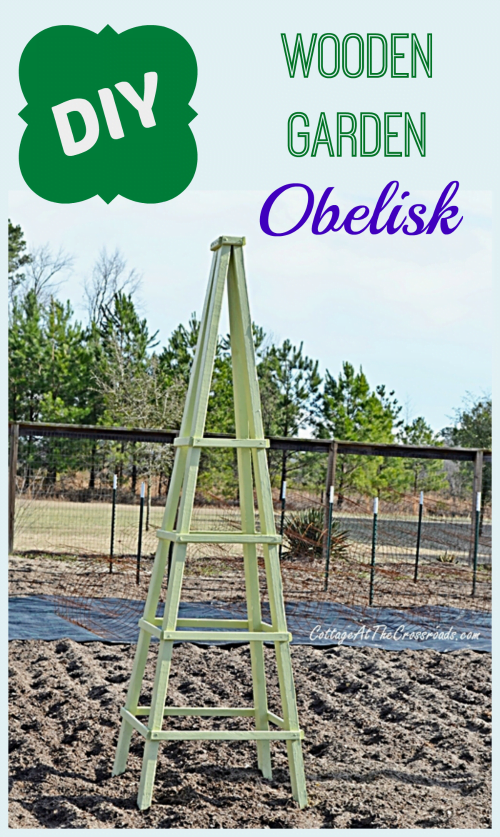
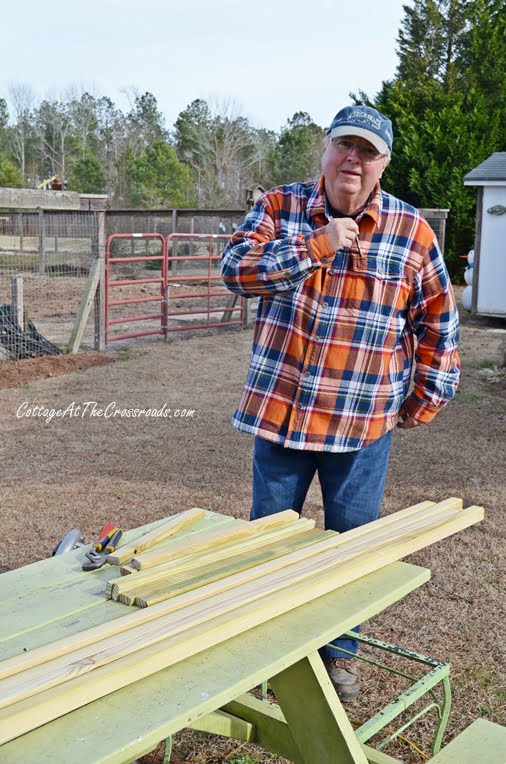
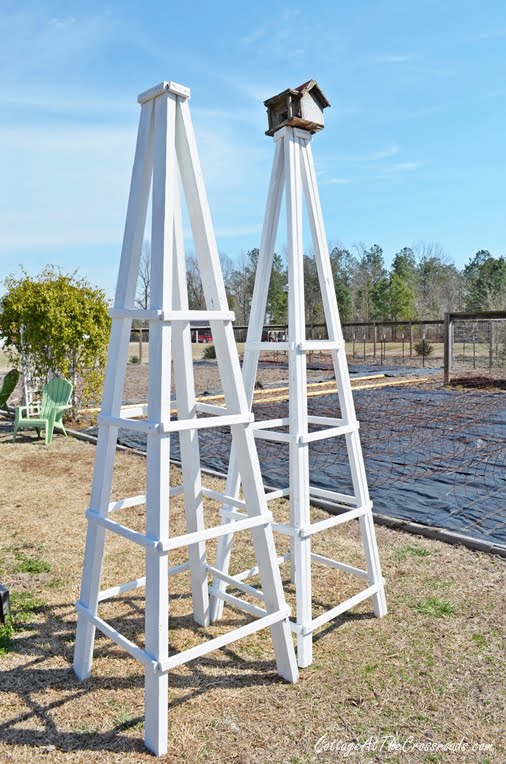
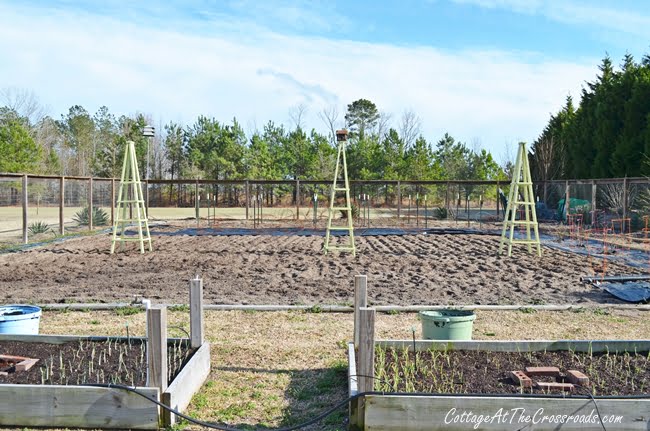
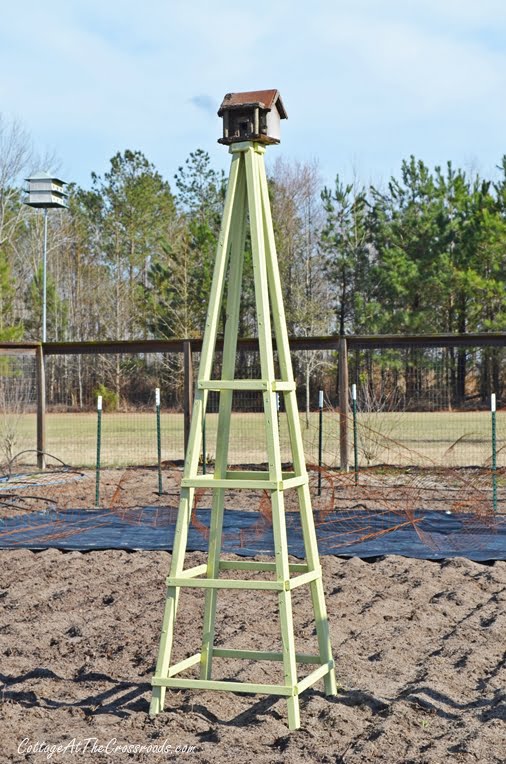
This easy-to-make wooden obelisk will look really nice in your garden. First of all, I must tell you that I am by no means a professional carpenter or woodworker. So if I can build this, you can too. I’m including step-by-step directions and a diagram so that you can make one too at very little cost.
Back in January, I was browsing through the How-To books in Lowe’s and spotted an obelisk. I had seen these around but had no idea it had such a fancy name. By definition, an obelisk is a tall, 4 sided, narrow, tapering structure which ends in a pyramid-like shape at the top. I’m just going to call it a wooden trellis that you can grow things on in the garden.
four 2″x 2″x 8′ pieces of treated wood
two 2″x 1″x 8′ treated wood
1 small box of 2″ coated deck screws
drill and bit
power or hand saw
tape measure
pencil
a long work bench or 2 sawbucks
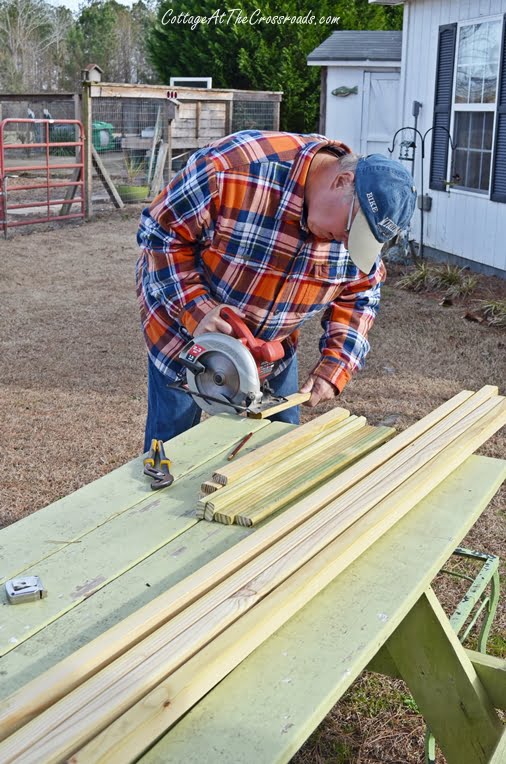
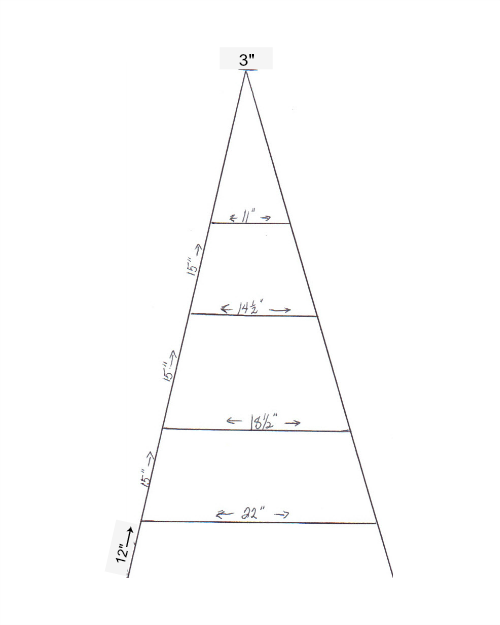
Cut the 2″x 1″ slats into the following lengths:
four 22″ pieces
four 18 1/2″ pieces
four 14 1/2″ pieces
four 11″ pieces
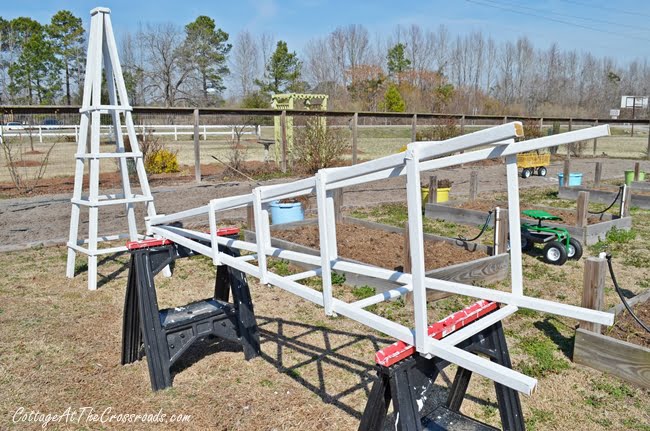
Next, drill a small hole 1/2 inch from both ends of each piece. This will keep the wood from splitting when you insert the screws later. Lay down two of the 2″x 2″x 8′ pieces on your work space, placing them into a pyramid shape. Next, screw a 22″slat 12 inches up from the bottom on both sides. Then, screw a 18 1/2″ slat up 15 inches up from where you put the first slat. The 14 1/2″ will go up 15 inches from that one, and the 11″ slat will go up 15 inches also.
While you’re screwing in these side slats, it’s important to have someone hold the top of the pyramid together. When you have this completed, you have one side of your obelisk built. Set it aside and build one more just like it.
After you have two sides, stand them up,have someone hold the tops together, and screw in the remaining slats. You will now have a 4 sided structure.
As you can see in this photo, I experimented with different ways to make the obelisk more sturdy. I doubled the 2″x 2″s and later I built another one using 2″ x4″s. But really the 2″x 2″s work just fine.
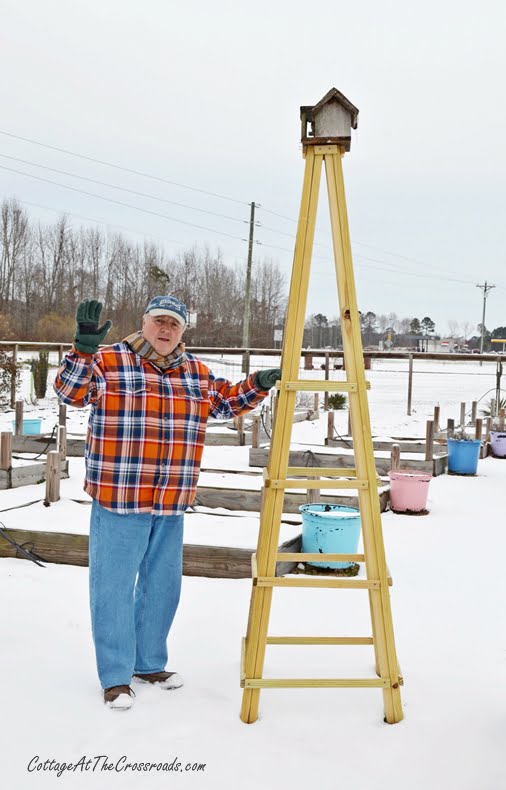
To finish off the top, I chose to just trim it out with four small pieces of the 2″x 1″ slats. I put this old birdhouse on the top just to get an idea of what I wanted to do. You may want to put a decorative finial on the to,p but we’re going to put birdhouses on the top of ours.
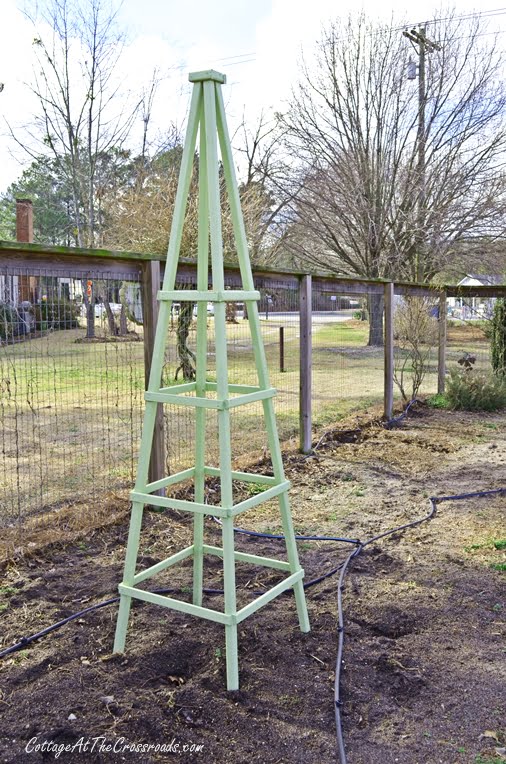
You may choose to leave them a natural wood color, but we decided to paint ours to add some more color to the garden.
First, we put a coat of a good quality exterior latex primer on them. After all, I don’t want to have to be painting these things every year since painting is one of my least favorite things.
We chose to paint them what has become Cottage at the Crossroads signature shade of green. We’ve painted our Adirondack chairs, an arbor, picnic table, and some exterior doors this same shade of green. I’m planning on planting an indeterminate cherry tomato under this one because they can get very tall.
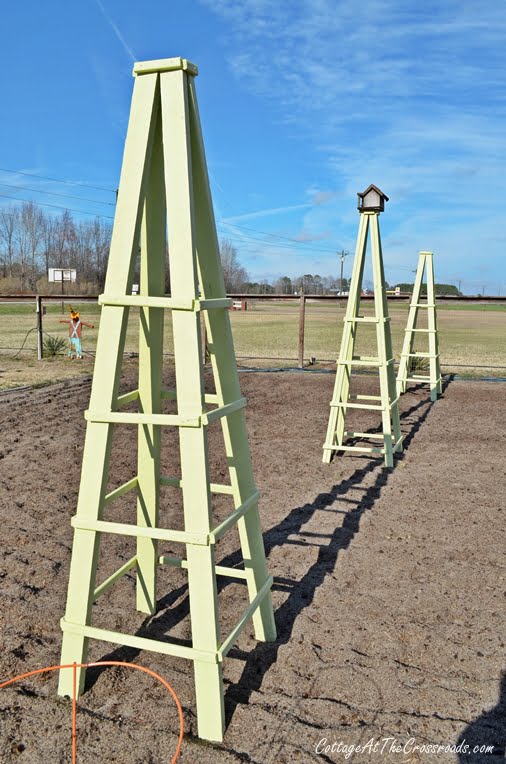
I got a little carried away and built four of them and had to decide where to place them in the garden. I think we’ll plant some pole beans under two of them and perhaps a flowering vine under one. I’ll leave that monumental decision up to my full time decorator, Jane!
This year, we’re concentrating on not only having a fully productive vegetable garden but an attractive sanctuary as well. You know, a place to enjoy the great outdoors with a glass of wine.
You may want to choose how you’re going to anchor the obelisk. I bought some stakes at Lowe’s. Jane and I are now shopping for some attractive birdhouses. Stay tuned to this blog to see the finished product which will include the birdhouses and the climbing plants.
If you decide to build an obelisk, let me know how it turns out.
Last night I visited my talented friend Holli from Hollyhocks&Hydrangreas & almost died from landscaping beauty. Her home is not the only beautiful thing, but all of the foliage surrounding her home is just stunning. The thought & care she puts into each plant & tree surrounding her home is a gift. There is one thing I have started to become passionate about lately it’s plants. I’ve always loved house plants, but landscaping & gardening has peaked my interest lately & her landscaping was so inspiring. She had the widest variety of plants & knew so much about each and every one of them. Ps. I wish I could tell my 18 year old self that I would go over to my friends house and talk about plants & goats one day… I would love to see my 18 year old reaction. Plants & goats are so exciting! The most magical thing in my adult life is having creative friends that inspire me, push me, & impress me with their talent. I love connecting with creative souls that have true passion that oozes out of them in forms of art. Holli’s recent grand piece of art? A DIY window greenhouse that transports you to a magical secret garden…
Isn’t it gorgeous? Want to know the coolest part? Holli built this greenhouse all by herself. It went from being a dream in her creative mind to reality with some blood, sweat, & tears. How inspiring is that? She said she always dreamed of having a greenhouse so that she would keep her plants safe & warm in our cold early spring months here in Michigan. I have always dreamed of having a greenhouse too, but mine was for looks or an LMB office… she inspires me to really flex my green thumb & build a greenhouse for the same reason. While I was taking these photos last night Holli talked about all here dreams she had for the greenhouse & surrounding areas. The garden area behind the greenhouse is going to be filled with rows of wild flowers, the garden to the left of the greenhouse is going to be sunflowers, & the greenhouse will be filled with plants as well as she starts playing around in the. She kept saying how everything was “unfinished”, but all I saw was beauty.
Holli made this greenhouse entirely out of antique windows, & even made that cupola herself out of old windows. A lot of planning went into this little guy, & I’m sure she could go on and on & tell you about how she put everything together, but I really just came here today to show off her beautiful work. Each detail made me sigh. It took everything in me to stop telling her how amazing the greenhouse was because after the 80th time I’m sure that gets annoying. & can we talk about that white picket fence? It just adds to the charm…
Many of you may not know that Holli is also a local talented artist here in Michigan & we carry her amazing paintings in our store. You can see more of her work [here] on her Instagram. She is also the artist who painted our store sign. I could rave about her all day, but I know that if I keep going on I will embarrass her because she is also one of them most humble people I have ever met. But, when you make a greenhouse like this you are allowed to be a little full of yourself.
Ok, I’m done. Sorry about the picture overload, but I really couldn’t control myself. Holli’s home was just dreamy & maybe I can convince her to let me show you the rest of her home because I feel like you guys would love it. I hope you enjoyed seeing her amazing DIY window greenhouse & that it inspired you in some way. Thank you SO MUCH for stopping by the blog today & be sure to go & show Holli some love. You can find her Facebook & Instagram where she shares more of her work. Also, be sure to follow me on Instagram, Pinterest, & Facebook for behind the scenes updates of what we are up to at our farmhouse & recent posts. xx
Check out our mini window greenhouse we recently made below…
Click [here] to see more of this DIY window greenhouse & see how we made it.
You might also be interested in:
Original article and pictures take www.lizmarieblog.com site