Using an area rug can help define your space and solidify your overall theme. Perhaps you need a little splash of color to really bring the room together or you want to find something that will accent the sofa. Maybe you need an area rug to cover up that hideous stain on the floor that you cannot get rid of! Whatever the reason for needing or wanting an area rug, know that we have the selection and the price that will make you happy. Shop online at Wayfair to find an area or throw rug that will match the décor and style of any room – whether it is for a dining room, kitchen bedroom or living room floor.
Original article and pictures take secure.img1-ag.wfcdn.com site
The fishtail braid is by far our favorite go-to hairstyle. It’s so unique, elegant, and super flexible. You can do a really tight, sophisticated braid, or you can mess with your braid a little bit to create a more casual, messy style. We worked with Christian Marc and Temptu to create this tutorial to show you how to create a perfectly styled, undone fishtail braid. We’d love to see a bride wear this with a more flowy, grecian style gown or even with a very structured modern dress to create a little contrast. Keep reading for the full instructions.
1. Start by pulling back clean, dry hair, and braid the upper half with a loose traditional braid.
2. Take a couple of pieces and pull them around the braid and pin with bobby pins to create a little texture at the top of the pony tail. Play with it a little bit until you’re happy with the way it looks. The messier, the better.
3. Take the remaining hair and use a fishtail style braid to finish the pony tail.
4. Create a messy look throughout the pony tail by pulling at the braid to loosen it up.
5. Secure the bottom of the braid with a small, clear rubber band or bobby pins.
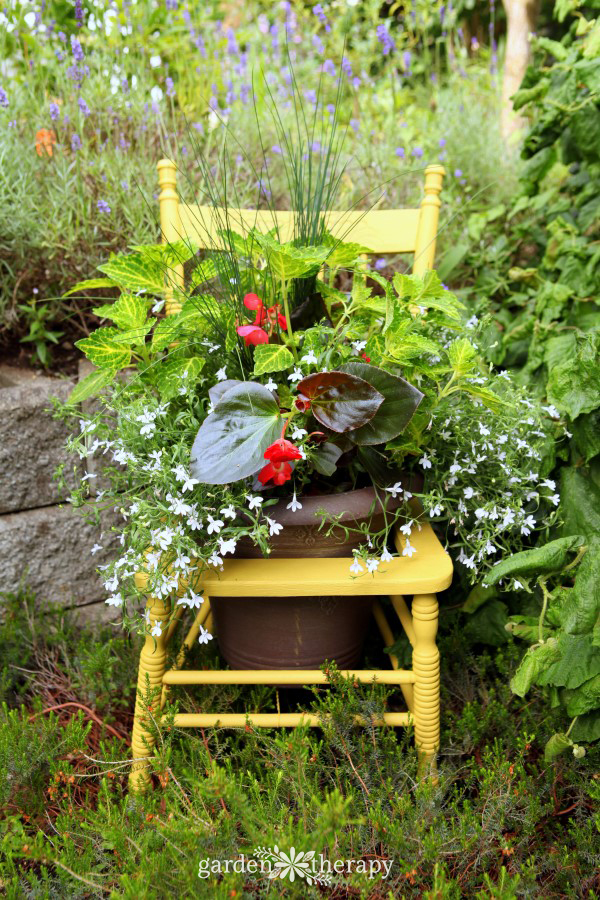
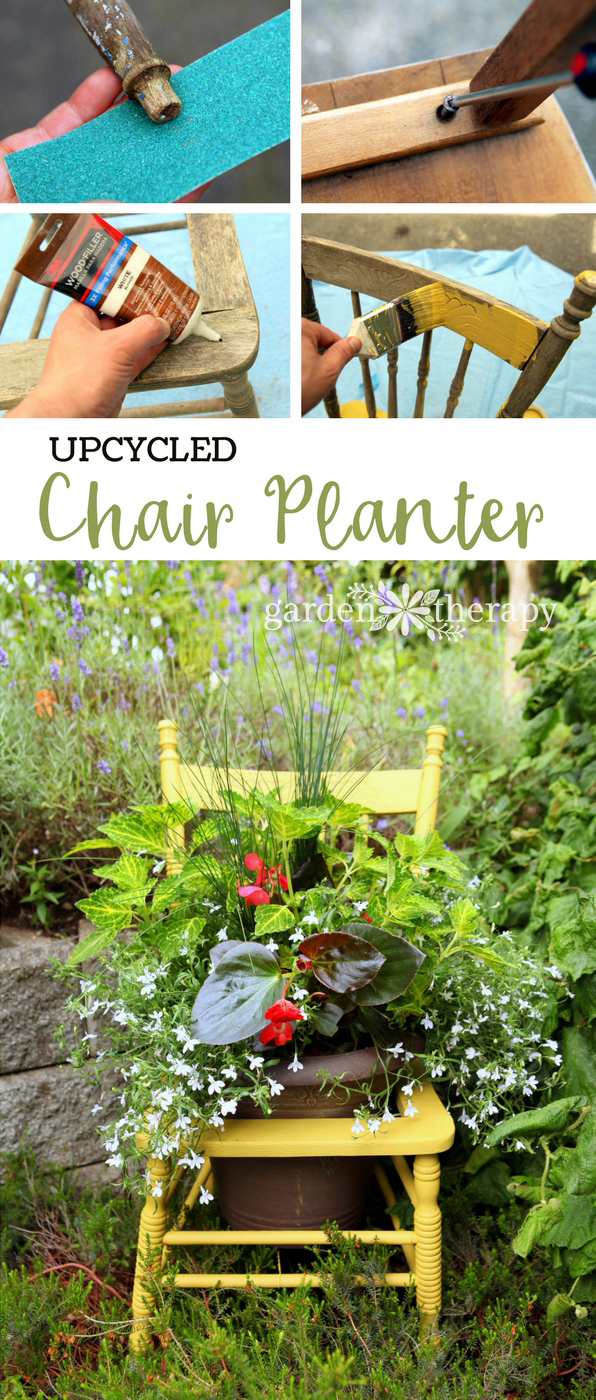
An Outdoor Chair Planter that Gives New Life to a Vintage Beauty
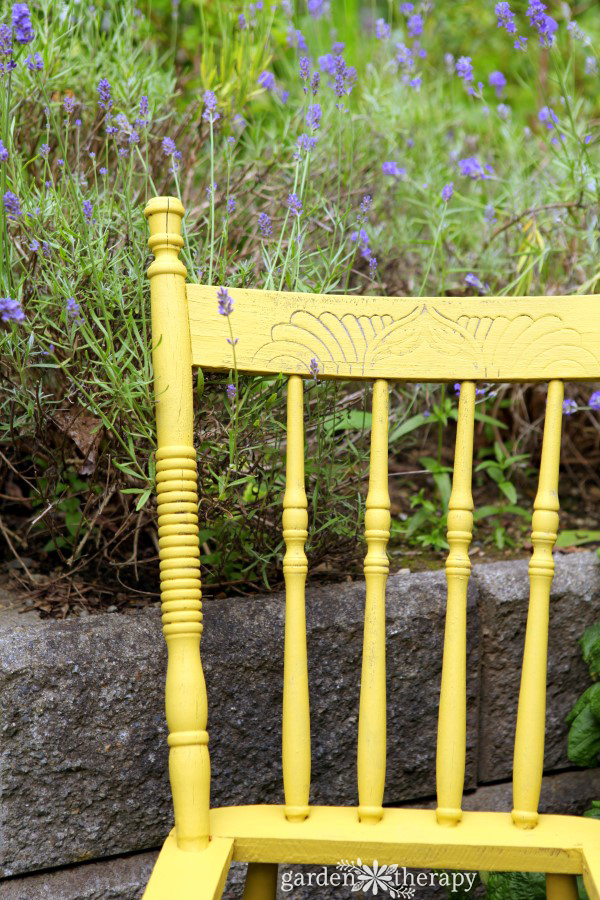
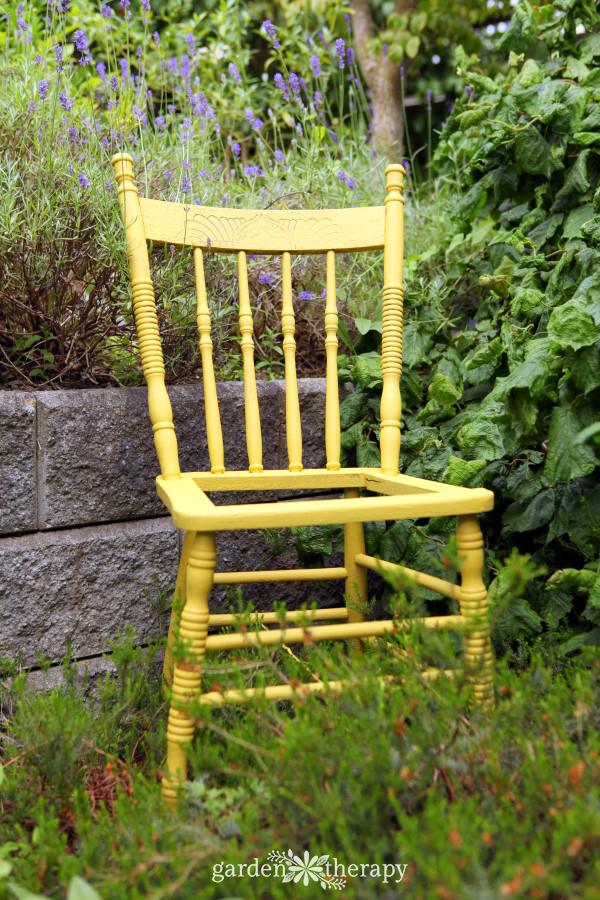
This sunny upcycled chair planter is just the thing to showcase a stunning annual display in a hidden part of the garden. It adds rustic charm and a touch of whimsy to any backyard. And it comes with a story.
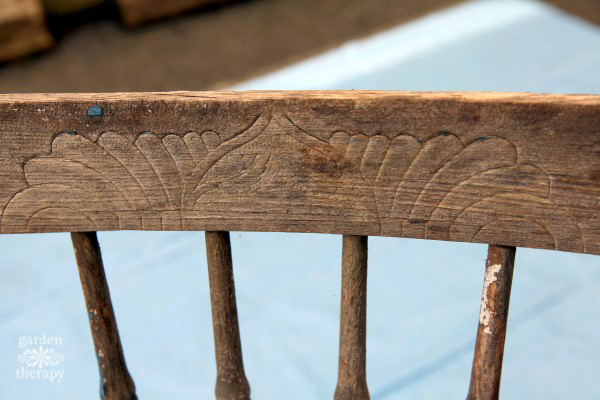
Not long ago, I happened to see a beat-up old wooden chair out in the back alley. It had no seat, the rungs were broken and unglued; it sat toppled over, looking a bit sad. I saw the beautiful details in the wood and had a vision for giving it a new life in my garden. I do love to add quirky elements like this to the garden, as you can see with this wire-basket-turned-garden-chandelier.
If you have the luck to happen by an old broken-down chair with too much personality to throw out, It’s not as simple as just throwing on a coat of paint. You will need to do some repairs and make sure that the chair is strong enough to last outdoors.
Disclosure: this post was sponsored by 3M who also sent me the materials to makeover the chair. The project ideas, instructions, and opinions expressed are my own.
Decorative container garden containing plants and container soil in a pot
Make it!
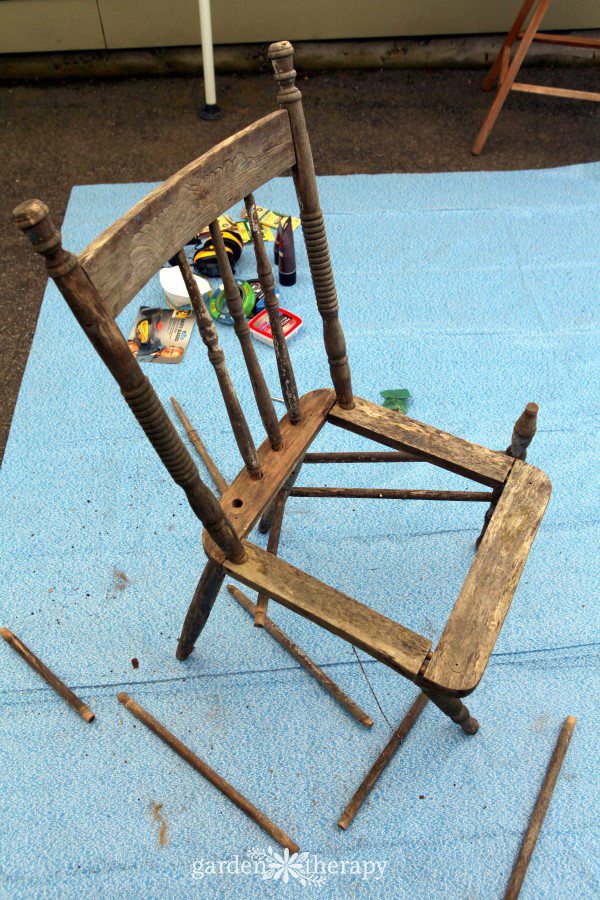
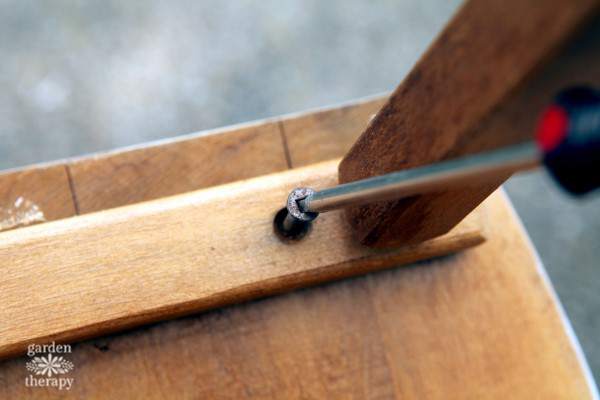
Pull apart any of the loose parts of the chair to see what you are working with. If the chair has a seat, use a screwdriver to remove it.
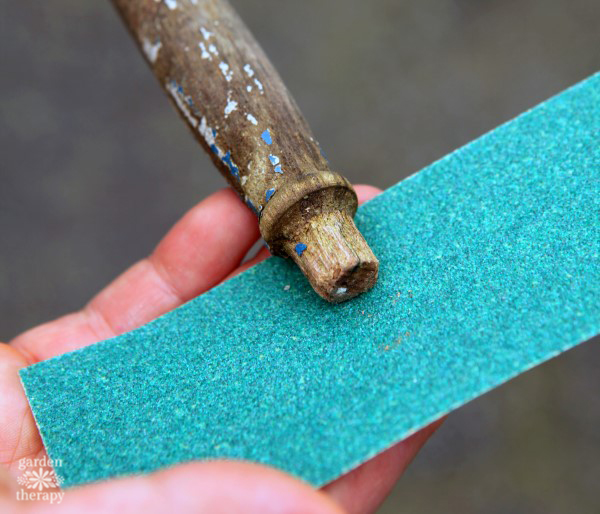
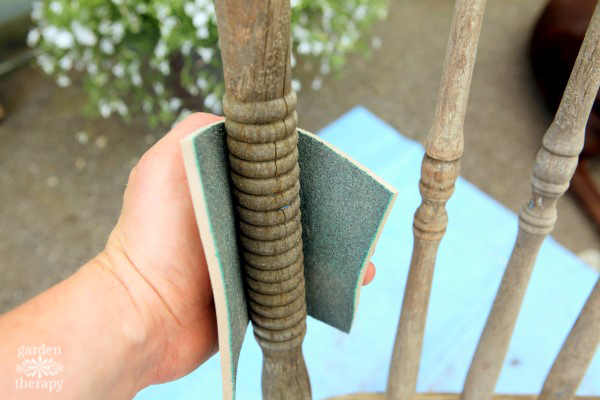
Use sandpaper in 80 grit to take off any remaining bits of glue, paint, or dirt on both the hole and peg of the chair rungs and legs. With older furniture that may have remnants of lead paint, it is best to use a valved respirator while sanding. Regardless of the age of the chair, it’s always best to use protection so mask up!
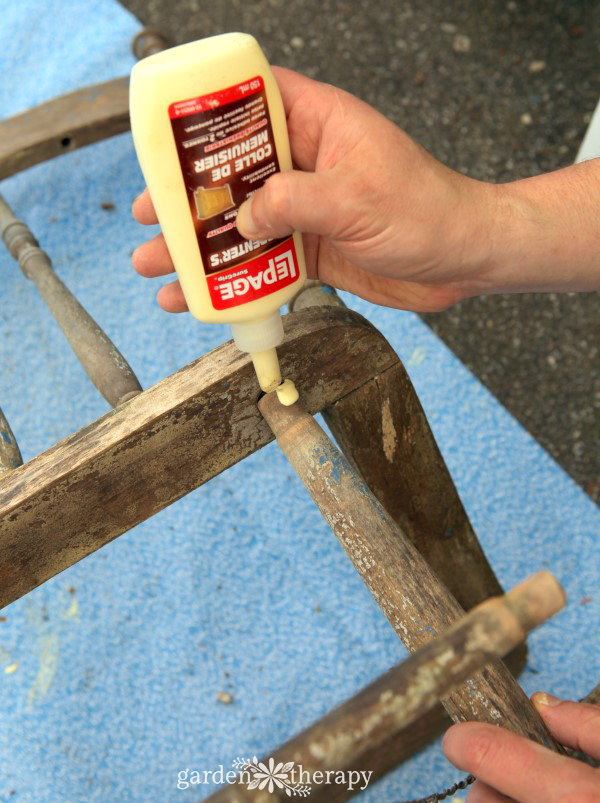
Use wood glue to secure all the parts back into place and strengthen any joints that are loosening.
Tighten the screws holding the chair together and replace any missing hardware.
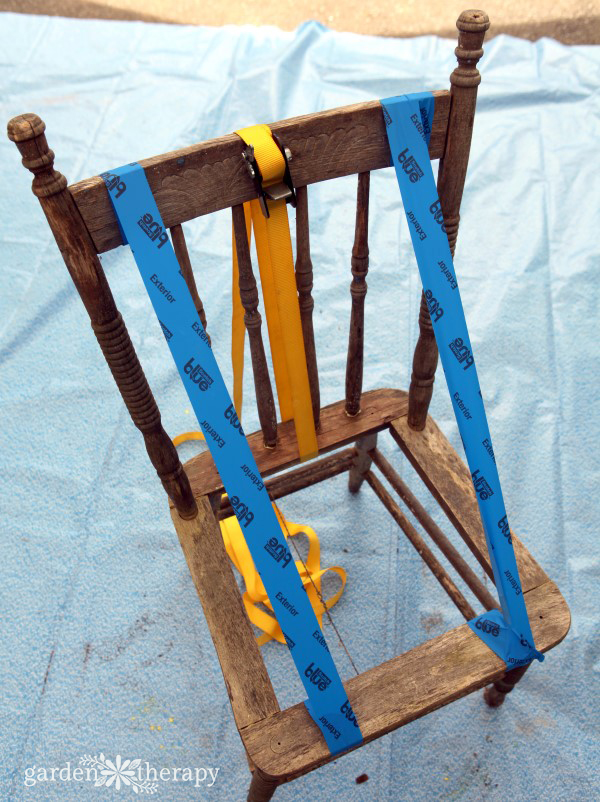
Use a strap clamp and painting tape to hold the joints together while the wood glue dries.
Fill any nicks, grooves, or holes with wood filler. Sand when dry to smooth out.
Prep the chair now for painting by sanding off any loose paint or debris on the wood with coarse 60-grit sandpaper. Wipe with a damp cloth to remove all sanding dust.
Paint the chair with an exterior wood paint with primer, or prime the wood surface before painting your chosen color. I used a flat paint in “lemongrass” which looks like a bright sunny yellow in the garden. I didn’t use a heavy hand with the paint on some of the details so they would stand out. On most other areas I gave it a few coats to ensure that the planter would stand up to the elements.
This chair is now ready for the garden. You can simply set it in the space to add some colors or use it to prop up floppy flowers like peonies.
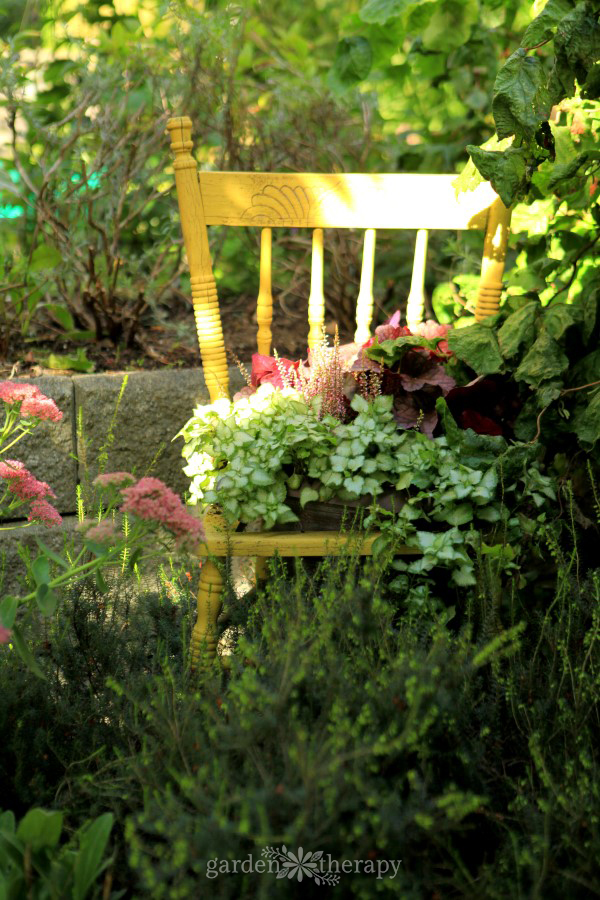
If you prefer to plant it, then look for a container that is wider at the top than the bottom so that it fits into your chair. Choose a decorative pot that compliments the chair, like this bronze pot which pulls out the details and the color of the decorative trim of the chair. The planter shown has begonias, coleus, and lobelia, with some grasses for height.
I swap out the plants each season, as you can see here with some perennials that have been planted in the fall.
Amaryllis Heart Wreath in bloom Amaryllis Heart Wreath
During the Christmas holidays, I spied a beautiful wreath planted with amaryllis bulbs. The price made me suck in my breath, so I thought up a way to make my own version at home. All you’ll need is amaryllis bulbs (I used two small ones), potting soil (water retentive variety), netting (I reused a produce bag), some burlap, floral wire and ribbon.
Follow the picture directions to make your own Amaryllis Heart Wreath. Mine is blooming just in time for Valentine’s Day !
All you’ll need is amaryllis bulbs, potting soil, netting, floral wire, burlap and a wreath amaryllis bulbs set in potting soil and wrapped in netting attach the burlap wrapped ball to the wreath with floral wire, then add a ribbon Amaryllis stalks starting to grow heart wreath Original article and pictures take ourfairfieldhomeandgarden.com site
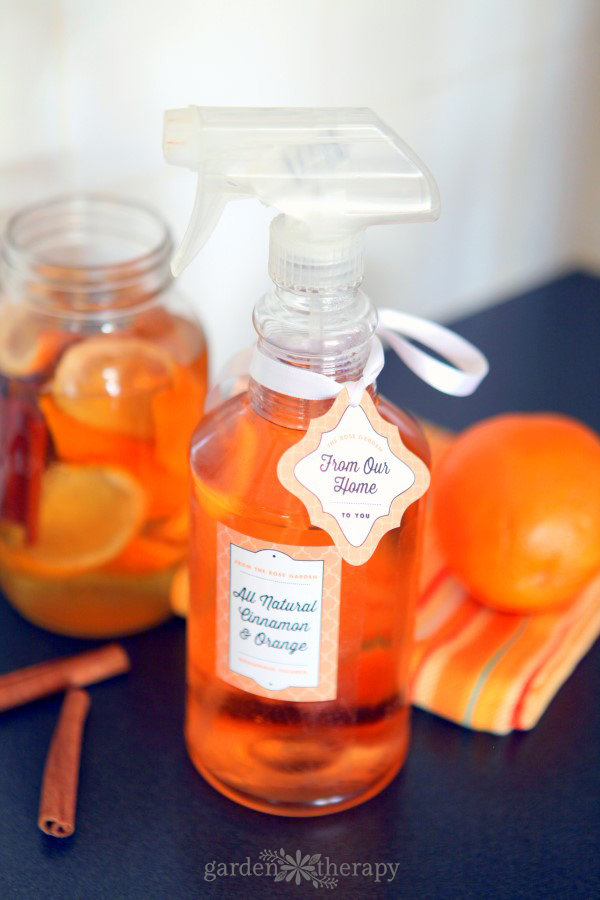
This citrus all-purpose cleaner recipe is simple and made with natural ingredients so fresh you could eat it! It may make an interesting salad dressing ingredient, but I’m more inclined to use it to clean the kitchen.
Store-bought household cleaners are full of potentially harmful chemicals and ingredients that most of us can’t even pronounce, let alone know what they are. I feel much better cleaning my home with something that I know for a fact (because I made it!) is all natural and has no chance of causing harm to myself, my family, or the environment.
This recipe is part of our Citrus Celebration series here on Garden Therapy and is in great company with:
To make this recipe, add orange peels to a Mason jar and top up with distilled white vinegar. Add a few cinnamon sticks to spice it up. Let sit covered in a cool, dark place for two weeks and then strain into a spray bottle. If you would like a stronger spice smell when strained, add a few drops of cinnamon essential oil. It’s the perfect cleaning recipe for the winter months as it warms things up just a bit more.
Your homemade cleaner is all purpose and perfect for bathrooms, kitchens, and floors. The more citrus and spice you use, the less vinegar-y it will smell. Use within about 6 weeks and make smaller batches so that you always have some fresh cleaner on hand.
Original article and pictures take gardentherapy.ca site
Are you faced with a lot of shade in your garden? We have three big old maple trees shading a large portion of our yard. When we moved here, there was nothing but poorly growing grass under the trees. It looked messy and unfinished. So we set about creating a shade garden.
This is what we started with in the spring of 2012. You can see it really was barren with just a few scillas growing under the maple.
Shade Garden BEFORE
And here we are today. A garden filled with hosts, ferns and astilbe. It still has a long way to go before it’s “full”, but we’re on the way to getting it into something I think is wonderful.
Shade Garden AFTER
The weeping cypress and white sumac in the background were there when we moved in, but everything else is new to the garden. We started by extending the bed under the sumac to include hostas, lungwort, spiderwort and astilbe. This area actually gets a bit more sun than under the maples, so there was more flexibility to add the lungwort and spiderwort which do better with more light.
Tranquility Fountain
The centrepiece of the garden is the tranquility fountain. You can read about how we made and installed it here. You actually can’t see it in the “after” shot because it hasn’t been taken out of winter storage yet. So with that in place, we had something to build on. But I knew that plant choices were limited due to the light, so it had to be hosta and ferns. The biggest challenge was adding some light to this very dark area.
The best way to add some light to a shade garden is to use plants with a lot of variation in the leaves. Above are some of my favourites which have been used in our shade garden. In most cases, its the leaves of these plants that add interest and light. So I’ve added things like the golden heart bleeding heart for it’s chartreuse foliage. The ghost fern for its frothy foliage and deep red stems. And variegated hosta of all types add so much impact into the garden.
Ready for planting – Orange Marmalade & Linda Sue
Another way to add some light into a dark corner is to use items that reflect the light, such as this glass totem.
Or how about adding mirrors like this one from HGTV? Not only will this add light to a shady spot, but a breeze will add movement.
Mirror Garland – HGTV
So if you have a deep shady spot in your garden which is uninspiring, look for variegated foliage, white or light coloured flowers and light reflecting objects to add some light to your shade garden.
Original article and pictures take www.newhousenewhomenewlife.com site
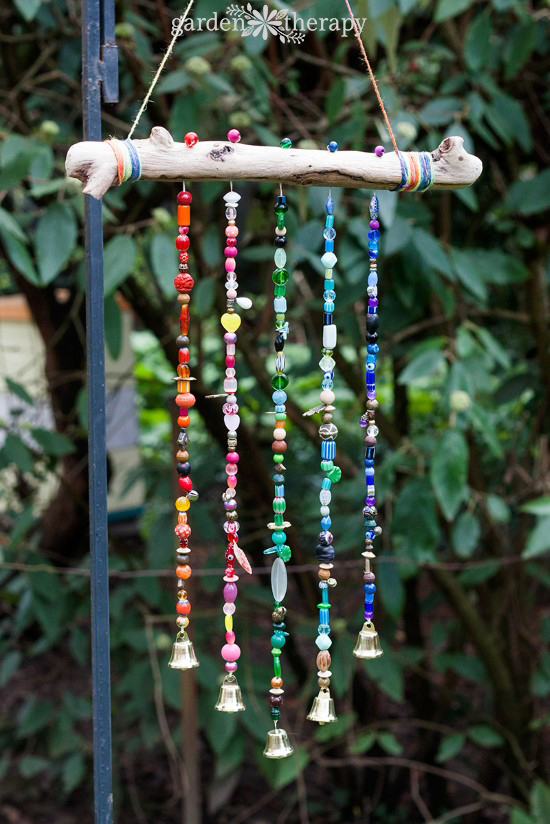
Add Sparkle to the Garden With This Beautiful Beaded Wind Chime
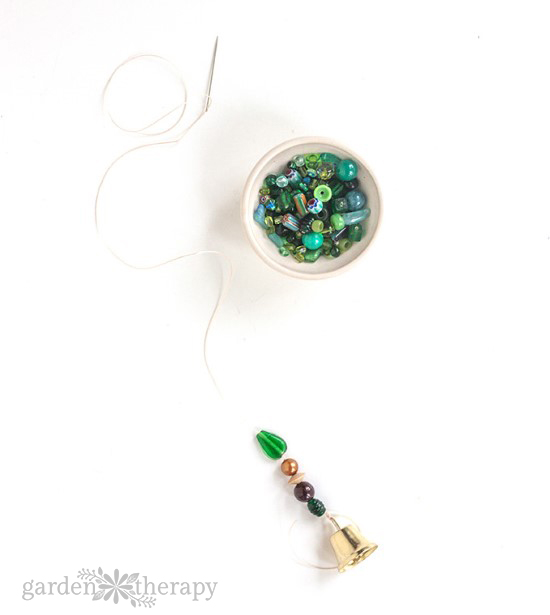
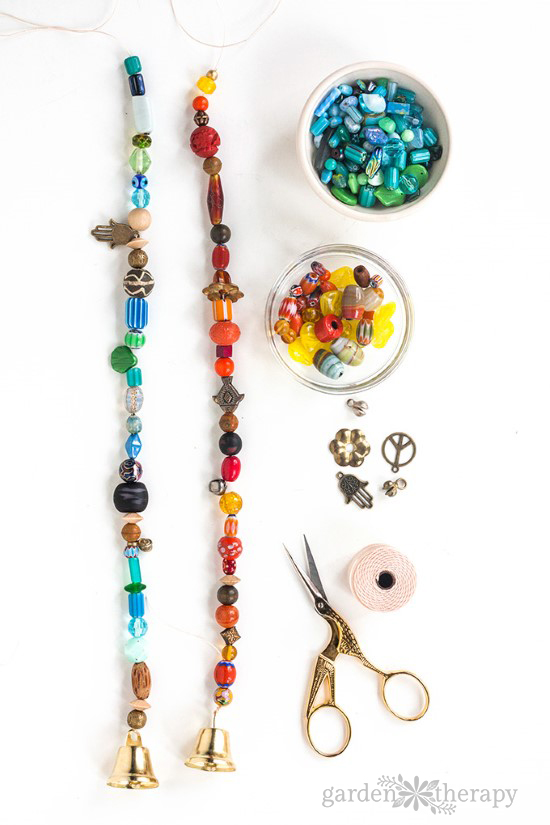
Add some extra jingle and sparkle to your backyard this year with a handmade beaded wind chime! I’ll admit I’m a bit of a craft supply hoarder and have accumulated a massive amount of beautiful beads over the years but have barely used them. This project is the perfect excuse to get out my bead supply and make something I’ll enjoy seeing out my window every day.
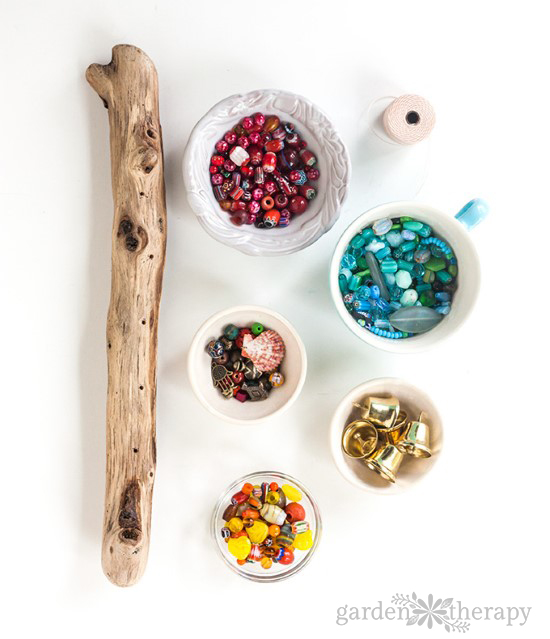
Materials:
Bells (or anything that makes a pleasant sound when the wind blows)
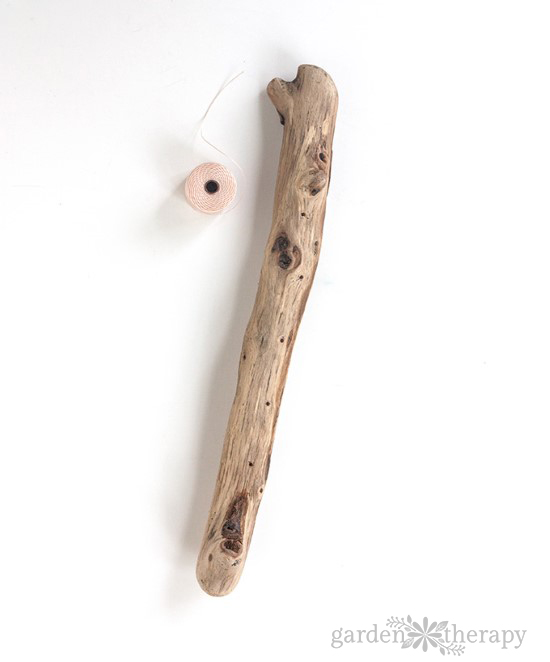
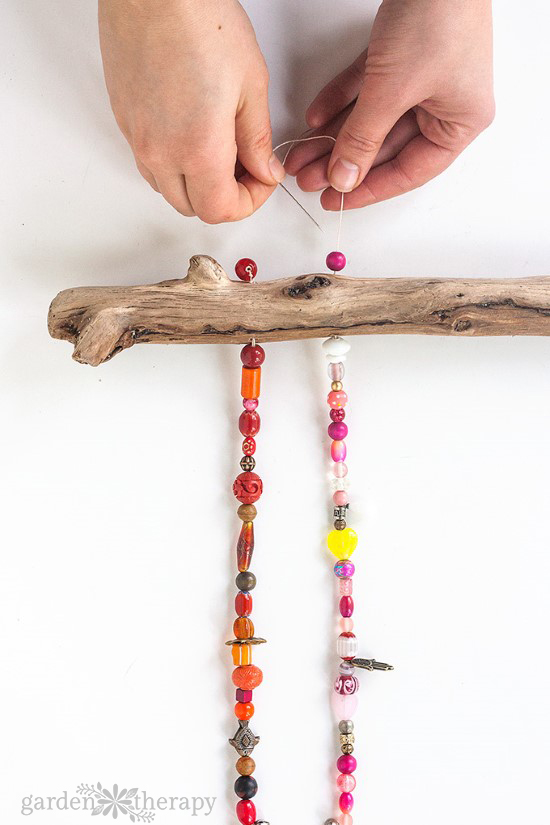
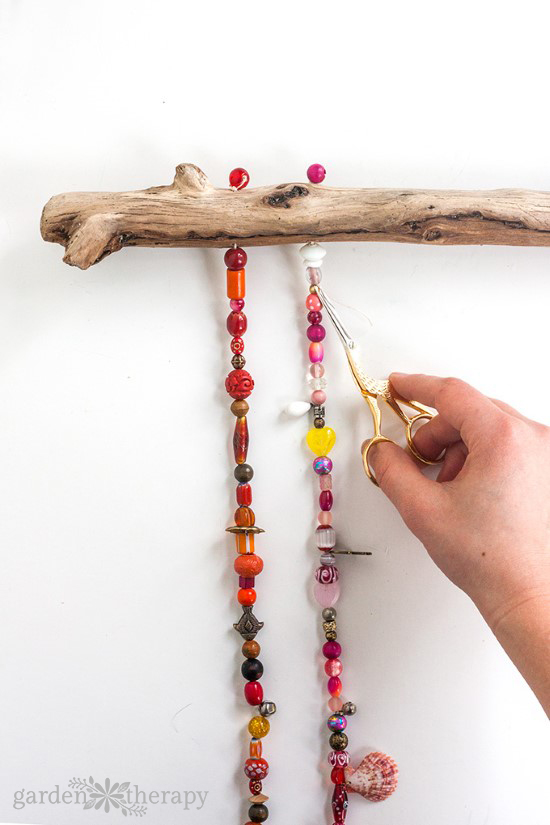
Start by drilling holes in your piece of driftwood (or wooden dowel). I used a pen to mark where I wanted the holes to go. I chose to make 5 holes but you could make as many as you like.
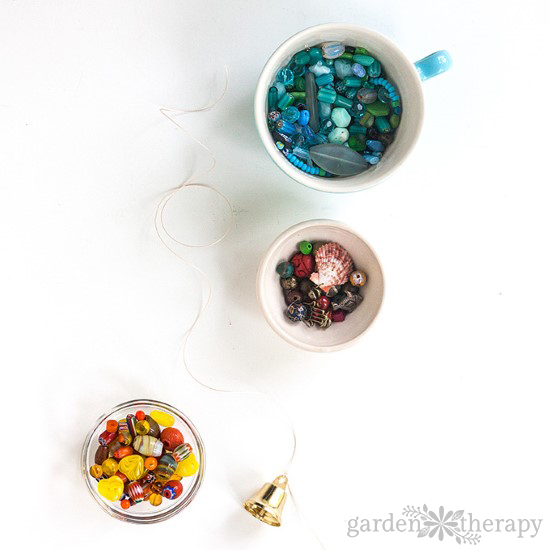
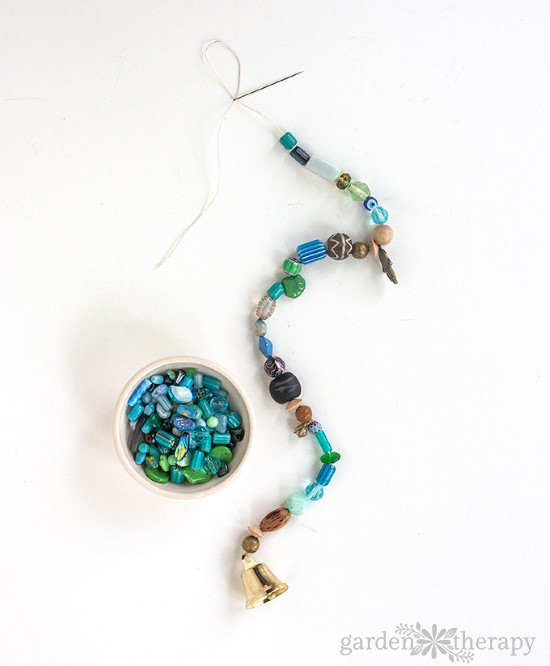
Pour your beads, charms and bells into small bowls or teacups (I sorted mine by color). Then cut a length of nylon beading thread to approx. 22” in length. Tie a bell to one end leaving a few inches of excess thread at the end of the knot. Thread the needle onto the other end of the string.
Begin threading beads onto the nylon string. I chose to have each strand be a different color, to create a rainbow effect. I also mixed in wooden beads and metal charms.
Once you’ve finished beading your strand, unthread the needle. Then, making sure not to lose your beads, thread the needle onto the few inches of string you left at the bottom (from knotting the bell). Then insert the needle back up through two or three beads to hide the end of the thread. Snip off any excess string and carefully set the beaded strand aside and start the next one.
Continue to create beaded strands until you have enough for each hole that you made in the driftwood.
Once you’re done you can lay the finished strands out and make any adjustments you might want. I wanted my beaded wind chime to hang at different lengths so I removed a few beads from some strands and added beads to others until I achieved a look I liked.
Next, carefully pick up the first strand. Thread the needle and string it through the first hole in the driftwood. Thread a bead onto the top of the wood and carefully tie a secure knot around the bead. Thread the excess string back down through the driftwood and through a few beads, then snip any excess.
Repeat this process until all beaded strands are secured onto the wood.
Finally, make a hanger by wrapping twine around one end of the wood, securing with a knot. Then allow some slack for the beaded wind chime to hang from and wrap the string around the other end of the wood. Secure with a knot (I also covered the end of my string with some kraft glue to hold it down) and you’re done! Hang outside a window where you can enjoy its beauty and hear it chime in the wind.
Original article and pictures take gardentherapy.ca site
Today I’m taking you with me on a trip down memory lane to my former garden. Our brick split-level sat on a seventy-five by one hundred foot lot in a development established in the 1950s and looked pretty much like all the other homes around us. Over the course of thirteen years, using landscaping , paint and accents, we transformed this cookie-cutter house into a country cottage home.
Each year, I planned one or two big projects such as new flower beds, house painting, a block driveway or a Bluestone patio. We did whatever we had the skills and muscles for and hired a few of the jobs out. But mostly the change evolved from the landscaping and details. Both side yards were only ten feet wide, so a Garden Display ladder and stone foot path went on one side with an entrance to the garden. The other became a flower bed.
Garden rooms were established in the back yard by creating arbors, nooks and seating areas with plantings to complement them. Fencing and Arborvitae shrubs were put in to enclose the back garden. Winding flowerbeds were edged in river rock, and the grass paths were mulched to reduce mowing and watering. Accents and salvaged items were tucked in among the flowers to be discovered by visitors as they walked the garden. Many of those surprises and projects were created from items my husband and I found at yard sales and on neighborhood trash days!
When I ran out of space, vertical plantings of clematis, wisteria, kiwi vine, window boxes and ladders were used to make this little space appear larger. Vegetables and herbs were planted right along with the flowers and shrubs. Plant selections were made to include native plants and incorporated over four hundred flower, shrub and bulb varieties, documented when we became a certified Backyard Habitat Garden.
This tiny garden was a joy to me, open to our friends and neighbors and was even featured on several garden tours. But time marches on. All those steps inside and outside and the sloped front yard made this a home we realized we could not grow old in. Five years ago, we began making a new garden and an older ranch home our own.
But , once in a while, I have to look back and remember that lovely little garden which I’ll always carry in my heart.
After ~ what a difference some paint and plantings can make ! Before ~ after the first year when I made the front flower beds birdhouse ladder and iris in the back garden pocket garden by the sunporch shady nook with a bubbling vase Wheelbarrow planting by the arbor swing tiny side yard garden Rusty Tool Arbor in June wheelbarrow water garden The Garden Shed and Bluestone patio Garden display ladder and stone foot path faucet handle flowers Bluestone patio back fence garden and birdhouses Wisteria on the gazebo in spring Gazebo & back deck in summer Copper Garden Flowers Original article and pictures take ourfairfieldhomeandgarden.com site