Monday, January 30, 2017

Painted Jar Planters + Shamrocks

Painted Jar Planters + Shamrocks

St. Patrick’s Day typically reminds folks of leprechauns, green beer, Ireland, and shamrocks: the symbol seen on green-felt fedoras. But I’m a plant nerd, so I think about the shamrock from a botanical point of view (and I try not to remember those nights drinking green beer). The symbol of Ireland is the three-leaf white clover, Trifolium repens, which is common in North America and Europe in grassy areas as well as a pasture crop. I fondly remember summer days as a child searching for a lucky four-leaf clover lying in park grass. While many launch a year-long fight to get clover out of their lawns, I’m happy to leave it blooming for the bees and give the lawn a rich green color.


Painted mason jars as vases - this tutorial shows you how to make them glossy and water tight

There are a few other three-leaf herbaceous plants that share the Shamrock moniker, my favorite being Oxalis. Native to South America and Africa, this genus of over 500 species are often grown as ornamental plants in home gardens or as houseplants.


Purple oxalis in a sage green painted mason jar vase

Oxalis grows in my garden in tucked-in shady woodland areas where it generally hides from the camera. To get a few better shots and really enjoy the beauty of the plant, I picked up a few from the garden center to use in my spring arrangements.


Hanging wire balls with moss and oxalis make a gorgeous spring display

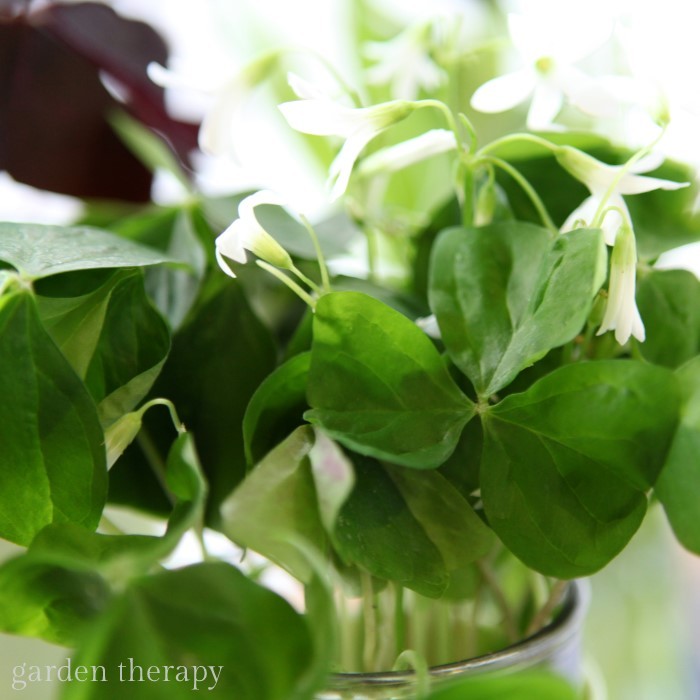
Oxalis regnellii is typically grown in my zone (7-8) as a houseplant due to its vulnerability to frost. Pale lavender to white flowers bloom regularly on healthy plants given plenty of light but placed away from direct sunlight.


Gorgeous oxalis

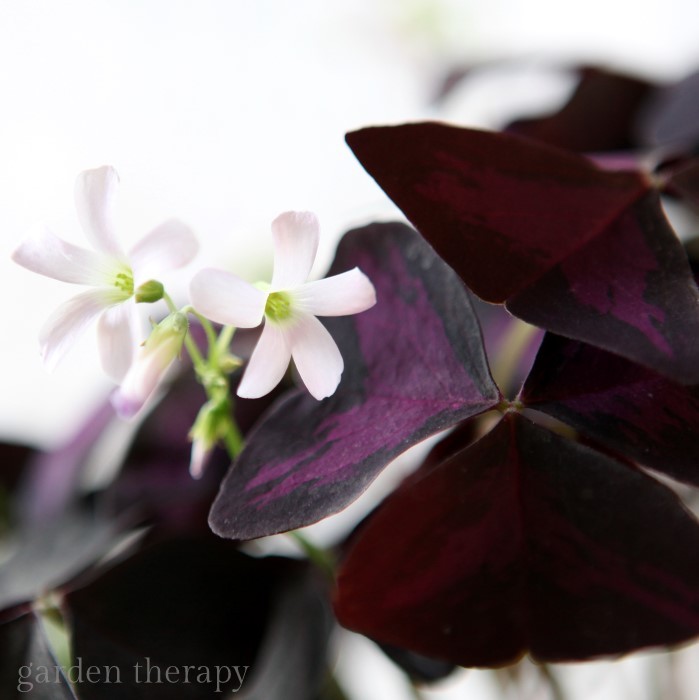
With Oxalis regnellii ‘Atropurpurea,’ the blooms are hardly worth considering when compared to the dark eggplant foliage, often with brighter purple center leaf margins.


delicate purple and white blooms of oxalis

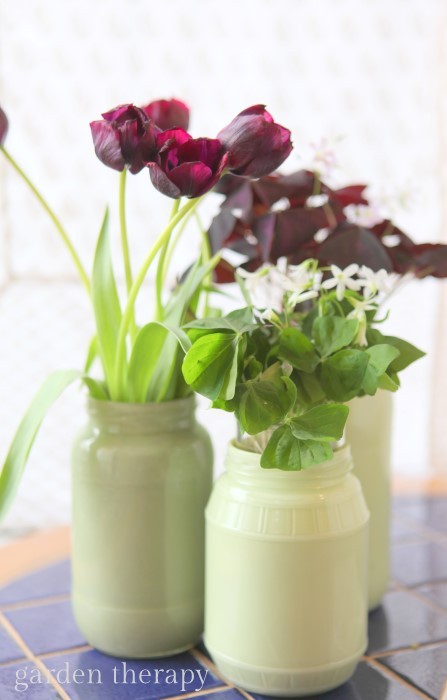
Inspired by the color palette provided by the two false shamrocks, I created a St. Patty’s day floral arrangement using painted mason jars as planters and as a case for some deep purple tulips.


Upcycled Mason Jar Planters hack that keeps them shiny on the outside

Painted Mason Jar Tutorial


Materials:


  • Mason jar(s)
  • Latex house paint
  • Craft paint
  • Foam paint brush
  • Flowers / plants

Painted Mason jar vases - supplies

Make it!


This is a simple project that I have seen done with spray paint. I chose to tint some leftover latex trim paint as : a) I had some, b) I wasn’t keen on the fumes from the spray, and c) I wanted more control over the color.


Materials to paint mason jar vases

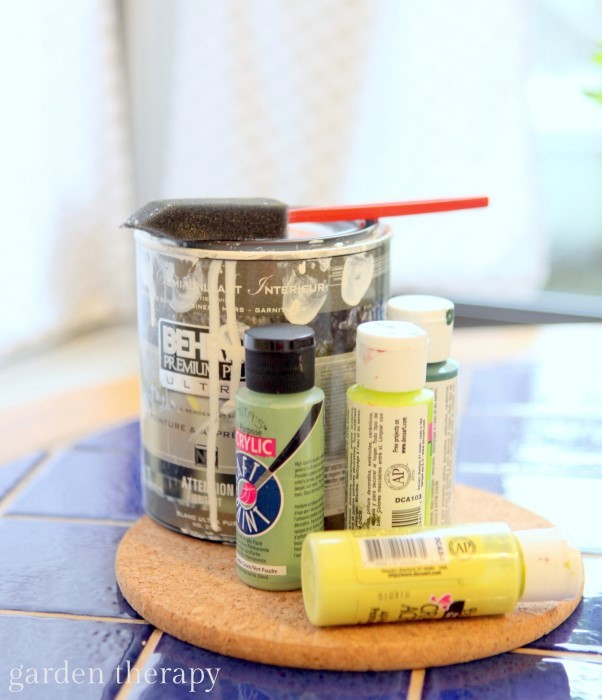
Simply mix up the color that you want by adding craft paint into the latex paint in a clean yogurt container. Mix really well, then pour a little into your Mason jar. Use the brush to paint the inside evenly and leave to dry. Apply a second coat if necessary. One coat is shown here.


How to paint a mason jar so it is shiny

To make into a planter, fit a plastic nursery container containing your plant onto the top. Ensure there is a little lip holding it on the edge so that you can remove it when necessary.


To make a vase, insert a thin glass vase into the painted jar. Choosing interesting shapes and patterned jars will add even more interest to the project. I like the simplicity of them on my fireplace mantle where they contrast with the painting.


Gorgeous flower arrangement with a mix of cut flowers and potted plants #oxalis #tulips #spring

It has also been quite fun to watch the Oxalis “go to sleep” at night, or rather the leaves droop down as a result of nyctinasty, a plant’s chemical response to the onset of darkness that causes the leaves to tuck in for the night. It gives these guys a bit of personality which may leave you unconsciously whispering at night so as to not disturb them.


You can use this planter any day of the year of course, but there are also many more mason jar projects.


Pin it!


painted mason jar planters and shamrocks for St. Patrick's Day

Original article and pictures take gardentherapy.ca site

Thursday, January 26, 2017

Paint a Stepping Stone Flower

Paint a Stepping Stone Flower

The other day I was working in my Secret Garden, laying out a paved area under an arbor. I am using the 12 x 12 concrete pavers. Thinking they looked so bland I wanted to add a bit of whimsy to them. I decided I wanted to paint a stepping stone flower.


paint a stepping stone into a flower, FlowerPatchFarmhouse.com (10 of 23)

I remembered a book I had tucked away somewhere by Lin Wellford on painting stepping stones with flowers and butterflies so I tracked it down. She did hers on round pavers but I figured I could make the square ones work just fine.


I started with some Zinser Bulls Eye paint (I had it on hand), I laid it on thick to help fill in the crevices a bit. These pavers are very pitted. She explains to hand draw a 5 pointed star in the middle. Mine is a little wonky but I tell myself I like things that way. Draw out lines from the points of the star then draw some slightly curved wavy lines along the outer edges to mimic petals.


Paint a concrete stepping stone into a flower. Easy and an oh so fun way to dress up those drab pavers. FlowerPatchFarmhouse.com

I thought about leaving the background white but her photos in the book showed the flowers really popping against the black so I decided to follow her directions on this one. So, as you see I added the black. I used regular bottled craft acrylic.


paint a stepping stone into a flower, FlowerPatchFarmhouse.com (4 of 23)

I chose a violet color for the petals since I am sticking with pinks, purples and blues in my Secret Garden. I used these white nylon brushes, these are my ‘go to’ brushes for base painting or doing large flowers, painting furniture. The light weight is easy on the hands and wrists when doing a large piece and I seem to have more control. I have also found these at JoAnn’s, look in the craft paint department.


paint a stepping stone into a flower, FlowerPatchFarmhouse.com (5 of 23)

I added the shading and highlights as directed in her book.


paint a stepping stone into a flower, FlowerPatchFarmhouse.com (6 of 23)

Some fuchsia in the center with some details. It is the details that make projects like this come together. And they disguise flaws too.


paint a stepping stone into a flower, FlowerPatchFarmhouse.com (8 of 23)

Once it is fully dry I will seal it with a few coats of Exterior Varathane. I will coat all sides even the back to inhibit the concrete from absorbing water and lifting the paint from the back. Even so being out in the weather all the time will still do it some damage but I can always repaint. I should try this with Patio Paint and see if it lasts longer.

What do you think?


I can’t wait to do some butterflies, the ones Lin Wellford has in her book are just beautiful.


UPDATE: I have painted the butterflies and I love them, check out the posts below for more!


Happy Painting!

If you enjoyed this, Please PIN and share..


Easily paint these beautiful blossoms on plain concrete pavers for a glorious walk in the garden! FlowerPatchFarmhouse.com

Original article and pictures take www.flowerpatchfarmhouse.com site

Wednesday, January 25, 2017

Oven-Baked Summer Squash Fries

Oven-Baked Summer Squash Fries

Everybody loves fries, but deep frying in oil is anything but healthy! Try this baked version without all the unnecessary fat and calories.

Read More...


Who doesn't love pizza? We all crave for it sometimes, but now you can eat a whole pizza without feeling guilty! A very easy recipe for a delicious and above all really healthy vegetarian pizza!


Read More...


Of course, the name 'spring salad' does not mean you can only eat it in spring! It means the ingredients that define the strong taste of this salad are the ones that remind you of the season. Enjoy this easy recipe!


Read More...


Very healthy and easy way to make a vegetarian pasta! The bright colors make it look very good on your table, and the numerous vegetables make it even better for your body! Ready in just 40 minutes!


Read More...


Original article and pictures take www.bonjourhealth.com site

Monday, January 23, 2017

Outdoor Lighting Ideas for the Garden

Outdoor Lighting Ideas for the Garden

Adding lighting to landscaping can showcase plants in a new way, illuminate a pathway, or just create a warm glow. Here are a few outdoor lighting ideas to use throughout the year.


garden lighting
10 DIY Outdoor Lighting Projects and Ideas

For the Birds


Let the birds fly free and fill a pretty birdcage with string lights.


birdcage outdoor garden light with warm white string lights

For this project I used waterproof, batter-powered LED lights. I can leave it out in the garden and not worry about the rain getting the lights wet. A string of solar-powered fairy lights would also work beautifully as long as you set the charger out in the sun during the daytime.


birdcage outdoor fairy lights

Dress Up the Table


This DIY solar light chandelier was made from just three materials (which you very well may already have)! See how to make it here.


DIY Solar Light Chandelier - an easy ouutdoor project in just 15 minutes!

Recycling at its Best


These tulip lights are a thrifty way to dress up the garden using recycled water bottles! See some inspiring photos and instructions on how to make them here.


These tulip lights are a gorgeous way to use up recycling!

Light a Candle


Hanging lanterns lit with tea lights creates a flickering glow and warmth to a summer night. Hang them in the trees surrounding a patio, off fences, or underneath arbors. These lanterns made from tin cans have been all the rage this summer. Check out this DIY from Fine Gardening Magazine.


recycled can lanterns

Welcome guests to the garden with paper bag lanterns along a dark pathway or up the front steps. Fill brown paper lunch bags with sand and set a glass votive inside. Fold the top of the bag down to create a wider opening at the top. I love these from House to Home.


paper bag lanterns
paper bag lanterns

Citronella CAN-dles pull double duty by creating ambiance for guests while warding off pests. Set cans around the perimeter of the entertaining area and enjoy a mosquito-free evening.


Keep mosquitoes from spoiling the party with upcycled citronella candles

Learn how to make this amazing wine bottle torch lamp over at Design*Sponge for a modern take on the tiki torch.


tiki torch
tiki torch DIY Project

Make a Candle Planter


This simple but stunning candle planter takes a few minutes to make and makes for a festive table centerpiece. check out the tips on how to put this together easily here:


This easy candle planter is made with two pots plus some annuals and a candle

Using Solar Power


Christmas lights aren’t just for December. Line fences or under eaves with warm white solar-powered string lights, wind them around trees, or drape them over an eating area. There are so many options as shown from Fresh Home.


outdoor string lights

Solar-powered fence caps light up the perimeters of the garden, giving a wider sense of space to the garden area at night.


Or create a set of Mason jar solar lights to add a vintage flare to your garden space.


Make Mason Jar Solar Lanterns from vintage mason jars and solar lights - this has full step-by-step instructions

Once you make Mason jar lights, you can dress them up! These seaside solar lights are full of beach glass and shells that reflect the light, making them bright and beachy!


These DIY Beach Mason Jar Solar Lights really cast a glow reflected off the beach glass

Indoor Lighting Outdoors


Craft an outdoor lamp from a hanging pendant and a tree branch.


DIY Branch Outdoor Lamp Project
DIY Branch Outdoor Lamp Project via Garden Therapy #garden #lighting

And finally, these terrarium night lights can be made for indoors or out, although I prefer to keep mine on my bedside table. It offers a warm glow and mystical feel. See how to make one here:


Use a waterproof LED light to make a night light terrarium

Creative Outdoor Lighting Ideas

Original article and pictures take gardentherapy.ca site

Friday, January 20, 2017

Our Summer Potting Sink

Our Summer Potting Sink

Can I just tell you how much I love our vintage potting sink? I dress her up for the seasons and special holidays and, as I come down the garden path and she comes into view, I smile every time. You see, my sink is a girl !

Three cute gingham and applique half-aprons found at yard sales create the sink skirting which conceals a five-gallon bucket and recirculating pump housed there. Since we are having quite a heat wave, I moved heat-tolerant succulents from other spots in the garden to be this month’s stars. She's fresh as a daisy in her gingham and ready for the summer days ahead.

http://ourfairfieldhomeandgarden.com/our-summer-potting-sink/

Like us on FaceBook at www.facebook.com/OurFairfieldHomeAndGarden


  • our summer potting sink, flowers, gardening, outdoor living, succulents, Succulent in a vintage colander
    Succulent in a vintage colander

  • our summer potting sink, flowers, gardening, outdoor living, succulents, aprons skirt the sink
    aprons skirt the sink

  • our summer potting sink, flowers, gardening, outdoor living, succulents, Birdhouse in a wire basket
    Birdhouse in a wire basket

  • our summer potting sink, flowers, gardening, outdoor living, succulents, water trickles from the faucet enticing nearby birds
    water trickles from the faucet, enticing nearby birds

  • our summer potting sink, flowers, gardening, outdoor living, succulents, Our Summer Potting Sink

To see more: http://ourfairfieldhomeandgarden.com/our-summer-potting-sink/


Suggested Project Book


s 30 essential hacks for cleaning around your home

Original article and pictures take cdn.hometalk.com site

Thursday, January 19, 2017

Ornamental Gourds

Ornamental Gourds

Something I’ve been planning on growing for many years is ornamental gourds. For some reason they fascinate me. They have such a wonderful shape and when dried can be used for many creative projects. I especially like the Lagenaria or hard skinned gourds.


Something I’ve been planning on growing for many years is ornamental gourds. For some reason they fascinate me.
When to Harvest Gourds

Easy to plant and easy to grow, gourds are similar to pumpkins. Your gourds will grow green on the vine and turn to tan or brown as they dry out. An added bonus is the large beautiful pure white flowers that bloom at night. When you notice that the stems have dried out and turned brown it is time to harvest your gourds. This will most likely be late summer or early fall. They must be harvested before a frost or they will simply rot.


Ornamental Gourds with Sensible Gardening
How to Dry Gourds

Drying gourds is a lengthy process as they take a long time to cure and dry. Once the outside has dried it can take up to six months for the insides to dry. After harvesting wash your gourds with soap and water and air dry. Rub each gourd with a bit of rubbing alcohol. Place them in a well ventilated area away from direct sunlight for about 1 week. The outer skin will harden and change color. Move to a dark well aired area and place a single layer on a screen or hang. Do not allow the gourds to touch each other as this will promote rot. Leave drying for about 6 months. Check your dry gourds regularly and throw away any that are decaying as they will only infect the others. Turn every couple of weeks so all sides are aired. Should you notice a bit of mold on the outer skin try wiping it away with a soft cloth dipped in bleach.


Ornamental Gourds with Sensible Gardening

Crafting with Gourds


When totally dry your dried gourds will be hard and seeds will shake inside. They are now ready for you to use and become decorative gourds. If there is a bit of peeling on the skin you can use a bit of light sandpaper to polish it off. You can carve them for ornaments or birdhouses and feeders. Try hand painting gourds, waxing or shellacking. It’s all up to you so be creative. I enjoy water color and acrylic painting and plan to decorate my gourds that way. Visit Turning Gourds into Art for a tutorial on how to paint gourds. A few will also be turned into bird feeders for the winter months next year. You will most likely have more than you can use so create home spun gifts with the rest.


Ornamental Gourds with Sensible Gardening

Ornamental Gourds with Sensible Gardening
Share on Pinterest

Something I’ve been planning on growing for many years is ornamental gourds. For some reason they fascinate me.

(Some photos are from Pixabay / JamesDeMers / StillWorksimagery / Jazzyfresh / Steinchen)


Tagged decorative gourds, dried gourds, dry gourds, drying gourds, hand painted gourds, ornamental gourds


Original article and pictures take sensiblegardening.com site

Monday, January 16, 2017

Organize Seed Packets in a Photo Album

Organize Seed Packets in a Photo Album

Organize Seed Packets in a Photo Album


The clear plastic pockets inside a photo album are great for organizing seeds into. Providing that the packets aren’t too thick, you can slide them in and out easily and the clear plastic makes them easy to browse. If you have a lot of seeds, you could even have seed albums for salad crops, herbs, roots, brassicas, etc.


This tutorial shows how to recover an old photo album in fabric so that it’s a just a little bit prettier. You could of course omit this step though and just store your seeds in a ready-made album.


Use an old photo album to create a clever seed packet organizer! Cover the album in fabric for a finishing touch #crafts

The Fabric


To start the project I purchased a ‘Fat Quarter’ of fabric, which turned out to be far more than I needed. To fix the fabric to the album covers I used ordinary spray mount though I’m sure any glue that’s suitable for both cloth and paper will do. In all, the project took about half an hour and I’m pretty excited with how the new seed book looks.


I think that an ordinary album might be trickier to use for this project because seed packets are thick when stacked one on top the other. Using a spiral bound album is far more practical when creating a seed album since it can help create space.


Spiral Binding


The trickiest part of the project for me was deciding how to approach covering the line of holes along the spine. In the end I decided to forget trying to cover them at all since it seemed like a mission and the chances of the fabric fraying around the holes is pretty high.


My solution was to turn the front and back sides of the album covers inside out so that the Cheetah design faced inwards and the visible part of the spine was black. Running the fabric right up to the holes but not covering them worked well and I was relieved to skip the ordeal of cutting out and pinning back fabric for every single hole. Though of course, carry on if you’d prefer to do so.


Step 2: Cut two pieces of fabric – one for each of the covers. Leave an extra 2-4cm of margin for the top, bottom and one of the sides. I only used 2cm in this project since I’m trying to save as much of the remaining fabric for another idea but I’d recommend a little bit more to make things easier. You’ll also notice that the edges of the fabric below are zigzag.


This is because I cut the fabric with pinking shears which can help minimise fraying at the edges. Though to be honest I don’t think it’s a big deal if you cut the fabric this way or just with ordinary scissors.


Use an old photo album to create a clever seed packet organizer! Cover the album in fabric for a finishing touch #crafts

Original article and pictures take lovelygreens.com site

OOPS! Your offer could not be found...

OOPS! Your offer could not be found...

Copyright © CJ ®, Inc. All rights reserved. Privacy Policy | Terms of Use | Contact Us


Original article and pictures take www.shopstyle.com site

Thursday, January 12, 2017

One-on-one Class

One-on-one Class


Original article and pictures take blog.hairandmakeupbysteph.com site