Decorative garden balls are an inexpensive alternative to the classic gazing ball. Plus, it’s a great way to recycle some old household items and turn them into garden art.
This tutorial shares the materials needed and a step-by-step guide to making your own basic decorative garden art ball.
Decorative garden balls (also called 'garden spheres' or 'glass garden globes') are an inexpensive alternative to the classic gazing ball. Plus, it's a great way to recycle some old household items and turn them into garden art.
I may receive a commission if you purchase something mentioned in a link on this post for sites including Amazon.com. Other links may go to websites where I have been paid to write a blog or article. See the entire disclosure here.
Quick Index – Decorative Garden Ball Tutorial
Basic Design and Material Ideas
Using a bowling ball or thick glass lamp globe (that’s what I use), some decorations, and adhesive (see the one I recommend here), you can make a glass garden sphere for approximately $5-20. I’ve provided free instructions below.
Along with flat marbles (glass gems), additional design options include pennies, old costume jewelry, and/or paint, or decoupage with Mod Podge. Really, you can cover the base sphere in just about anything with a flat side that adheres nicely and can withstand the weather.
I often get asked about grout after the basic ball is completed. No, you cannot grout the balls with this method. If you want to cover up the areas between the marbles (as shown in the photo below), use mini bits, which are listed in the Garden Art Balls Materials section (below).
Garden Art DIY: Make your own decorative garden balls
Here are ideas for the base, decorative materials, and adhesive:
Round Base
. I look for old lamp globes (from ceiling fixtures) at the thrift store that have strong, thick glass. I have lamp globes in my garden all year-round here in Canada and I am yet to have one break. The old ones are tough!
Lamp globe
or
Bowling ball. Be sure to sand off the glossy surface before you start for better adhesion.
Some people also use old sports balls such as a soccer or football ball but I have not tried this myself.
This may be the only decorative item you need. If you want to make a complex design, consider the following items as well.
Mini-bits (embellishment glass, 2-4 mm)
Vase gems
Filler confetti…
These fillers (for the gaps between the flat-marbles) are sold under various names. It really helps to see them in-person or read the size descriptions carefully online. You want to be sure they are the size, colours, and textures you want for your project.
I have found them in craft store, florist shops, and dollar stores. Most often they are in the floral department.
More Ideas for Decorative Materials
Coins, round glass or mosaic pieces, flat stones or decorative accent glass, beads, necklaces, aquarium gravel…. Quantity will depend on the size of your ball or globe. Leftovers can always be used for other projects.
Adhesive
Outdoorsilicone sealant/adhesive. I use clear (not white or any other colour) GE Silicone II and it must be waterproof and made for outdoor use. GE Silicone II sealant is sold as a sealant but works as an adhesive when you apply it fairly thickly, allowing it to grab the flat marbles as it sets. Do not substitute with other sealant products – GE Silicone II is the only one I’ve tested that works. Check the ‘USE BY’ date on the tube to make sure you’re getting fresh product.
Caulking gun (if you’re using a tube cartridge). Don’t worry: they’re inexpensive and they’re not guns. They simply dispense the silicone sealant. Phew.
Adhesive Notes
GE Silicone II works very nicely as an adhesive for outdoor garden art projects because it is permanent.
This means you cannot remove it once it has dried.
This is why I recommend you plan your project design in advance, make sure you have enough materials, and work in small sections, applying just enough adhesive to secure a handful of flat-marbles before continuing with the next section.
If you have to stop in the middle of your project, use up any adhesive you have already applied first. You cannot add more adhesive on top of dried adhesive. It will not stick.
Plan your design ahead and be sure you have the right amount of materials. Garden Art DIY: Make your own decorative garden balls
Read all the steps before you start. This tutorial a basic ball with flat-marbles. Using fillers or ‘mini bits’ is a more advanced method that requires a lot of time and patience, applying each tiny bit, one at a time, while the adhesive is still wet. If you are keen to try this, be sure you read and obey the adhesive product warnings regarding ventilation and skin contact.
Caution:
You must read and obey the warnings on the adhesive product label.
The adhesive works so well because it forms a permanent bond. This also means, you only have a limited amount of time to add your decorative materials before it dries. Once it is dry, it is never coming off and there is not anything that will remove it. This is why I advise you to plan your project ahead, and work in small sections.
STEP 1 – Assemble Your Materials
Assemble your materials including glass lamp globe or bowling ball, flat marbles, floral fillers, and GE Silicone II. Read the product label to understand health and safety considerations, clean up, and drying times.
Garden Art DIY: Make your own decorative garden balls
Start with clean, dry glass lamp globe (the old kind with thick glass) or a bowling ball.
For best adhesion, rough up the surface of the bowling ball with sandpaper.
You can also apply spray paint if you want a specific base colour. If the spray paint creates a really smooth surface, rough it up (gently) with fine-grit sandpaper.
You must be certain the surface you apply the adhesive to has some ‘grab’ and is grease-free or the adhesive and marbles may not stick.
Make sure you are using the correct adhesive. Other sealants I’ve tested do not work the same way.
Plan your design first, work in small sections, and be sure you have enough materials to complete the design.
Use a strong bowl to hold the glass globe or bowling ball in place while you’re applying the silicone sealant.
Work in small sections. You want the sealant at least 1/4″ thick. Again, read the label on the silicone sealant and follow the safety guidelines. It will also tell you how long the adhesive will take to dry.
If you want to add decorative fillers, this must be done while the adhesive is still wet. Once the silicone sealant dries, it cannot be removed and will not stick to anything.
Press each marble snugly into the silicone and let the silicone ooze out around it. This will hold the marbles in place as the silicone dries. Do not get the adhesive on your skin.
If your marbles are not sticking, stop what you are doing. This probably means the surface is not clean enough or has some sort of greasy residue that the adhesive cannot stick to. Or, the adhesive may be old and faulty. Either way, remove all adhesive immediately with a rag, before it dries, and see this page for troubleshooting the problem.
If you work from the bottom up, each new row of marbles rests on the row below and they won’t shift around while you are waiting for the adhesive to dry.
If you’ve applied at least a 1/4″ of silicone, and let the marbles touch each other, they should stay firmly in place.
Need a Break? If you do not want to complete the entire project in one sitting, just make sure you have applied marbles to any section with adhesive before taking a break. Again, you cannot make the adhesive sticky again once it has dried. There are no second chances with this stuff. But it’s worth it because it works so well.
When you have finished adding all the marbles, allow everything to dry. See the product label for the required drying time.
When the silicone has dried, your globe is ready to be displayed outdoors.
Have a look at your local thrift shop. I often see weird nameless things that would make great stands.
Metal plant stands
Solar lamp stands
Vases
Lamp bases
Bird bath or flower pot, or on the ground.
I used an old glass lamp as the base for this garden art ball (above) and solar lamp stands for the ones below.
Garden Art DIY: Make your own decorative garden balls
WANT MORE?
Popular garden art projects (with complete instructions) from this site are available in my eBook:
Empress of Dirt Garden Art & Ideas
Thrifty ways to use household stuff to create a wonderful garden.
Empress of Dirt Garden Art & Ideas Thrifty ways to use household stuff to create a wonderful garden.
$3.99 US
I hope you’ll make something wonderful.
~Melissa the Empress of Dirt ♛
Empress of Dirt TV
Original article and pictures take empressofdirt.net site
I love concrete in the garden. It’s such an organic material that blends well with nature, yet it holds up over time, and only improves it’s looks with age. It’s inexpensive, and can be bought in ready made forms, or created by mixing with water and other organic elements. Grow a little moss on it, and you will have me swooning… So given a choice, if I can’t have a natural element such as stone or wood…give me concrete! Here are our fav DIY concrete garden projects gathered from around the web. Our featured project, above – Give you garden structure with this DIY concrete edging project.
Upcycled Garden Style created these outdoor planters from concrete pavers and caulking adhesive. These are so simple, they’re brilliant! Can’t wait to try this out! Remember to check out the caulking you use and make sure its warm enough outside for it to harden and cure.
Martha tells us how to use the age old technique of hypertufa to create cool planters that make great garden accents.
The Hunted Interior has a great tutorial on how she made this cinder block planter… hers also happened to be an outdoor bar as well! You gotta check out this project…
I’m always up for a challenge. So when my friend, Bev posted on Facebook about a DIY bee skep and then challenged us to make one – well, you know the rest…..
But first…..what is a bee skep other than a cute looking basket thingy which I frequently see in upscale gardening stores? Well, according to Wikepedia…….”Skeps, which are baskets placed open-end-down, have been used for about 2000 years. Initially they were made from wicker plastered with mud and dung but from the Middle Ages they were made of straw. In northern and western Europe, skeps were made of coils of grass or straw. In its simplest form, there is a single entrance at the bottom of the skep. Again, there is no internal structure provided for the bees and the colony must produce its own honeycomb, which is attached to the inside of the skip. “ In other words, they are the predecessors of the modern day beehives we see everywhere.
All I knew is that I have wanted one for a while to add to my garden decor and a challenge to make my own DIY bee skip was not to be ignored.
DIY BEE SKEP HOW-TO
You’ll need the following:
2 x 50′ spool of 1/4″ sisal rope and some twine
tomato cage (I actually used two for better support) – cut off the largest ring or two and about 6″ of the prongs that go into the ground
Glue gun, LOTS of glue sticks, scissors.
DIY Bee Skep – Step One
Cut a piece of twine about 3′ long and start to wrap it around the rope (as shown above). You’ll wrap all the rope eventually. But cutting it into shorter lengths made it more manageable.
DIY Bee Skep – Step Two
Start by gluing the rope around the base ring of the tomato cage. Continue wrapping and gluing the rope for about 5 rows. You’ll need to glue along the entire length of the rope to secure it. When you get to a support post, wrap the twine in and behind the post. This gives it an anchor as you build the skip.
DIY Bee Skep – Step Three
When you finish wrapping about 5 rows (I think I actually did 7), you’ll want to make the opening for the bees to enter. Do this by stopping the wrap at one of the posts and doubling back. This is where having two cages came in handy because it allowed for another support post a few inches away from the first one. Continue wrapping and returning direction for about 3 rows.
DIY Bee Skep – Step Four
In order to get the rounded top, you’ll need to bend down the upright posts. Use this to determine the dome shape. As you can see from mine, it’s not exactly round and more pointy. This is because I didn’t bend the posts down far enough and it created a more oval effect.
Finish it off by cutting off the rope and circling it onto the top.
My next job was to find a home in the garden. Did it look good sitting on the little chair amongst the peonies and day lilies?
Or perhaps it’s better on the bench sitting on the deck at the back of the garden along with my birdhouse collection.
No, I think I like it here in the shade garden amongst the host and hydrangeas.
It’s not perfectly round and there are some gaps and too much glue. But I’m happy with not spending over $100 and having a bee skep in my garden. Are you up for the challenge of making your own? Give yourself 3 or 4 hours to complete this.
Original article and pictures take www.newhousenewhomenewlife.com site
DIY ~ Terrariums for Gift Giving Click to pin it on Pinterest!
Some of my gardening buddies in The Garden Charmers and I just got together to show you a perfect do-it-yourself gift idea for this holiday season; terrariums. Know a gardening friend that gets the heebie-jeebies in winter? A miniature indoor garden to tend is the best antidote! Every skill level from the least experienced to master gardeners will enjoy this little touch of nature to hold them over until spring. Easy upkeep and requiring minimal space make these tiny gardens perfect for apartment dwellers. They can also be incorporated into any home or office decor. Best of all, a terrarium can be assembled in less than an hour! So check out this collection of terrariums and easy directions. And get growing!
Terrariums of all kinds are Shelley’s specialty at Sow & Dipity. Here’s a pretty one pictured below from her collection of fourteen! Notice how the addition of green plants and a pinecone or two make this extra special for holiday gift giving. Can’t you just see this with a perky red bow?
Terrariums by Shelley of Sow & Dipity ~ click to view the whole collection!
The basic supplies are quite simple as Amy, of A Healthy Life For Me, shows in her quick and easy tutorial for making a terrarium ornament. Wouldn’t this be lovely suspended in a window or on the Christmas tree?
Terrarium supplies ~ click for the tutorial! Terrarium Ornament ~ click to see the easy directions!
Stephanie, of Garden Therapy, has lots of ideas on her blog for “thinking outside the container” when creating a terrarium. Here’s one fun upcycle of a clear glass teapot. To see more, click on the picture below!
Teapot Terrarium ~ click to see more great container ideas!
Fairies make a lovely addition to terrariums and create the sense of a tiny, magical garden. This example is from Barb at Our Fairfield Home and Garden.
A fairy terrarium by Barb ~ click to see more of her terrariums!
Lynne, of Sensible Gardening & Living, explains the simple differences between open and closed terrarium construction in her wonderful article. Click on either of her terrariums pictured below to read more!
Terrarium By Lynne ~ click to see how she made it! Closed Terrarium by Lynne ~ click to see how it is made! Terrarium with a potted violet, moss, pinecones & a fairy accent ~ click to see more!
Not every terrarium is a planter. Above, an IKEA lantern is filled with just a potted African violet surrounded by moss and pine cones with a tiny fairy accent.
Succulents and small houseplants are perfect for an open terrarium. Get creative like Jacki, of Drought Smart Plants, and reuse a container you already have, like this fish tank! You will never miss the fish!
Jacki’s Fish Tank Terrarium ~ click to see how she made it! Original article and pictures take ourfairfieldhomeandgarden.com site
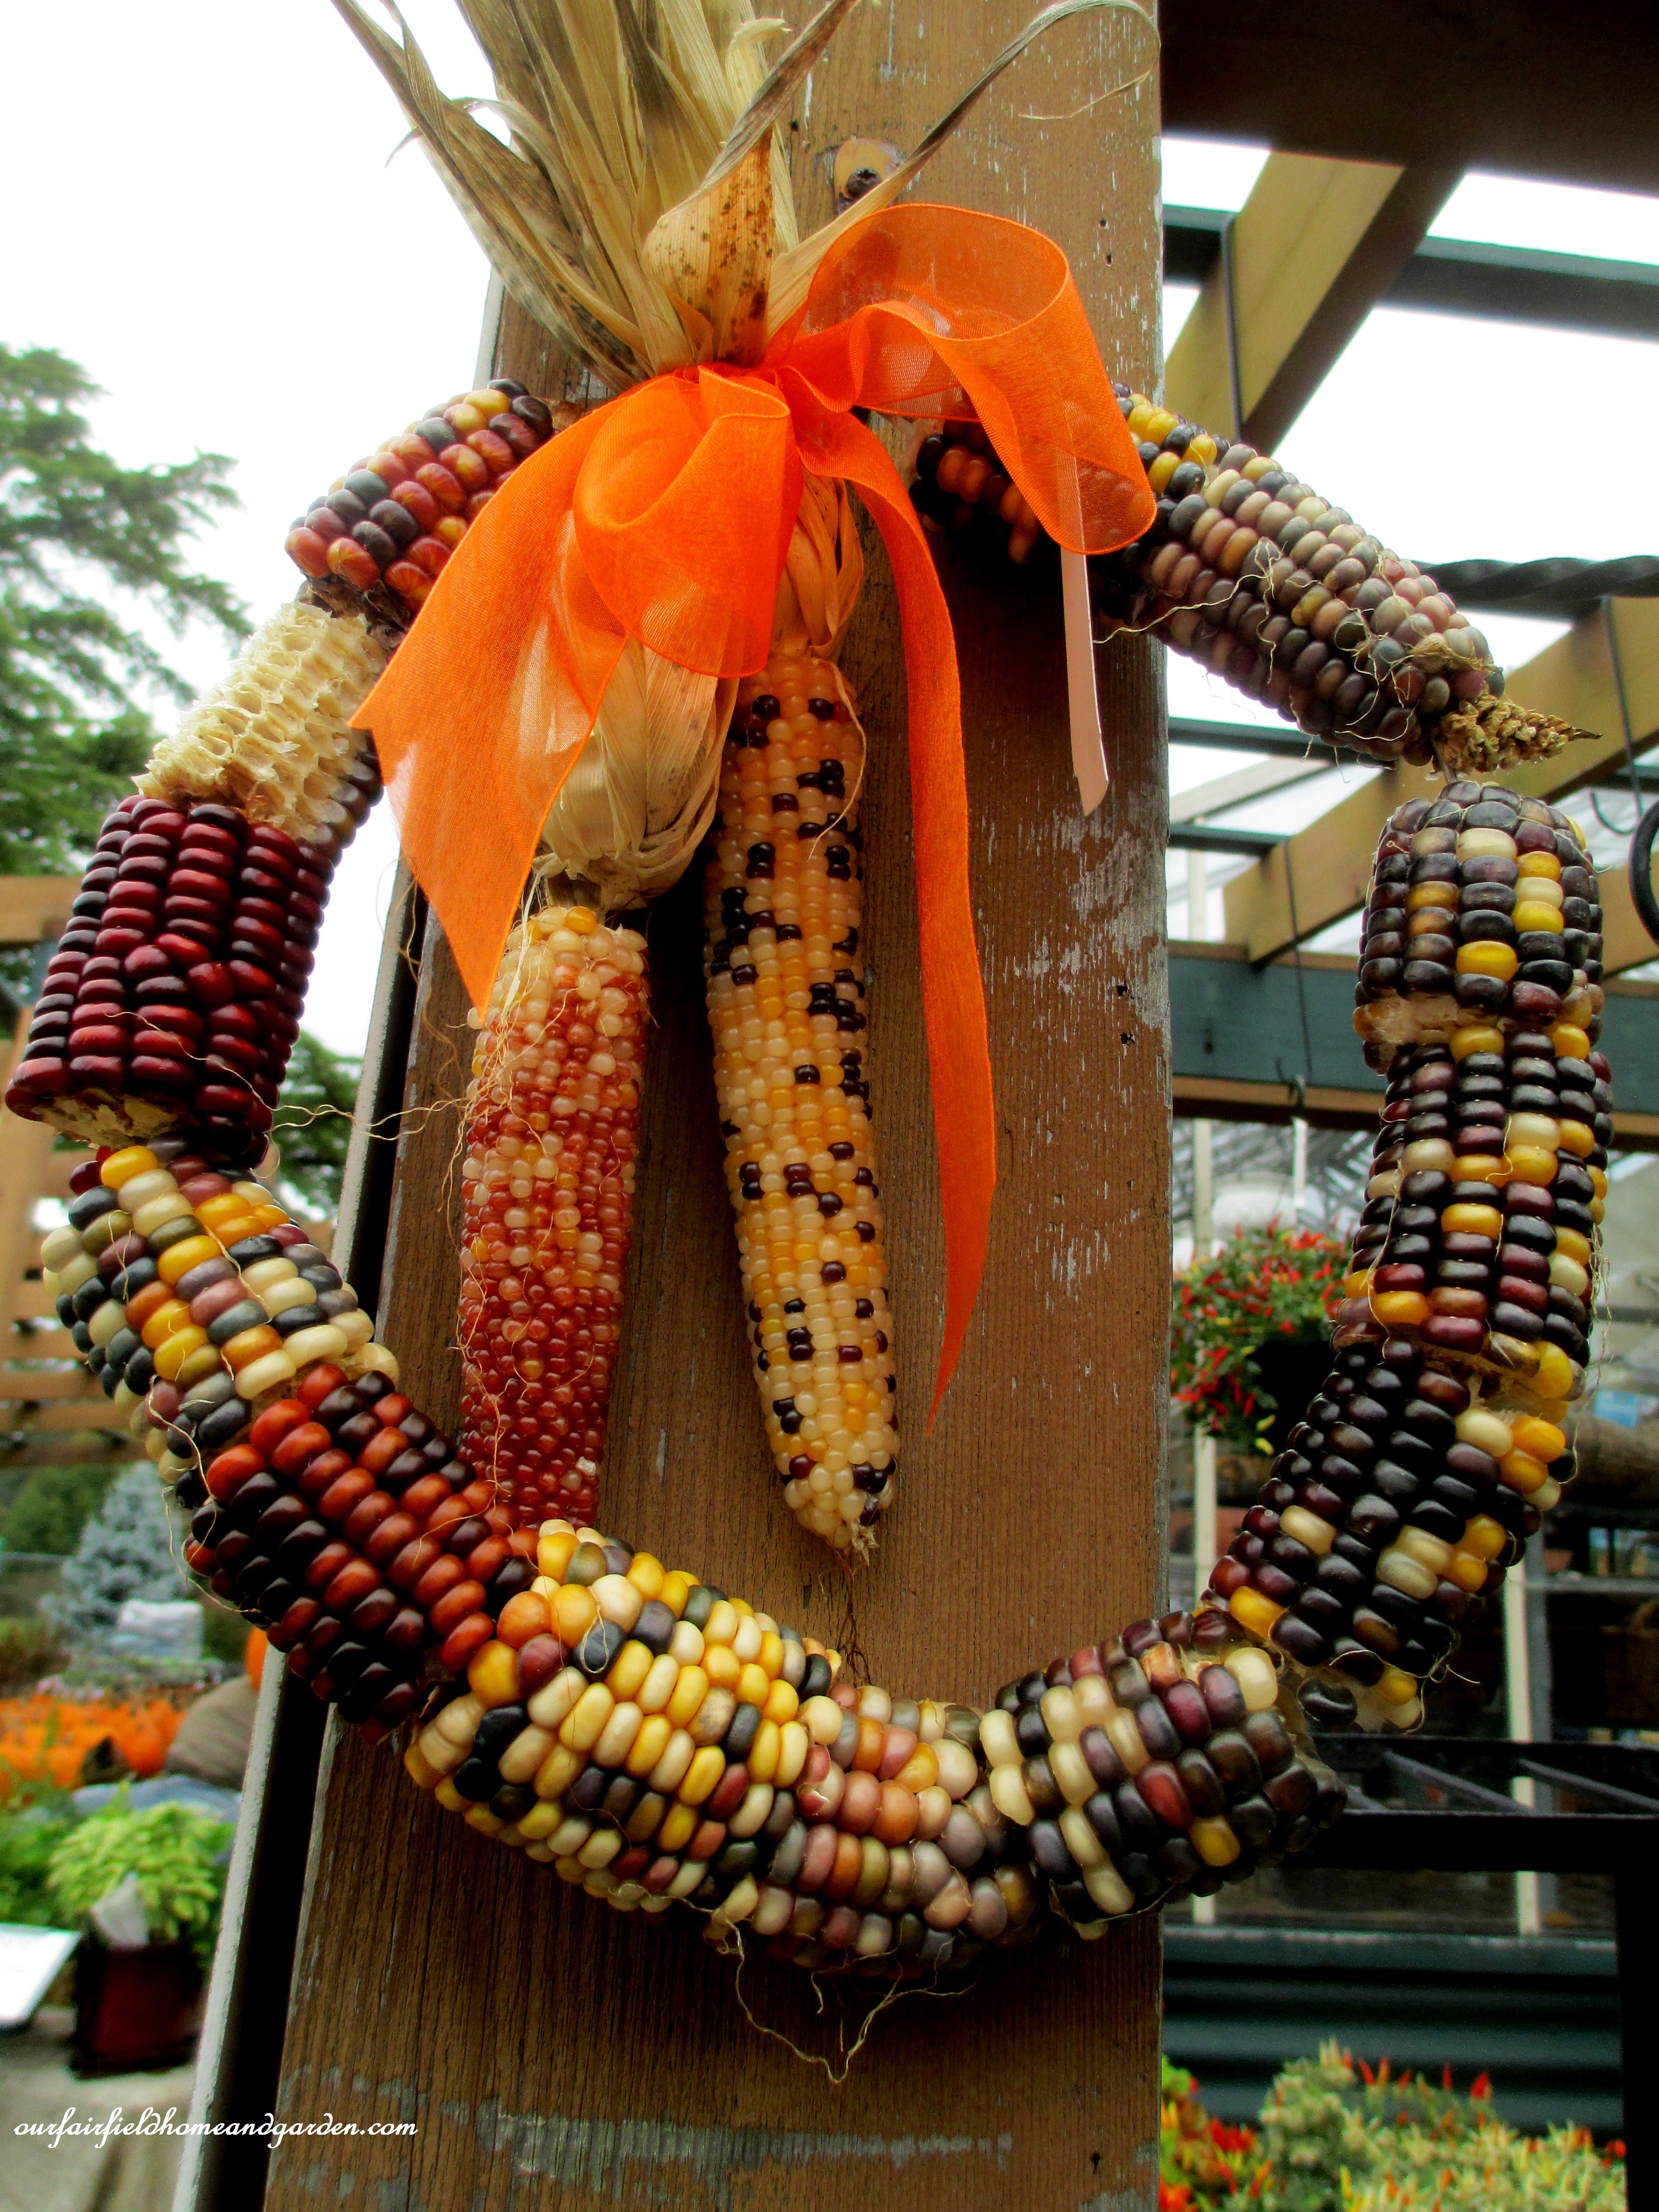
DIY ~ Fall Corn Cob Wreath Here’s the corn cob wreath I spotted in a garden center for $15 ! My version of the corn cob wreath made for just $4 !
While buying some winter pansies this week at a local nursery, I spotted a wonderful corn cob wreath. The price was too high at $15 for my wallet, so I decided to recreate it. Since I don’t grow corn, I had to purchase some, but it was only $4 for two bunches of Indian corn. I chose a larger bunch with five ears of corn in darker colors and a smaller bunch in lighter colors.
You will need the following materials: 5 large ears of Indian Corn, 2 ears of small Indian Corn, about 30 inches of wire or a straightened wire coat hanger, an electric drill and wired burlap ribbon.
I started by snapping each large ear into three pieces (a total of 15 pieces) and then drilled a hole through each one. Make sure the hole you drill is large enough for the wire. Do the drilling over a piece of wood, so when the bit breaks through the end it doesn’t damage your work table. Make a twist at one end of the wire before threading the corn pieces so they stay on. Once all the drilled pieces are threaded, twist the wire end pieces together to form a circle. Now attach the small corn pieces using some wired burlap ribbon (which I had on hand!).
Your wreath is ready for decorative seasonal use and will double as a pretty fall birdfeeder too!
After breaking the large Indian Corn into thirds, drill a hole through each piece and insert the wire. Twist the wire ends together to make a circle. Tie the smaller Indian Corn on with wired burlap ribbon. Corn Cob Wreath finished & ready to hang ! Original article and pictures take ourfairfieldhomeandgarden.com site
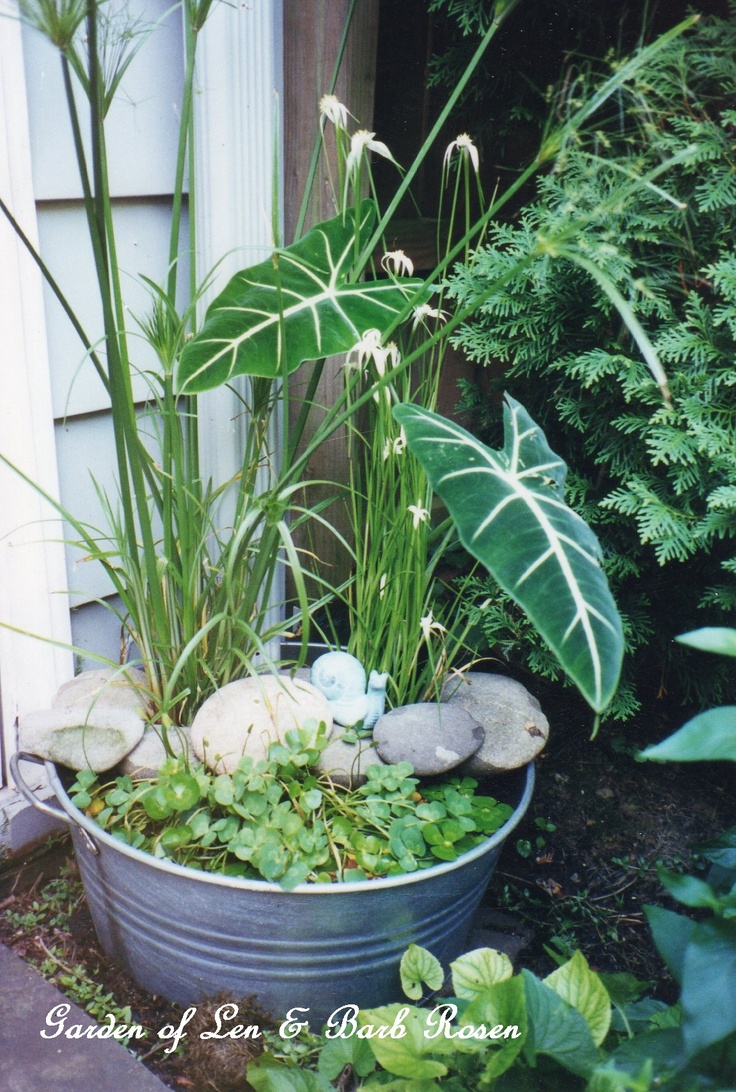
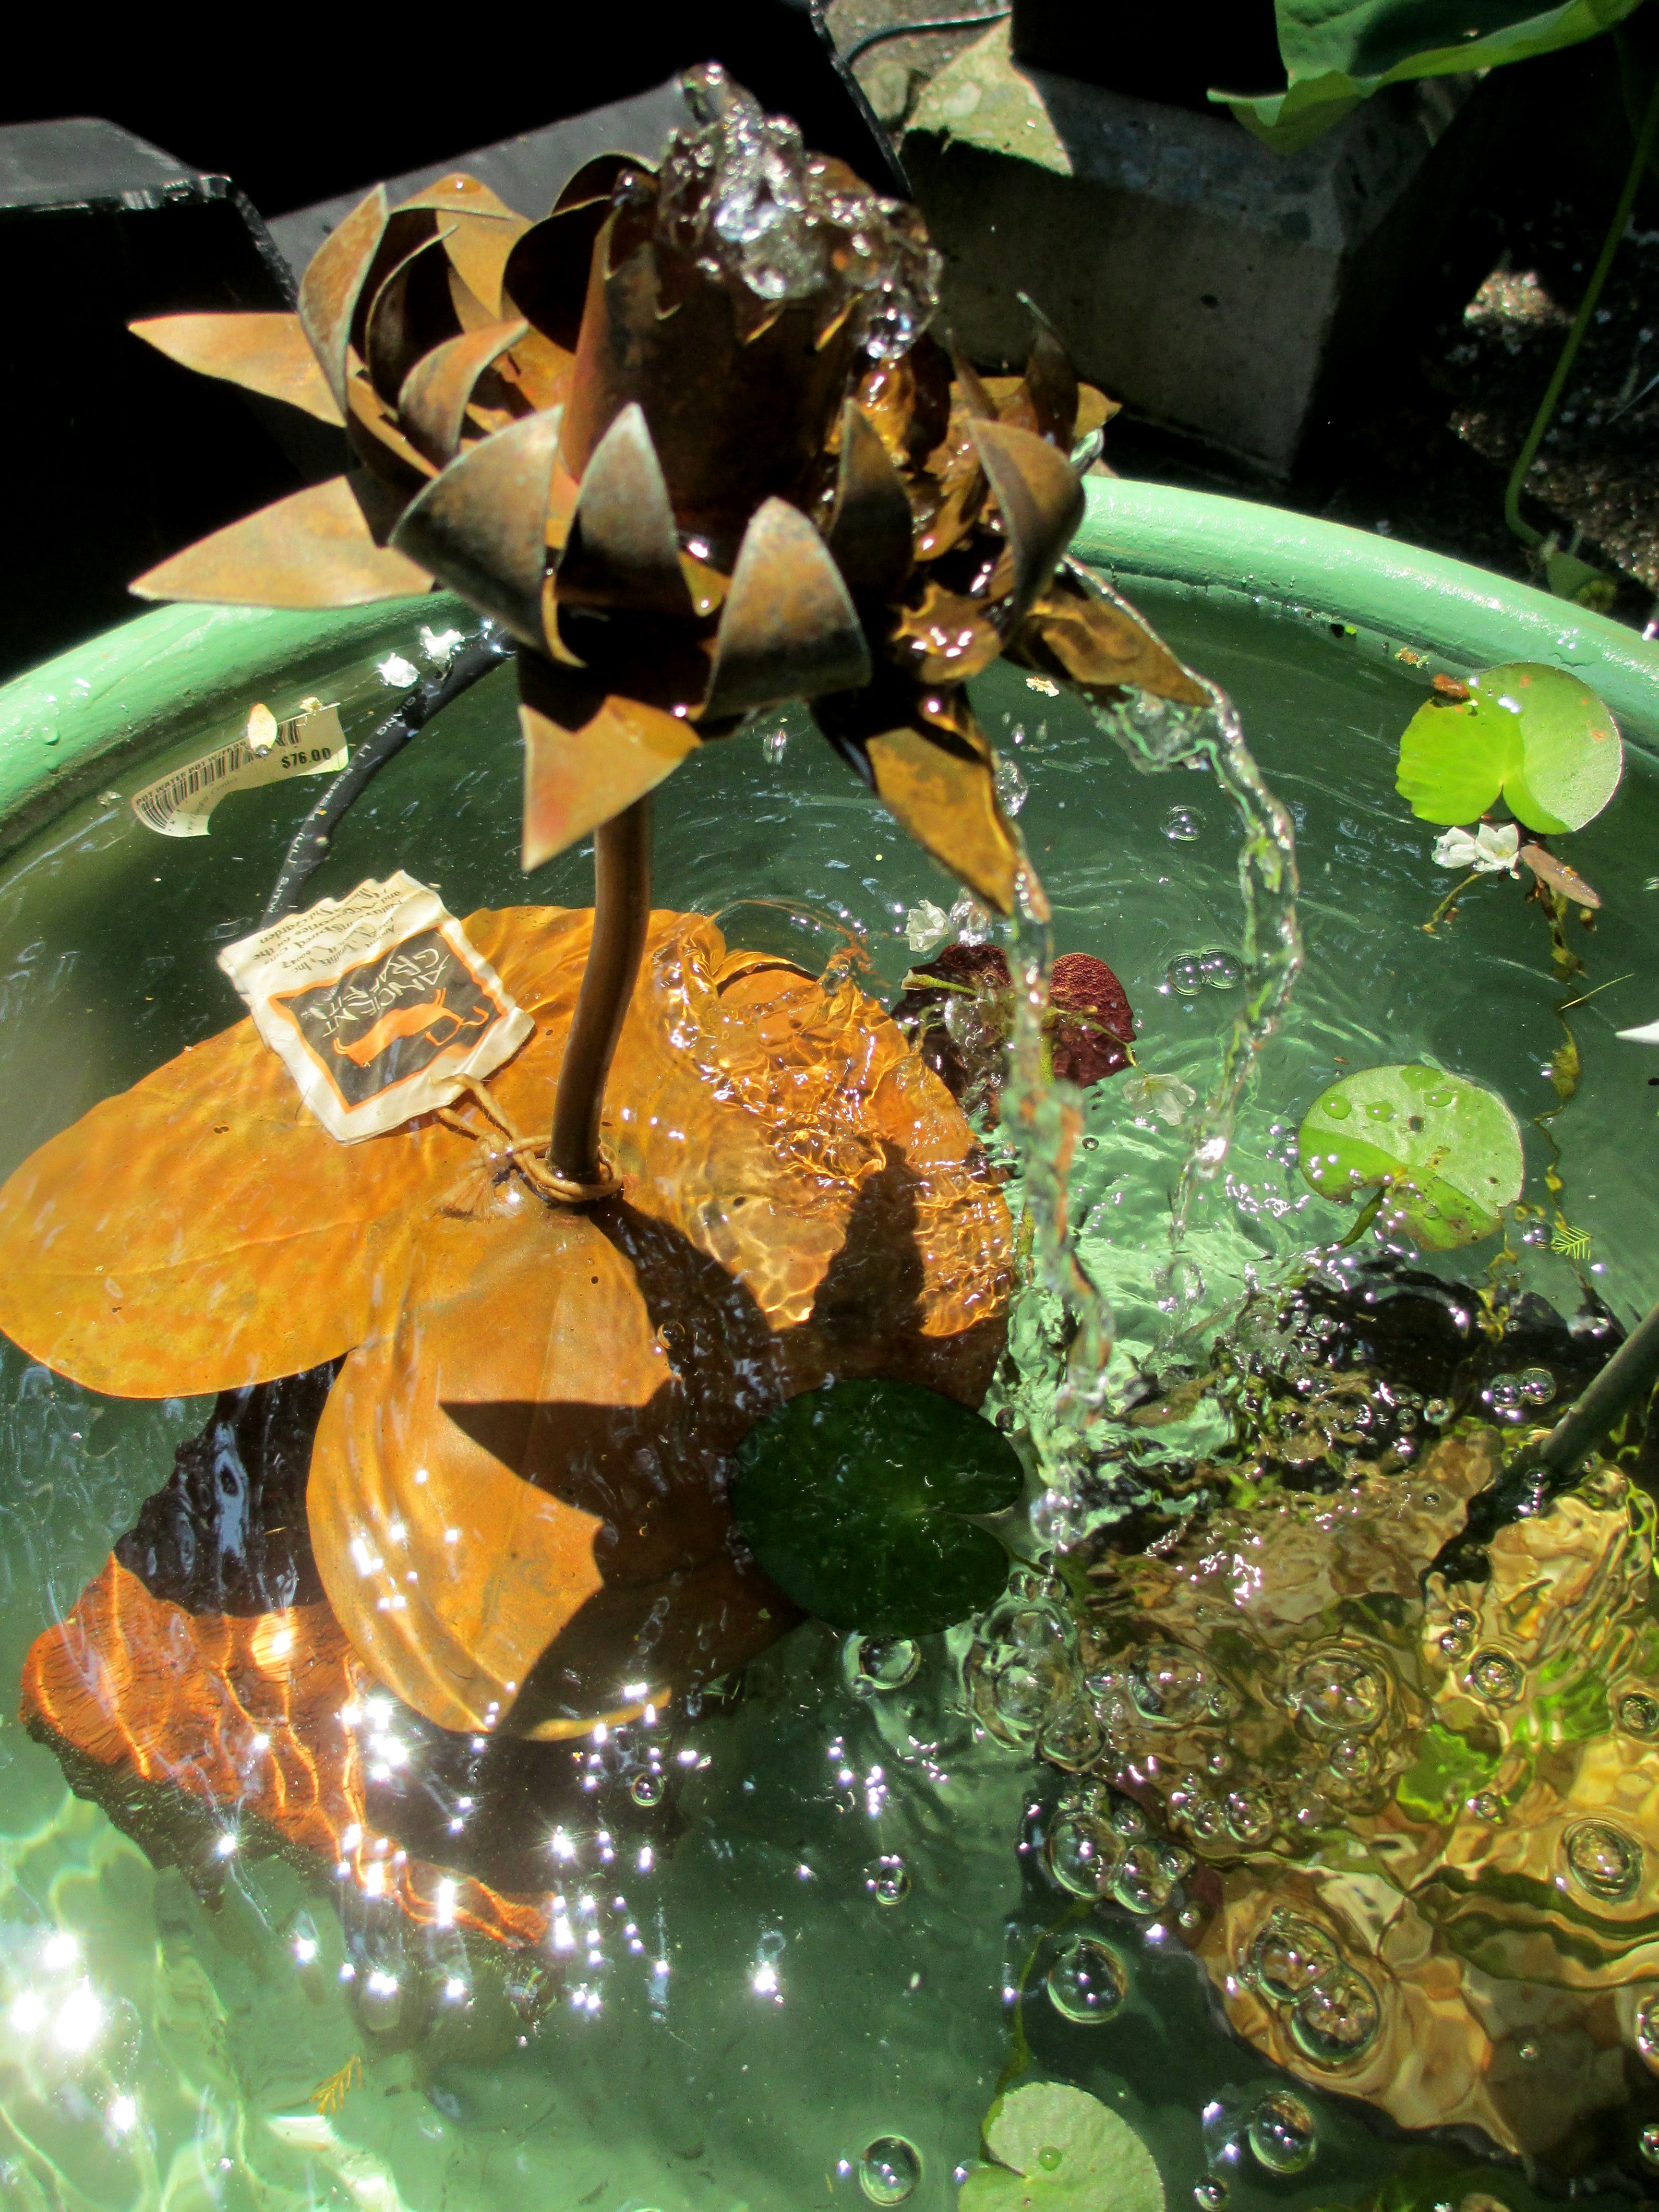
DIY ~ Create Your Own Water Garden In A Container! My galvanized water garden!
What better topic is there on a mid-90 degree day in July than water gardening ? Even though the thermometer was recording 97 degrees, under the pavilion at TheDCH, it seemed cooler because of the lovely sounds of trickling water. Peg and Tiffany of Gateway Garden Center in Hockessin, Delaware (http://www.gatewaygardens.com/) gave us a quick lunch time course on water gardening in containers, complete with a few samples of these self-contained gardens to see in person.
Peg explained that water gardening in a container was very easy to set up, versatile and could be anything from a small container with a fountain on a deck or patio to a large container in the garden. Moving water requires a pump and outdoor electrical outlet (with GFI protection), but a still water container can also be beautiful. Tiffany stressed there were few rules except to have an adequate size container for your plants and to choose plants according to the sun exposure they will receive.
To keep mosquitoes at bay, mosquito dunks can be dissolved in the water monthly to kill larva. The dunks are non- toxic to fish, pets and wildlife.
Marginal plants are potted in heavy soil topped with stones and placed in the containers as accents. Pots can be placed on a brick or paver to achieve the right height. Peg did caution against using concrete pavers as they will sometimes leach and change the water PH. Floater plants literally float on the surface and provide shade that decreases algae growth in sunnier settings. Fertilizer plugs may also be purchased and pushed down into the pots to encourage heavier blooming.
Water gardening 101 according to Peg & Tiffany
Pick Your Location
Sun for more flowers, but maybe more algae
Shade for less algae, but also less flowers
Consider how you will view your container
near an electrical outlet (with GFI protector) for fountains and moving water
Pick Your Container
Scale the pot to the site (the more open the site, the larger)
Dark colored containers appear deeper and discourage algae growth
Pot should be as deep as it is wide to discourage algae growth
whiskey half barrels with liners are almost perfect
Pots with holes can be “corked” and sealed with silicone
Horse troughs, galvanized tubs, bathtubs … anything that holds water will work. (keep under 2 feet deep)
Pick Your Sound
Silence is good!
Fountains and spouted ornaments bring motion as well as sound
Keep moving water close to the surface to avoid splashing
Shallow moving water attracts birds
Pick Your Plants
Floating plants provide shade to the water (recommended in sunny sites)
Examples of floating plants are : water hyacinths, water lettuce, dwarf water lilies, nymphoides, mosaic plants, water clover and more!
Taller plants, called marginal or bog plants, are used to create vertical accents
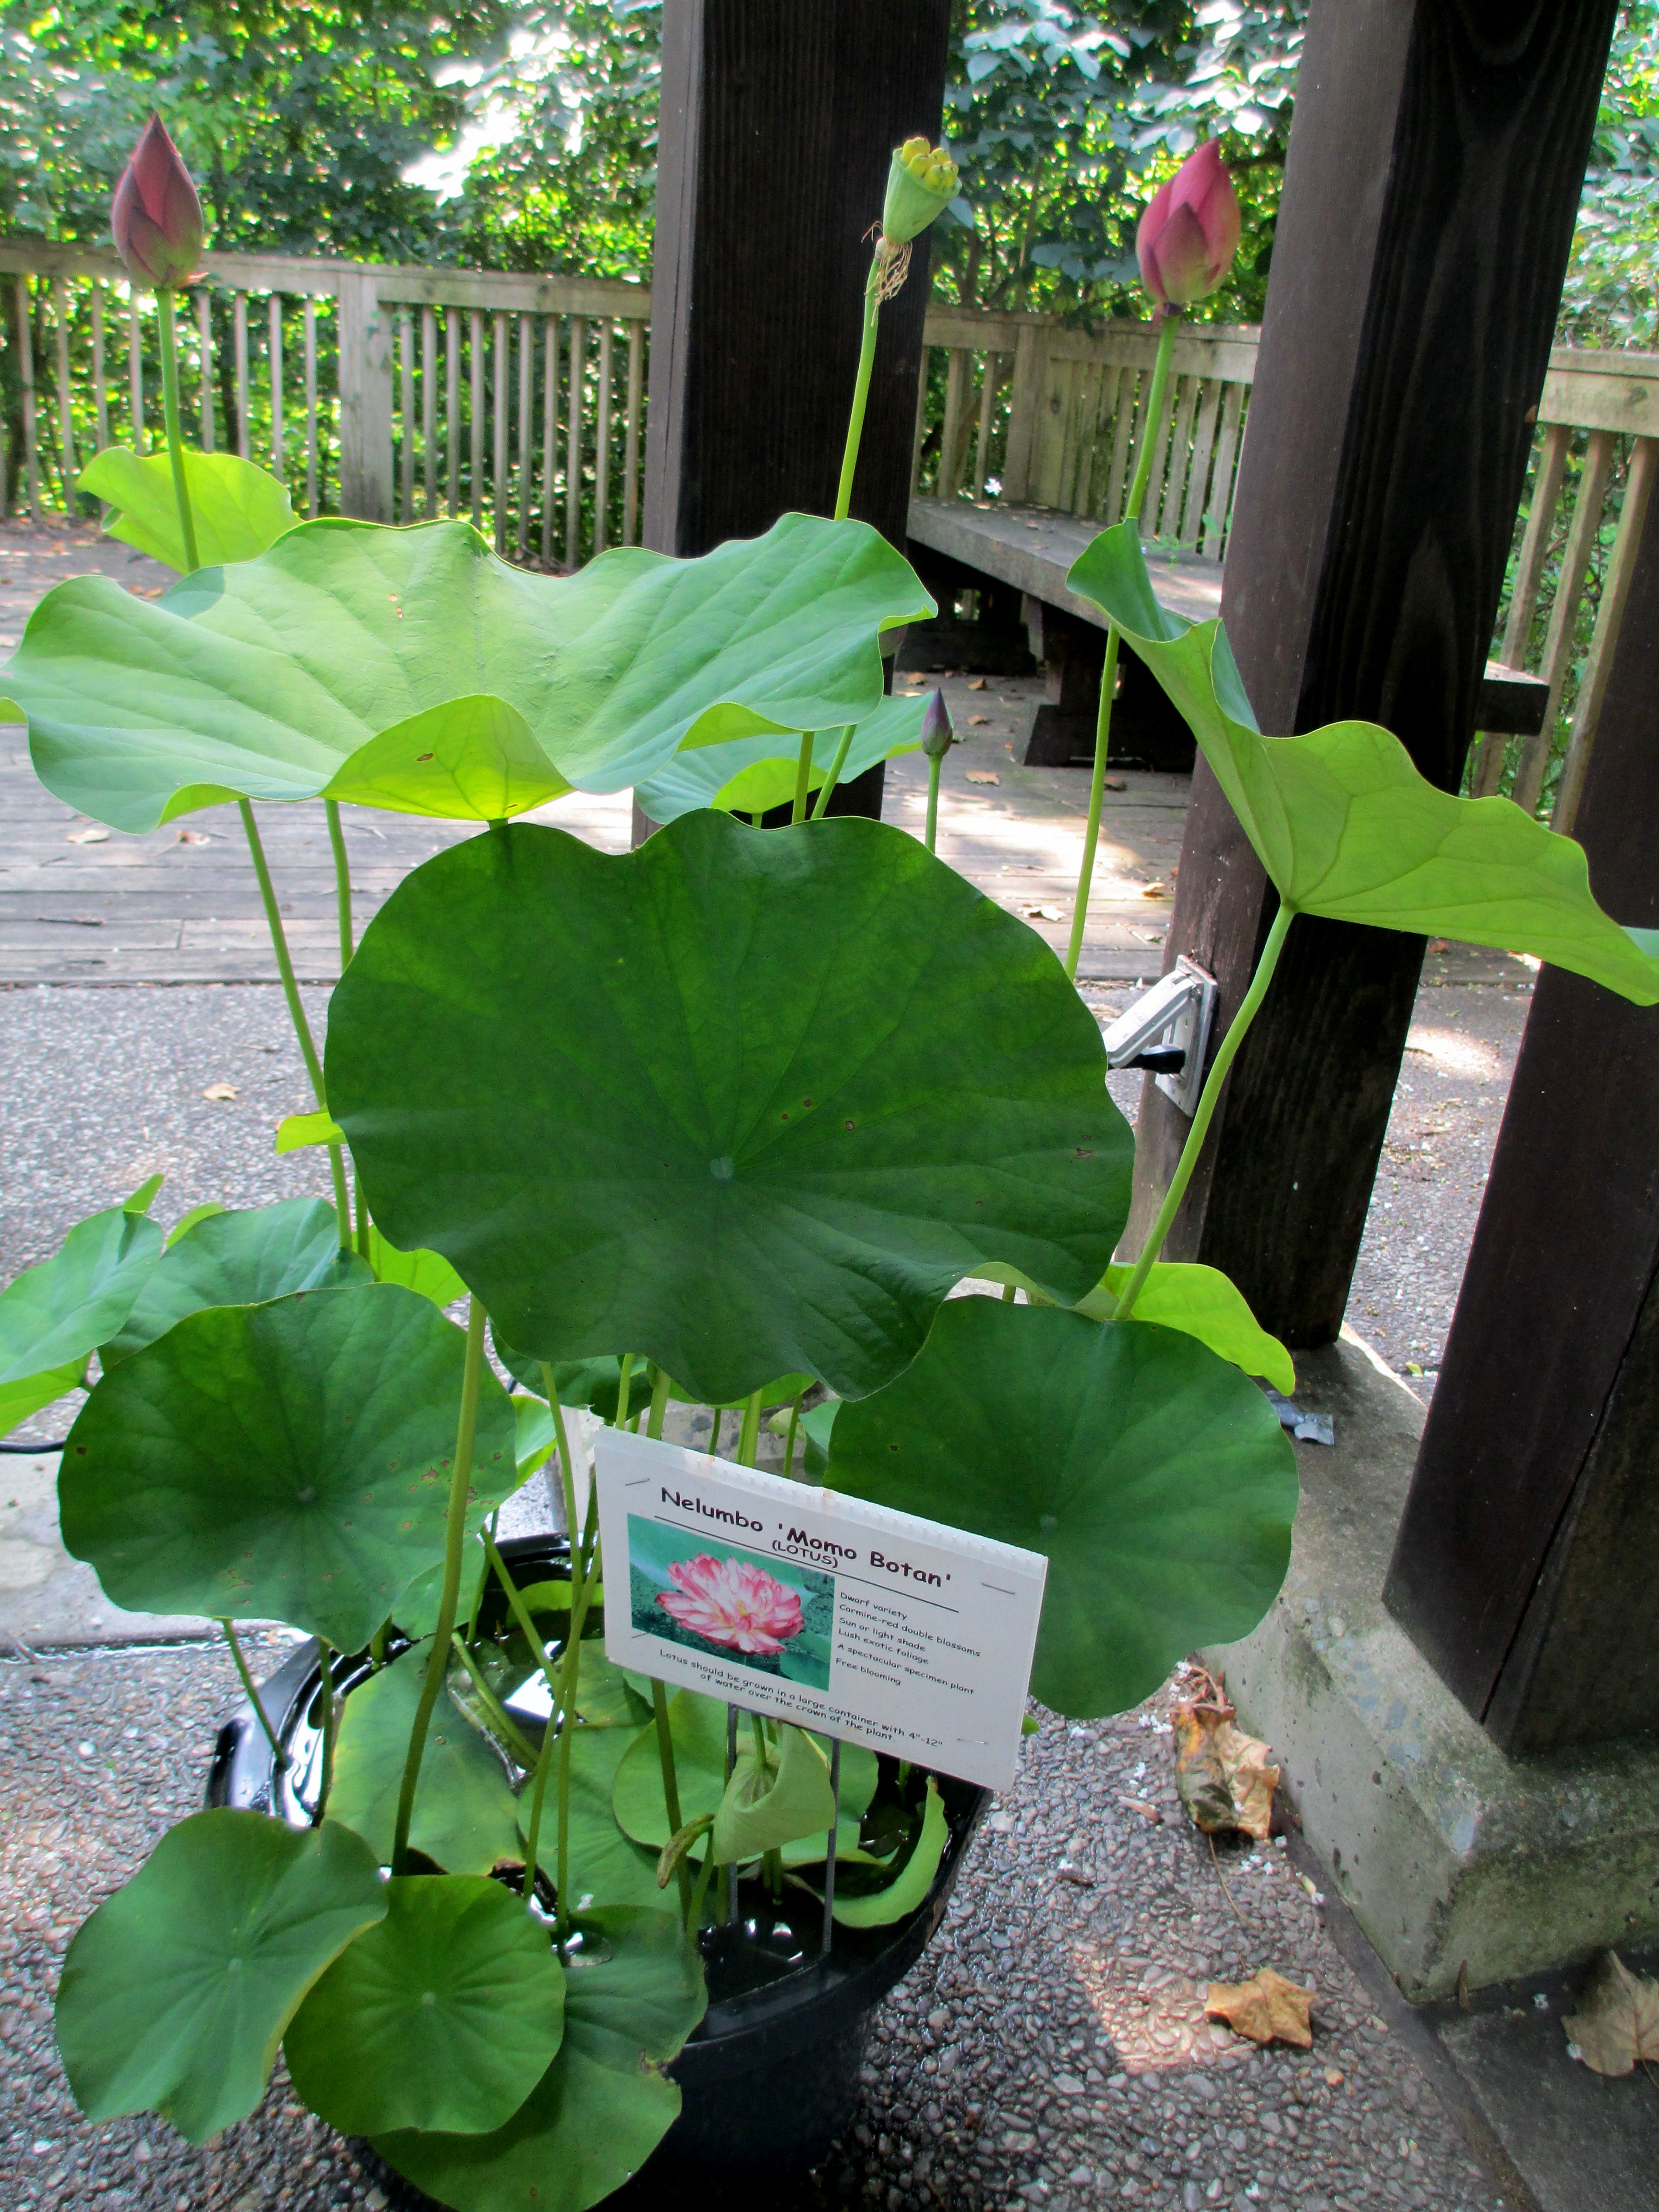
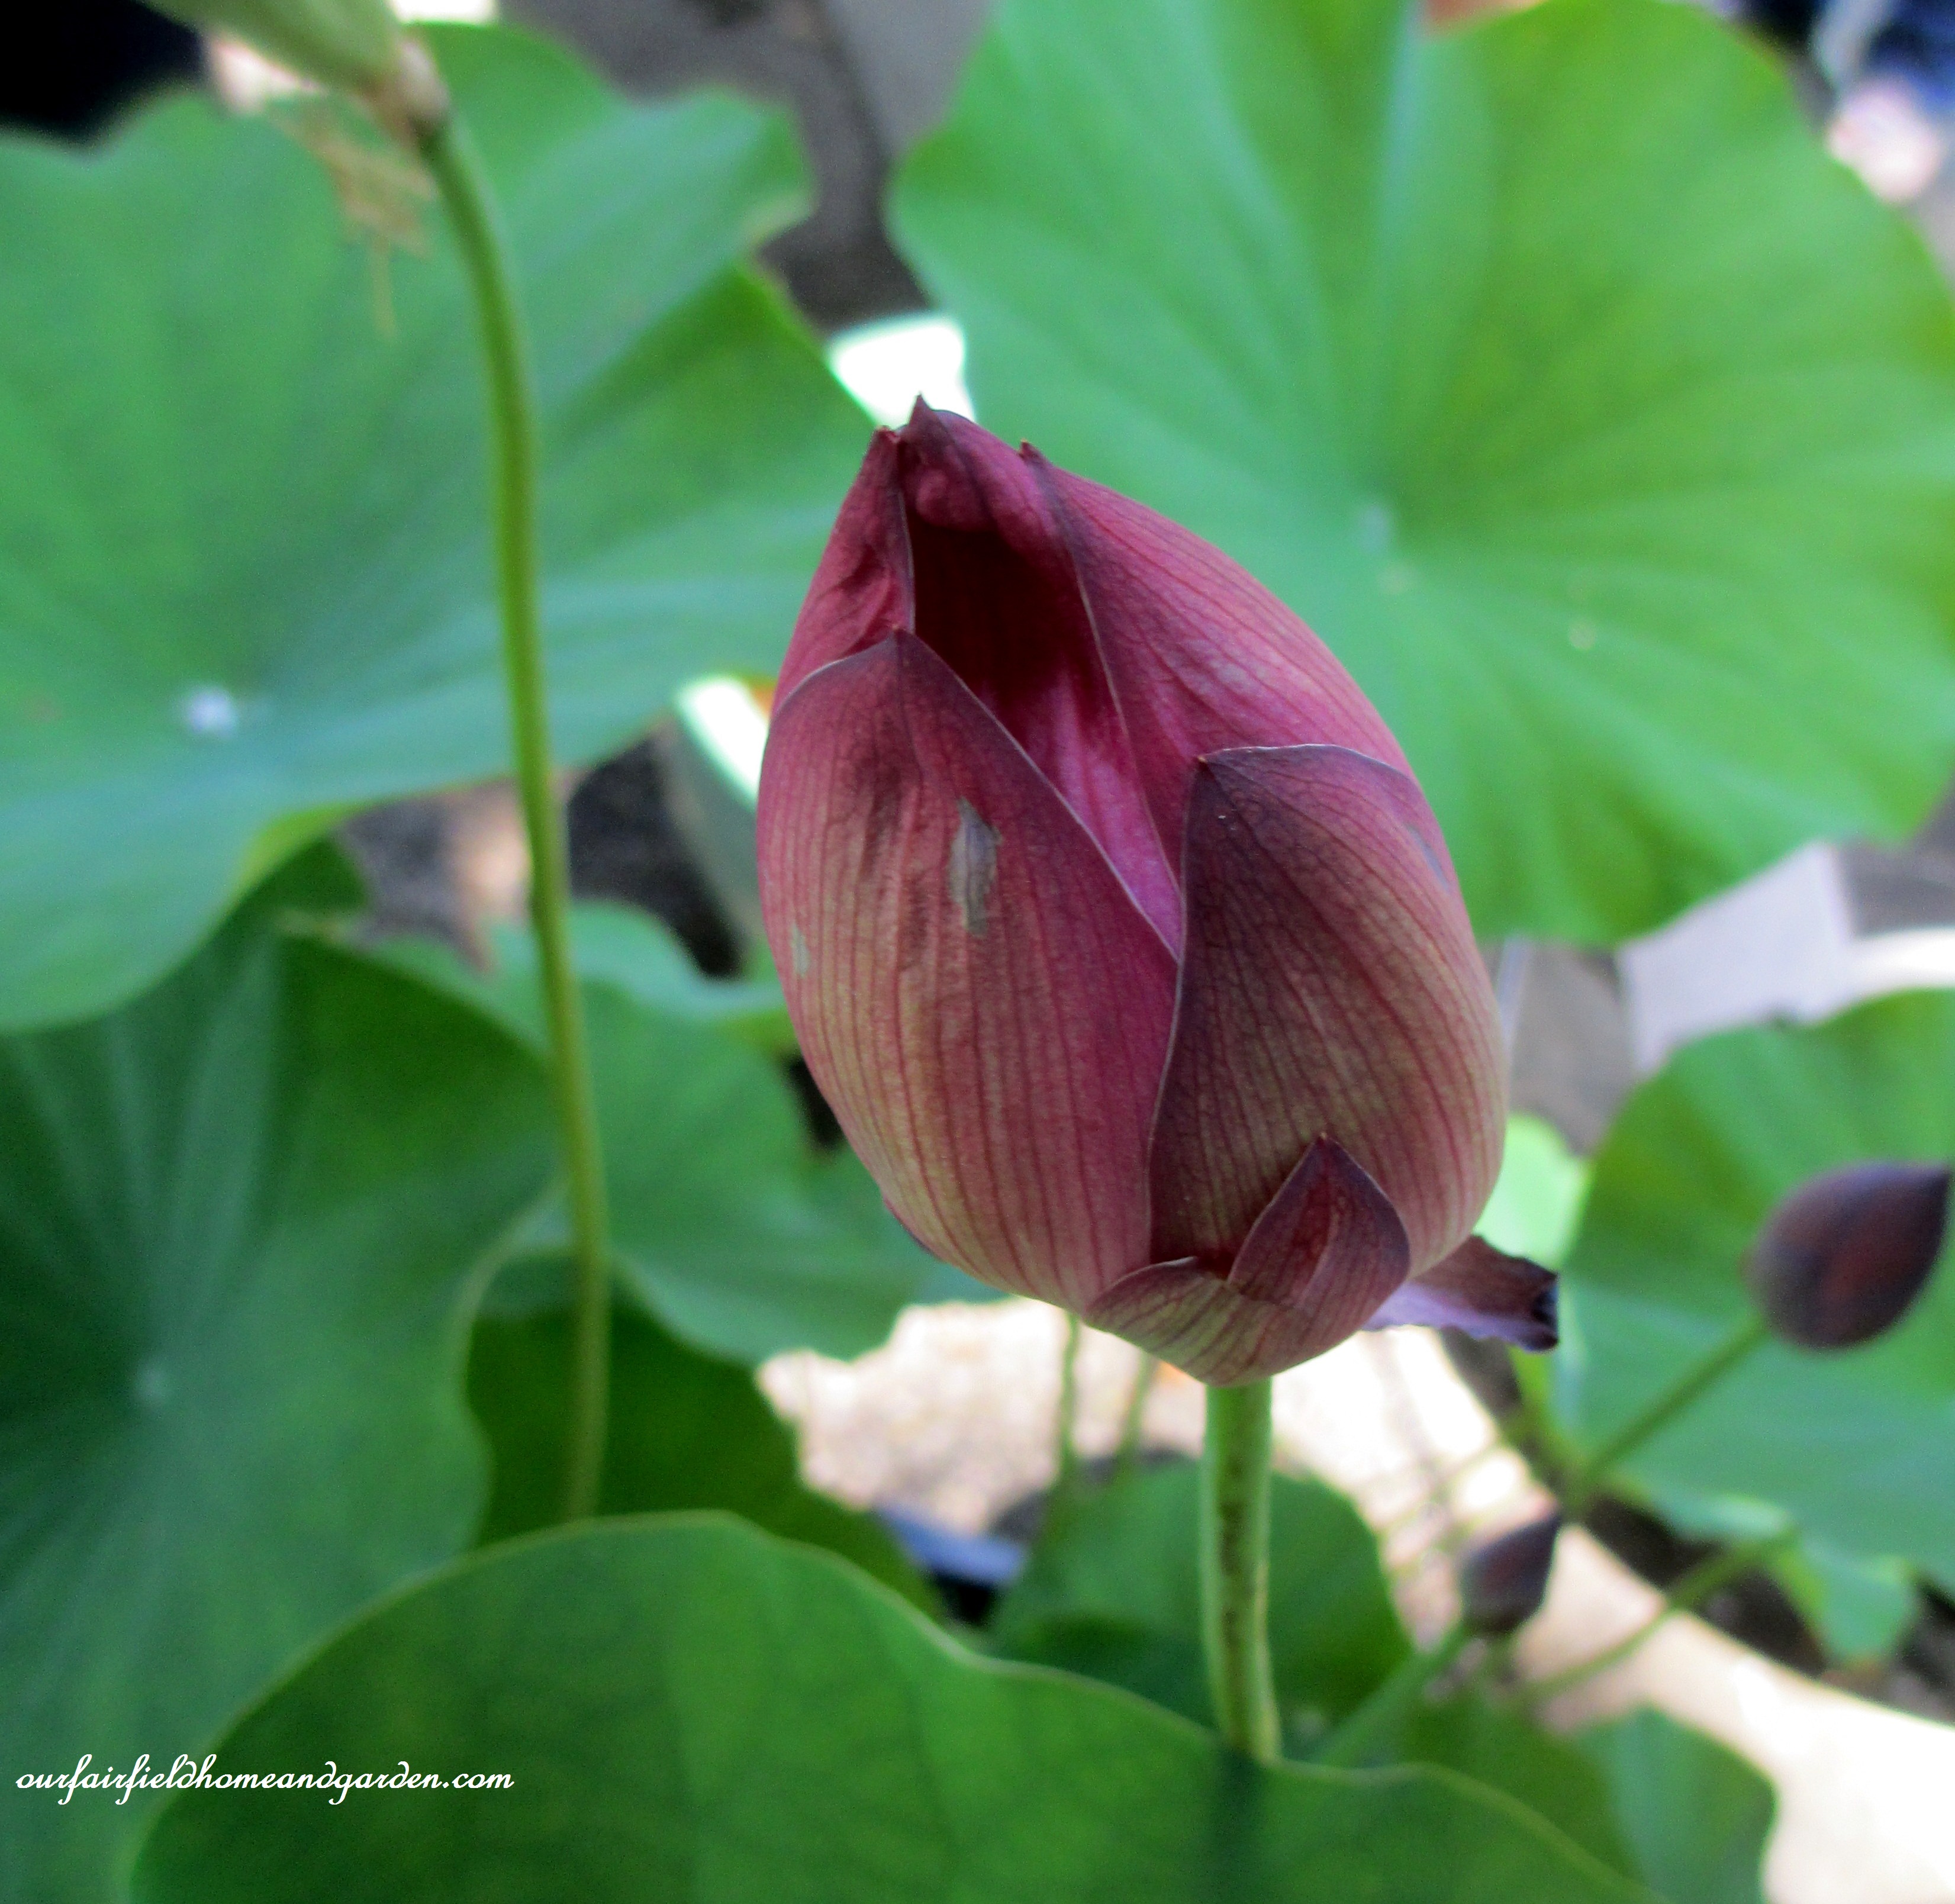
Examples of marginal plants are: water lilies, lotus, parrot feather, papyrus, iris and more!
Underwater plants such as anacharis and hornwort are excellent natural filters
Water gardening plants and materials can be purchased at Gateway Garden Center. The staff will happily assist you in selecting just what you need. And, if you are a member of TheDCH, you’ll receive a 10% discount on the plants! Visit them on-line at http://www.gatewaygardens.com/
Peg & Tiffany from Gateway Garden Center Water Mosaic Plant Water Lettuce Copper fountain in a ceramic pot water garden Lotus can be kept in smaller containers than you might think on a patio or deck! Nelumbo Lotus Flower Bud A sample water garden container from Gateway Gardens Original article and pictures take ourfairfieldhomeandgarden.com site