Friday, May 29, 2015

Catherine’s junktique garden

Catherine’s junktique garden

Garden Tour!


Catherine Lepage lives and gardens in Eastern Ontario, Canada near the US border. She says, “I collect old galvanized containers and grow lovely flowers in all of them; washtubs, pails, feeding troughs… I will plant flowers in absolutely anything! I love hostas, Lupines and lilies the most. Here, we grow apples, plums, grapes and all of the regular garden fare and my yard covers approximately on and a half acres and is full of colour all summer long.”


Using vintage family artifacts in the junk garden


Catherine's traditional front porch flower bed
Welcome to Catherine’s traditional front porch with it’s cool flower bed

Cool blue lupine contrasts with hosta

A Flea market gardening icon
A Flea Market Gardening icon

Garden legacy


“I have enjoyed gardening since I was a child. My paternal grandmother had the most beautiful gardens, both flower and veggie and she cherished them! Every time you visited you had to do a “garden tour” with her. My Dad loved to garden, too, and I used to putter there as well as help take care of our neighbour’s gardens when they were away.”


Galvanized, iron and rust,...all accented with fresh flowers
Galvanized, iron and rust,…all accented with fresh flowers… Catherine received this wagon wheel for a Mother’s Day gift.

“When I grew up and lived in an apartment in Ottawa, I could not wait for the day to move into a home with a yard so that I could have gardens!! My first veggie garden could have fed the masses!! It was huge and I planted anything that our climate could grow.”


Sitting pretty...
Sitting pretty…

Don’t fence me in


“Our home now sits on 51 acres of almost all wooded land. When we purchased our home, it was a clean slate…no landscaping, no gardens. I started small, planting flowers and shrubs in front, then I grew the yard to incorporate more land and trees and it got bigger and wider until my husband said “WHOA! We cannot plant 51 acres of yard and flowers!” He has now bound me with perimeters, that are, rustic rail fences! I add more vintage items and my collection of galvanized containers run throughout my yard.”


Catherine's pink petunias hovers in a tree
Catherine’s pink petunias hover in a tree

Catherine’s ‘garden vignette’ How-To


“Here I go again…copying what I have seen on Flea Market Gardening! Birdbaths made from re-purposed vases, platters and microwave turntables….one-of-a-kind beauties! I have since placed a solar spotlight aimed at the vases and the blue beads inside glow at night! The blue ball in the center is an upside-down tea light holder.”


Gem-filled totem bird bath

“I saw the idea of the “bird-watering” station on this page and decided to try it out. Ashtrays are hard to get anymore so I decided to try pickle trays, platters, anything that has a rim on it. I think that I have cleared out the local “Value Village” of their vases, platters and microwave turntables!”


“I, then, decided to add “pops” of colour by incorporating “gems” from the dollar stores. If you wrap a paper towel tube with plastic wrap and place in the middle of the vase, you do not need to use as many gems!

I have placed solar spot lights aimed at the vases and this makes the birdbath glow, the gem colour, in the dark…quite spectacular actually, if I say so myself!”


Family treasures used in the garden


Catherine’s Dad recently moved into a nursing home, so, as the family got his house readied for sale, she came across some wonderful finds in his attic, basement and garage. Everything from old windows and lanterns to old gardening tools and rubber boots…all now enhance her flower gardens!


Catherine Lepage  Almost hidden, succulents grow in the tree
Catherine Lepage Almost hidden, succulents grow in the tree

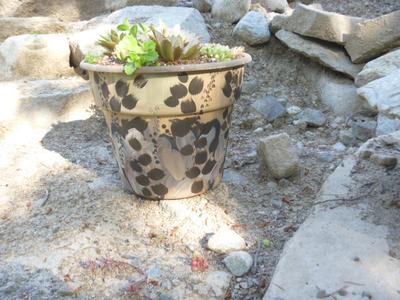
Catherine says, “In the back of my yard, I have planted hens ‘n chicks in the crotch of a tree! They are spreading well and will attach themselves to anything! Makes a great conversation piece, too!”


A heavy woven basket,..perfect for bright flowers

“Anything can become a flowerpot! I collect baskets and old furniture to use to display my annuals,” Catherine tells us.


An old wooden bench set against a tree
An old wooden bench set against a tree is the starting point for a pretty vignette

An artless arrangement of garden treasures

Birdhouses and baskets,...see the cat?
Birdhouses and baskets,…see the cat?

“Gardening is my “go to” place when I need calm!! I love it and I love the ideas that I get from Flea Market Gardening!” Catherine says.


An chippy French door and old crates with flowers

A wooden stump holds geraniums and impatiens

Original article and pictures take www.fleamarketgardening.org site

Thursday, May 28, 2015

Candles in the Garden

Candles in the Garden


  • Set the wood block in the bottom center of the large pot.
  • Place annuals in the nursery pots into the large pot, around the wood block. Set the smaller pot on the wood block and fill 1/3 with small river stones.
  • Set the pillar candle on the river stones and set out in the garden.

Protect the candle by bringing it indoors between uses, but the planter can stay outside to thrive!


  • Melt the old candles in a double boiler. Add citronella oil to the melted wax at a ratio of 1 oz per lb of wax and stir well.
  • Pour scented wax into clean tin cans and insert a wick (tab side down). Hold the wick in place for a few minutes so it stays centered as the wax cools.

Cool the candles completely then move them out to the garden to keep the party free of pests.


Original article and pictures take www.ebay.com site

Tuesday, May 26, 2015

Camouflage Plant Pots

Camouflage Plant Pots

by Jacki

(Grand Forks, B.C. Canada)


I inherited a whole lot of plastic pots after a friend died, and passed them on to me. They are several different sizes, and are made from the kind of plastic that is a little bit flexible. I like the shape, which is the same as my favorite terracotta pots, but they are either green or peach color, so they weren't getting used much. After my project painting my camouflage chaise, I decided that this was so similar in texture, that I would try painting the pots in the same way.


First, I sanded the pots, to rough up the surface - in most cases, these are well used pots, so they have some tooth already. I dusted them off with a rag, then proceeded to paint them.


I use acrylic craft paint from the dollar store - it's cheap and comes in many colors, or you can do what I do and just get the primary colors, white and black and mix your own.


For most of the pots I used a dark background, by mixing black with brown and a little bit of white. Some have a paler background, using mostly yellow and white mixed together, and then using the same brush as the dark background gave me mingled and mixed colors. The aim was to make them camouflage, so they fit the ambiance of my garden.


Once the first coat was dry, the fun began. I like leaves, twigs and other natural textures, so that's where I started. Some of the pots got dark leaf shapes painted first, as a shadow effect. It took all of them about four different coats to achieve the look I was after, and they're all unique.


Try it; this is a really expressive and creative way to use old worn out plant pots.


Find out more about the How to be Creative Guide
Find out more about the How to be Creative Guide or sign up below - it's free!

Original article and pictures take www.bluefoxfarm.com site

Thursday, May 21, 2015

BUY AND SELL PRE-OWNED LUXURY FASHION

BUY AND SELL PRE-OWNED LUXURY FASHION


Tier Offer US

Winter Sale Bags US

Faux Fur US

Winter Sale US

Vintage Ess US

JUST IN


VALENTINO Leather buckled boots
Leather buckled boots

NEW PROFILES


Original article and pictures take www.vestiairecollective.com site

Tuesday, May 19, 2015

Building a Wildlife Pond in the Vegetable Garden

Building a Wildlife Pond in the Vegetable Garden
How to build a small wildlife pond in the garden

This post may contain affiliate links for your convenience. Thank you for supporting Lovely Greens


Build a small pond in the garden to attract frogs. Frogs are an organic gardener’s best friend since they love eating slugs and other garden pests.


Although I try my best to garden organically there is one pesticide that I battle with myself over – slug pellets. Without them my leafy vegetables will be transformed into slimy green lace. You can argue for other methods – beer traps, egg shells, picking them off individually but for me slug pellets have always been the best and easiest way to do the job. There are organic and pet and animal-safe slug pellets available but I decided to try something I’ve heard was just as effective – frogs.


This post may contain affiliate links. Thank you for your continued support of this site!


Frogs are a natural predator of slugs and snails and if you invite them into your garden they’ll keep a close check on their numbers. Inviting them in is as easy as building a wildlife friendly pond with taller vegetation near it and some hiding places in the water. Build it and they will come.


The idea came to me as I was tidying up my cottage wildflower garden at the end of the season last year. I accidentally disturbed a large frog and then helped herd him into the hedge. I don’t know why I was surprised to see him there though, especially since there was a pool of water near the far end which had been there all summer. It was time to build a purpose-built frog pond where frogs were needed most – near my vegetables.


I’m 100% about making home and garden projects on the cheap so what I had on hand to create the pond at my allotment vegetable garden were:


  • An old wooden ‘raised bed’ that had been abandoned by a former plot holder
  • Black PVC plastic that had been used for suppressing weeds
  • Stones dug up from the soil
  • Plants and flowers from other parts of the garden

The first step was digging a hole deep enough to take the wooden raised bed. You could build a pond without this wooden frame but I though it would keep the edges of the pond neat, tidy, and less prone to soil falling in. I dug the area in the middle a little deeper to create a better hiding space for frogs and to also create a place to put a water plant.


Next I placed a layer of black plastic in the hole and then the wooden raised bed on top. I pulled the plastic up and over the sides of frame and stapled it on the inside lip. A second layer of black plastic then went inside the frame and its edges come up and over the wooden frame again. I wanted to protect the wood as much as possible from damp and rot so hopefully this plastic sandwich will work.


To secure the plastic I filled in the gap around the edge of the wooden frame with soil. It holds the plastic down and brings the soil level right up to the edge of the pool.


Next I filled the bottom of the pond with stones and lined the edge with larger ones. A large rock sits in the water at a diagonal to create a hiding space underneath and a way for frogs and animals to get out of the pond.


The water came from the hose-pipe and it cleared in the pond after only an hour. A clear pond is no use for frogs though so the next day I came with plants.


Yellow Flag Irises are marginal plants and I’ve planted them at the back where the most plastic is exposed (my pond is situated on a slope). I’ve also placed a Marsh Marigold (Caltha palustris) in the pond towards the front. When they take, they’ll provide food and foliage for frogs to live and hide in.


I was told by a friend that frogs will move in naturally and sometimes immediately but I’ve also had the offer of tadpoles to complete the project. Some of them will arrive today and others next week. With any luck, my garden will be ‘Hopping’ in now time!


Build a small pond in the garden to attract frogs. Frogs are an organic gardener's best friend since they love eating slugs and other garden pests.

Original article and pictures take lovelygreens.com site

Monday, May 18, 2015

Building a Small Garden Pond for Wildlife

Building a Small Garden Pond for Wildlife

Building a small pond can help with slug problems


As an organic gardener I’m always looking for ways that will help make gardening easier while keeping a natural ethos. One challenge that I have year after year is slugs — they’re an absolute nightmare and my one temptation to resort to chemical control: Slug pellets. Unfortunately he organic types don’t seem to work for me and the standard ones are harmful to the soil and to other animals.


It was while pondering this dilemma that I came up with the idea of building a small garden pond. Ponds attract frogs, which like to eat slugs. Ponds are also pretty and provide water for other animals too, like my honeybees. Sounds like a win win situation to me!


Materials I used to build the pond


  • Wooden raised bed (Optional and used to create a deeper pond on a slope)

A tear in my pond lining


I built it and it was wonderful but the plastic I used as a liner was damaged and my pond began to leak. Maybe the plastic wasn’t ideal to begin with, and maybe it was rocks that punctured it, but I knew that I needed to get it sorted before spring. It’s around now that frogs start to spawn and soon my water plants will start growing again. I had to work quickly and gently to make sure that I didn’t end up harming any wildlife that might still be inside.


A little frog was living in my pond


It’s a good thing that I went through the pond gently and thoroughly because I found a little frog. I had no idea it was living there and was both delighted and worried that it might get hurt. I caught it in an empty plant pot and set it aside until it was time to put it back in the water. It waited patiently and each time I checked in on it it seemed relaxed and froggy. Sitting quietly with its eyes shiny and alert and little silky throat moving in and out as it breathed.


Pond Renovation Work


After clearing the old pond out I managed to find the main leak. The plastic was damaged though and couldn’t be used as a pond liner again. Instead I re-dug the pond, made sure it was more level than the last time, and then placed the wooden frame back inside. I’m using it inside my pond because I’m on a slope and I want to make sure that the water is deep. Deep enough for frogs to hide from predators.


Lining the Pond


I also made sure to invest in good quality pond underlay so that the plastic wouldn’t be damaged the wooden frame. I draped it over the frame as you can see in the video and then spread the plastic pond liner on top. It was a bit unwieldy but once I filled the liner with water it was easier to pull and tuck the lining into place.


It’s recommended to wait a full day before putting edging stones along the edges of the pond. It’s to give the pond time to settle and for the plastic to fall into place. That day is also supposed to give time for the water to adjust to the ambient temperature and for city water to become less Chlorinated. Afterwards you can put water plants and animals back inside.


The new pond is better than the first


Although it was a mission to renovate the pond, I took the time to make it better than the first. It’s more level, the materials are higher quality, and because the wooden frame sits level, the pond is actually deeper. The video will show you more, as well as a cute clip of the little frog hopping back into its home. I hope that in the weeks to come that we’ll be seeing frog spawn in my little garden pond.


Original article and pictures take lovelygreens.com site

Friday, May 15, 2015

Build a Bug Hotel

Build a Bug Hotel

A bug hotel is part garden art and part winter habitat for beneficial insects, the garden army that helps to keep the bad bugs under control. If you are an organic gardener like me, then you will want to be sure that there is a place in your garden for beneficial insects to lodge for the winter. Next spring, when they wake up, lay eggs, and sweep your plants clean of aphids and mites, you will thank me. Here is how to make one for this weekend project.


How to create a bug hotel for overwintering beneficial insects in your home garden.

Build a Bug Hotel


How to create a bug hotel for overwintering beneficial insects in your home garden.

Oftentimes these decorative displays of plant material intended to provide shelter to overwintering insects are called “bug hotels” or “insect houses.” Perhaps they should be called “bug hostels” because the rooms are available to all but they do need to bring their own sleeping bag. Ok, so bugs don’t have sleeping bags, but some do bring their eggs or larva (sorry) for winter protection and gestation, while others have been known to fill up the hole with mud behind them. Setting up different protected areas in your bug hostel will let the bugs find a room that suits them and prepare it as they wish.


bug hotel
How to make a Bug Hotel and who will live there

Bees


Many garden bees are ground dwellers so they won’t have a need for a hotel room. They will dig a little hole in the soil for winter hibernation and you may see some groggy bumblebees when you are out digging in early spring if you wake them too early. Solitary bees, however, like to nest in hollow stems for the winter. Contrary to their title, they will often pack a number of bees in a stem before closing off the opening with some mud and then having a good snooze until spring.


Ladybugs


Ladybugs like to overwinter as large groups in between dry plant material. Some twigs packed together give the ladybugs plenty of room to squeeze in and wait for warmer days and eating aphids. More about ladybugs as garden helpers in this post on attracting beneficial insects.


Beetles, Spiders, Lacewings and Friends


Many other insects will have all sorts of nesting needs. By providing a variety of plant material in your bug hostel you will encourage all sorts of garden friends to lodge. How can you be sure that you are only providing shelter for beneficial insects? Well, you can’t. It’s a tough world out there and at times bad bugs (earwigs – yuck!!) will move in. Some may even eat their neighbors. You can’t control what happens in the bug hostel, just trust that if you provide enough space for the good guys, you can create balance in the garden.


How to create a bug hotel for overwintering beneficial insects in your home garden.

Materials


  • Cut bamboo pieces, stems, twigs, seed heads, pinecones, wood shavings, lichen
  • Using 3/4″ thick cedar or other rot-resistant wood. Cut the following pieces:
    • top: 5 1/2″(h) x 5 1/2″(w)
    • bottom: 5 1/2″(h) x 5 1/2″(w)
    • back panel: 12″(h) x 5 1/2″(w)
    • left panel: 12″(h) x 4 3/4″(w)
    • right panel: 12″(h) x 4 3/4″(w)
  • Weather-resistant screws between 1 1/4″ 1 1/2″ long. #6 or #8 size
  • Drill
  • Hanging hardware

Make it!


1. Cut cedar boards to the dimensions listed using a table saw or have them cut at your local hardware store if you don’t have one.


How to create a bug hotel for overwintering beneficial insects in your home garden.

2. Screw the box together by drilling pilot holes first through.


How to create a bug hotel for overwintering beneficial insects in your home garden.

3. Arrange plant materials within the structure, packed tightly so it will stay put, but with lots of available crevices for the bugs.


How to create a bug hotel for overwintering beneficial insects in your home garden.

4. Affix hanging hardware and hang in an area of the garden that is close to where you want the bugs next season.


How to create a bug hotel for overwintering beneficial insects in your home garden.

I chose to hang the bug hotel on my fence near the garden so the insects will emerge next spring near the plants.


How to create a bug hotel for overwintering beneficial insects in your home garden.

More Organic Gardening Ideas


I have plenty more articles here on Garden Therapy and my other blogs about organic gardening and beneficial insects as I am a passionate organic gardener!


Original article and pictures take gardentherapy.ca site

Tuesday, May 12, 2015

Brown Hair Color For Women (Pictures)

Brown Hair Color For Women (Pictures)

Hey there, I have fresh news for those who already decided to color their hair into brown color. This year the most trendy color vary from creamy caramel to dark chocolate. This season lots of celebrities make moodier shades and make it shiny. I think there is no need telling you how trendy this color is and how versatile this color may be styled. Look at the the rich diversity among brown color hues: love the darken rich espresso brown and caramel highlights. Please, take a closer look at this chic gallery of brown hair color shades.


Brown Hair Color For Women (Pictures) 2018

The brown hair color is among the most popular colors either because it suits almost any face shape and complexion. From light brown to dark brown all are very gorgeous. It has the ability to soften the person’s facial features.


Brown Hair Color For Women (Pictures) 2018

Brown Hair Color For Women (Pictures) 2018

Brown Hair Color For Women (Pictures) 2018

Brown Hair Color For Women (Pictures) 2018

Original article and pictures take thebestfashionblog.com site

Braid Your Rebellious Hair

Braid Your Rebellious Hair

Our hair is the reflection of our femininity and gives us the freedom to express our style and our sensuality.


Baroque Style

However when we are the kind of girls who spend our time on the beach and mainly in salty water so it is sometimes a real mission to maintain and choose which hairstyle to wear.


Let’s be honest, there is nothing sexier than salty, sun-kissed hair which we can add a bit of creativity by twisting, accessorising or braiding.


Fish Braid

So if you sometimes lack inspiration, and although some of this examples may turn out to be quite a bold statement bold, here are a few braid ideas to give you the urge to play with your rebellious hair.


Bohemian Style

Our hair is the reflection of our femininity and gives us the freedom to express our style and our sensuality so here are a few braid ideas to give you the urge to play with your rebellious hair.


Waves

Our hair is the reflection of our femininity and gives us the freedom to express our style and our sensuality so here are a few braid ideas to give you the urge to play with your rebellious hair.


Winter time

Our hair is the reflection of our femininity and gives us the freedom to express our style and our sensuality so here are a few braid ideas to give you the urge to play with your rebellious hair.


ChampĂȘtre

Our hair is the reflection of our femininity and gives us the freedom to express our style and our sensuality so here are a few braid ideas to give you the urge to play with your rebellious hair.


Short Hair

Our hair is the reflection of our femininity and gives us the freedom to express our style and our sensuality so here are a few braid ideas to give you the urge to play with your rebellious hair.


tresses-chignons-coiffure-reussie

Our hair is the reflection of our femininity and gives us the freedom to express our style and our sensuality so here are a few braid ideas to give you the urge to play with your rebellious hair.


Color Braid

Our hair is the reflection of our femininity and gives us the freedom to express our style and our sensuality so here are a few braid ideas to give you the urge to play with your rebellious hair.


Curly Hair

Our hair is the reflection of our femininity and gives us the freedom to express our style and our sensuality so here are a few braid ideas to give you the urge to play with your rebellious hair.


Flower Elastic Band

Our hair is the reflection of our femininity and gives us the freedom to express our style and our sensuality so here are a few braid ideas to give you the urge to play with your rebellious hair.


Headband

Our hair is the reflection of our femininity and gives us the freedom to express our style and our sensuality so here are a few braid ideas to give you the urge to play with your rebellious hair.


Winter Braid

Our hair is the reflection of our femininity and gives us the freedom to express our style and our sensuality so here are a few braid ideas to give you the urge to play with your rebellious hair.


Messy Hair

Our hair is the reflection of our femininity and gives us the freedom to express our style and our sensuality so here are a few braid ideas to give you the urge to play with your rebellious hair.


Beach braid

Our hair is the reflection of our femininity and gives us the freedom to express our style and our sensuality so here are a few braid ideas to give you the urge to play with your rebellious hair.


Romantic Hair

Our hair is the reflection of our femininity and gives us the freedom to express our style and our sensuality so here are a few braid ideas to give you the urge to play with your rebellious hair.


Ponytail Braid

Our hair is the reflection of our femininity and gives us the freedom to express our style and our sensuality so here are a few braid ideas to give you the urge to play with your rebellious hair.


Tutorial 1

Our hair is the reflection of our femininity and gives us the freedom to express our style and our sensuality so here are a few braid ideas to give you the urge to play with your rebellious hair.


Tutorial 2

Our hair is the reflection of our femininity and gives us the freedom to express our style and our sensuality so here are a few braid ideas to give you the urge to play with your rebellious hair.


Tutoriel 3

Original article and pictures take kite.sista.zone site