Tuesday, March 29, 2016

Green Roof Birdhouse Tutorial

Green Roof Birdhouse Tutorial

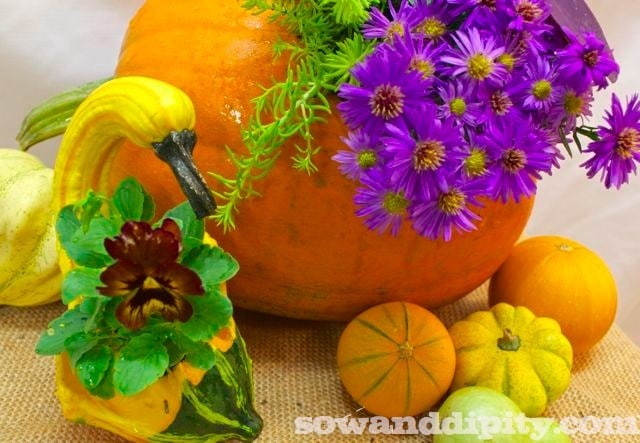
Green roofs are all the rage right now but why should we humans have all the fun? In this Weekend Project you will learn how to make a removable, plantable roof addition to a standard cedar birdhouse. Adorable.


Green Roof Birdhouse DIY with crocus, moss and sedum (Medium)

Green Roof Birdhouse DIY plant material, sedum stonecrop, yellow crocus, a moss balls (Small)

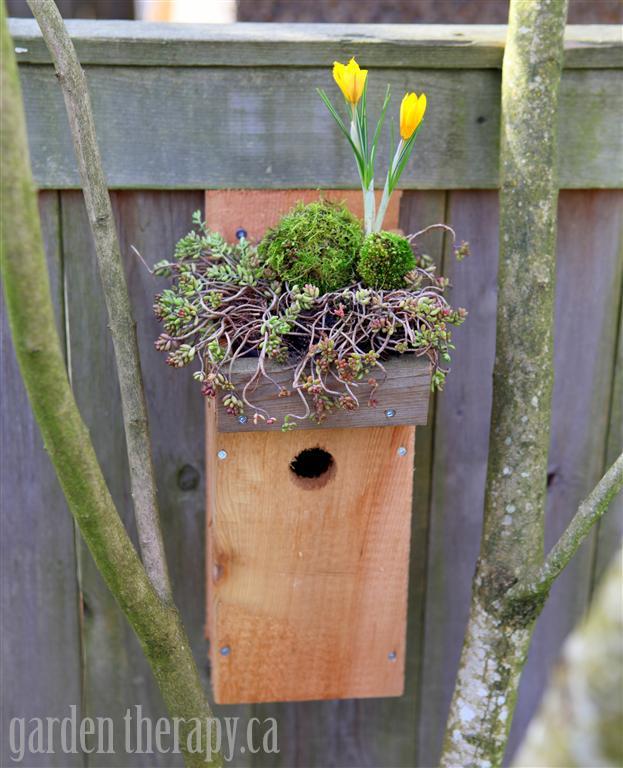
My husband is a hobbyist woodworker. Lucky me, right? And since we were talking about setting up some nesting boxes for our chickadees, he found some plans online, bought some wood, and then a few hours later we had this beautiful little birdhouse.


Chickadee or Nuthatch Nesting House Birdhouse (Small)

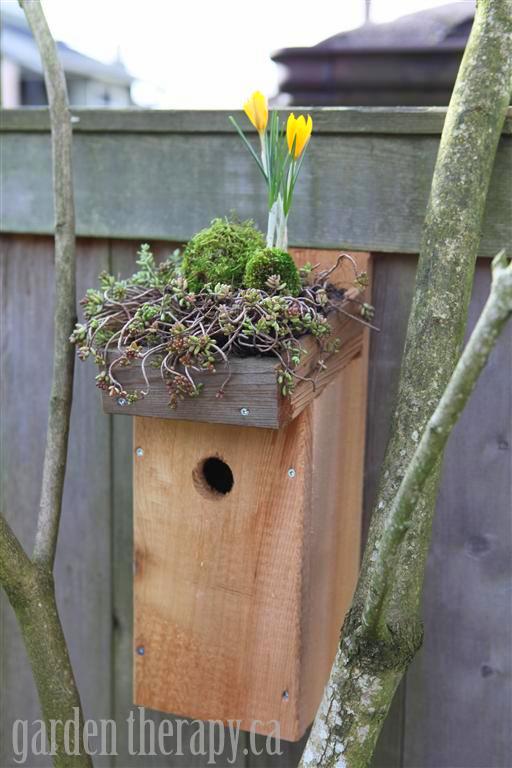
Gorgeous and perfectly made, with vent holes for the bird family’s air circulation, and the rough wood facing in so the fledglings can crawl up to the perfectly-sized hole for their first venture out into the world. Oh, and it has a hinged roof so that you can peek in on them <ahem> clean the birdhouse at the end of the season.


Me: “Great birdhouse, Honey. Let’s make a green roof for the birdies.”

Husband: “Um, ok, well….but if we put a green roof on it we won’t be able to lift it up to look clean inside.”

Me: “There has to be a way. We can figure it out, right?”

Husband: “Um, yeah…”


If you speak husband like I do then you know that basically means, “I don’t know what you’re up to, Crazy Woman, but I’m not touching that birdhouse”. So I waited for him to go to work and I got busy building this fabulous removable plant tray that acts as a green roof. Want to make one too? Here’s how: (If you don’t see the tutorial, please click ‘continue reading’.)


Materials:


  • Chickadee and nuthatch nesting box (made from these project plans, thank you 50 birds.com)
  • Hand saw
  • 2 ½” x ½” cedar board
  • 1 ½” x ½” cedar board
  • Drill / screwdriver & wood screws
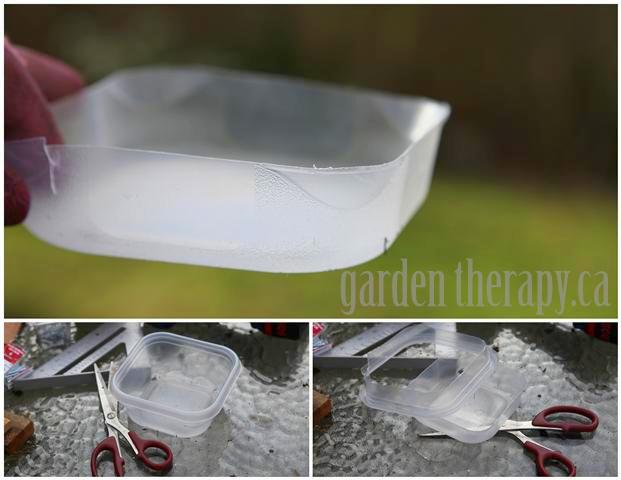
  • Plastic container, scissors
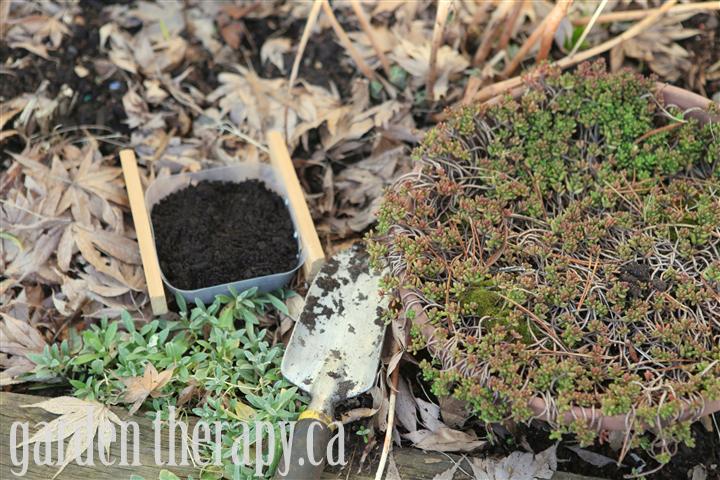
  • Drought-tolerant, shallow-rooted plants like Sedum album.

Directions:


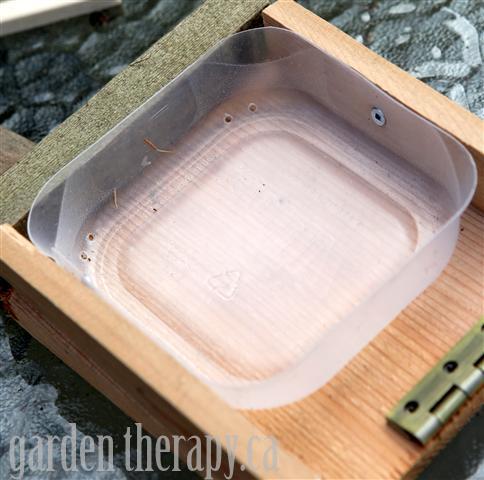
1. Measure out the ledge which will sit at the front of the roof and hold the plant tray. Cut the 2 ½” cedar board to the exact dimensions of the front of the roof. Affix the ledge onto the roof edge with wood screws as shown.


Green Roof Birdhouse DIY Make the Ledge (Small)

2. Cut a plastic container to the height of your wood boards, in this case it is 1½”.


Green Roof Birdhouse DIY Cut a Plant Tray (Small)

3. Measure and cut the smaller cedar board so that they fit in between the roof ledge and the back of the feeder. Affix the two cut boards to the plastic container with shorter wood screws.


Green Roof Birdhouse DIY Affix Sides onto plant tray (Small)

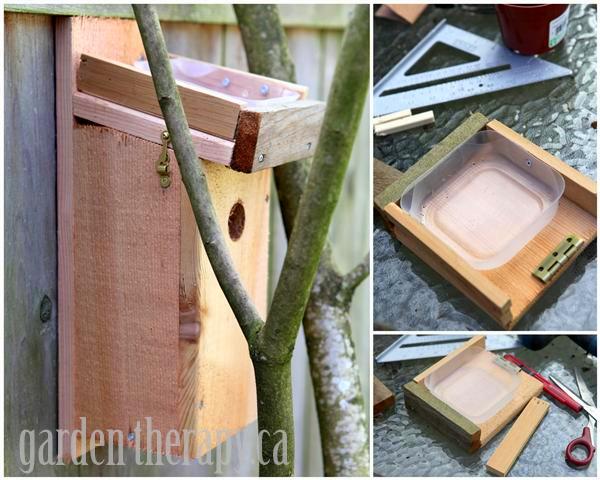
4. Drill a few drainage holes in the front corners of the plant tray. This will ensure the water will drain off the roof corners and keep birdies dry.


Green Roof Birdhouse DIY drill drainage holes in plant tray (Small)

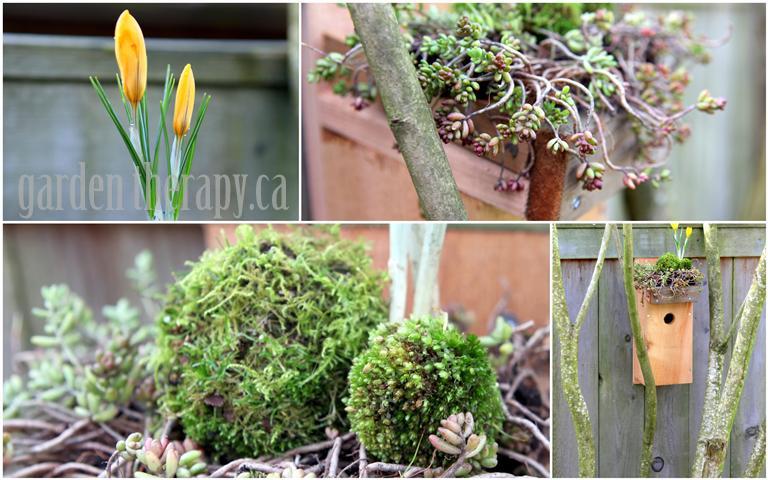
5. Add some container potting mix to the plant tray and fill with plants that work with the conditions the house will be set in. The bird house shouldn’t be somewhere too sunny or too high traffic which is why we placed it under the shade of a lilac. You won’t want to disturb the little bird family by watering so choose drought-tolerant plants that have shallow roots. This Sedum albumis very winter hardy, has a solid net of shallow roots, and those rubbery little leaves hold onto lots of water so it will naturalize there nicely. It will also start to grow long tendrils in the summer that will hang down the sides, get a mess of yellow (or white) flowers in the summer, and turn reddish in the fall and winter.


garden therapy.ca

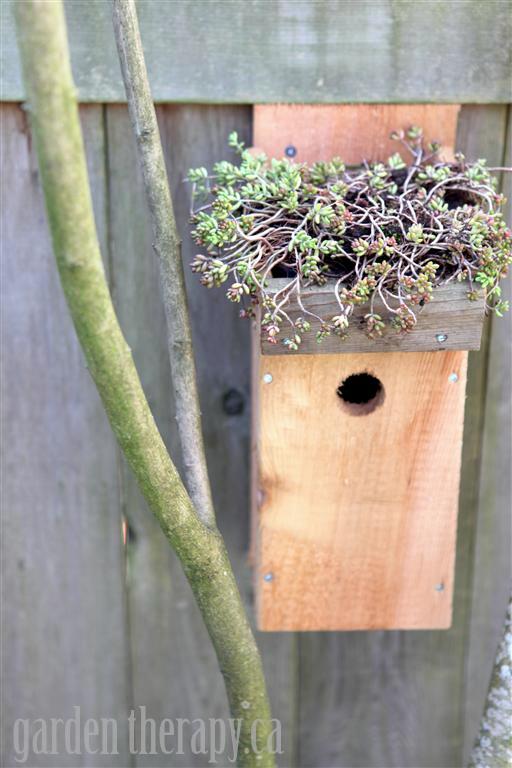
6. Give the plants a good water to get them started and slide the planting tray to the roof. You are now ready for the birds to move in.


Green Roof Birdhouse DIY with stonecrop sedum only (Medium)

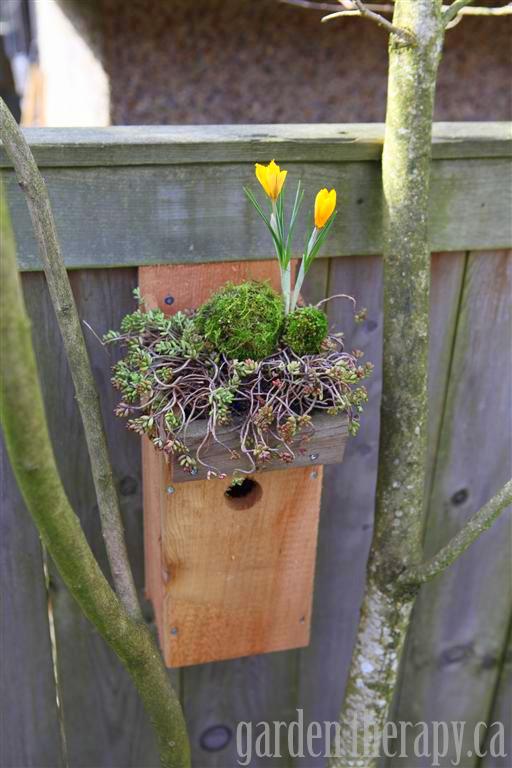
6 b. If you are like me and feel that while the Sedum album is growing in it need a little je ne sais quoi, then add a few garden decorations. I used some blooming crocus and some balls of moss. Snowdrops would also be really nice as well with a selection of hens and chicks or other sedum, mosses, or creeping plants.


How to Make Green Roof Bird House DIY project from top (Medium)

On a final note, please make sure there is some food and water in your garden for the birds when the move in as they don’t like to travel far to forage when nesting. Also, I really was kidding about looking in at the birds. If you don’t want to stress them and have them abandon the nest, no peeking! Just admire the little guys from afar.


How to make a Green Roof Birdhouse DIY Side View (Medium)

Thanks for visiting for the weekend project. Also check out this project and the other great features on Common Ground’s Vintage Inspiration Fridays.


Original article and pictures take gardentherapy.ca site

Monday, March 28, 2016

Great Fall Decor Painting Tutorials

Great Fall Decor Painting Tutorials

Great Fall decor painting tutorials you can find here on my blog. Paint up DIY porch signs, Autumn crafts, or create gifts.


Creating fabulous Fall / Autumn decorations can be as fun as they are beautiful. I have rounded up several of my Fall decor painting tutorials here for you to use. I am always adding more tutorials so this list is not all there is. Check out my Paint page listed in the toolbar above and you will find even more.


Paint Your Fall Decor Painting Tutorials, FlowerPatchFarmhouse.com

Click on photos to go to the Tutorial or on the title that is highlighted.


Pumpkins are always a popular Autumn decor item….


Learn to Paint a Pumpkin Fast and Fun

You paint them in so many colors, paint them on signs, pillows or whatever your imagination comes up with!

I love this one on a black background. The colors just pop. Click on title or photo to view.


How to Paint a Pumpkin, great for Fall Decor. FlowerPatchFarmhouse.com

Sunflowers are another great Fall inspiration for some fabulous decor..I have two different tutorials for Sunflowers so take your pick


Easy to Paint Sunflower tutorial, FlowerPatchFarmhouse.com

How to Paint a Sunflower, easy and fun, one stroke at a time. FlowerPatchFarmhouse.com

A Rustic Birds nest


You can switch out the color of the eggs to whatever you wish. And you can size it according to your surface easily.


Learn to Paint a Nest Fast and Easy

Here is an example of one I had made into a sign.


Nest Painting

Leaves are easy enough to paint and make great motifs on fall projects. click here for


Learn How to Paint Colorful Fall Leaves, one stroke at a time. Make great Fall crafts for your home decor! FlowerPatchFarmhouse.com

Scrabble Tiles


I used the Leaf and Pumpkin in place of the A.


DIY Fall Scrabble Tiles on Scrap Wood, FlowerPatchFarmhouse.com-0084

More painting tutorials: (click on title to see each one)

How to Paint a Harvest Sign (with download for lettering)

How to Paint a Fall sign with oak leaves and acorns (download for lettering)

How to Paint a Large Welcome sign (download for lettering)


For more painting ideas and projects just click on my Paint page in the toolbar above…I have tons more coming too so sign up for my email newsletter that gets sent out each time I post if you want to be updated right away!


Here are a couple others you may enjoy..


Chickadee Painting, FlowerPatchFarmhouse.com

Radish Vintage Crate Seed Packet sign FlowerPatchFarmhouse.com

Happy Fall painting!

What inspires you in Fall?


If you enjoyed this please PIN and share


Fabulous painting lessons for Fall Decor. Paint them on pillows, signs or canvas. Easy and FUN! FlowerPatchFarmhouse.com

Original article and pictures take www.flowerpatchfarmhouse.com site

Thursday, March 24, 2016

Grapevine Chandelier (Summer Outdoor Art Fest)

Grapevine Chandelier (Summer Outdoor Art Fest)
Rustic and Refined

Today is the first project that the Yard Art Ladies and I are sharing with you during our Summer Outdoor Art Fest. Let me introduce you to this fabulous group of bloggers:


yard art ladies


And now onto my first project – an Ikea hack actually that turned out to be a keeper for my backyard!!


Natura chandelier new house new home

Don’t you love it when you get a bargain? This nature chandelier candleholder was a steal at $10 even though it was missing a couple of the cups to hold the candles. I just knew that with a bit of spray paint and some imagination, this baby would turn out to be something wonderful and unique.


grapevine wreath new house new home

My inspiration came from this old grapevine wreath. I made it a couple years ago and it has been transformed a couple of times. You might remember seeing it on the old barn door in my vegetable garden, but it had lost its shape and was beginning to look a little sad. A quick shot of white spray paint helped transform the dark chandy into something light and airy for the garden.


grapevine chandelier new house new home

It was simple to unravel the grapevine wreath and to wind the new pieces onto the arms of the chandelier.


grapevine wreath close-up new house new home

little distressing on the metal gives the chandelier a shabby look, perfect for the rusticness of the grapevine.


grapevine chandelier new house new home

Be sure to wind the vine pieces in and out of the arms and up the centre portion to give it a natural look. This grapevine chandelier is going to be a great addition to the back deck – tea lights glowing in amongst the maple trees.


Be sure to visit the other Yard Art Ladies. Here’s what they’ve been up to this week:


Feeding Big
Feeding Big

Kathe with an E

Rustic & Refined

Original article and pictures take www.newhousenewhomenewlife.com site

Wednesday, March 23, 2016

Grape Vine Wreath Becomes Garden Art Bird Nest

Grape Vine Wreath Becomes Garden Art Bird Nest
Turn a grapevine wreath into a garden art bird nest

I may receive a commission if you purchase something mentioned in a link on this post for sites including Amazon.com. Other links may go to websites where I have been paid to write a blog or article. See the entire disclosure here.


DIY Garden Art Bird Nest


This giant bird nest is an easy, repurposed garden art project.


Turn a grape vine wreath into a garden art bird nest

I got the idea when I noticed a rock in my garden looked like a giant egg. I thought it would be fun to have a giant bird’s nest to go with it.


You’ll need a couple of unwanted grape vine wreaths and some matching wire — the larger the nest, the more wreaths you’ll need.


The initial preparation of the wreath takes 24 hours (while you wait for it to soften up) and the assembly of the nest takes about an hour.


With the declining popularity of wreaths in recent years, you should be able to find some used ones at a thrift store.


I’ve also had several emails asking where to find the cardinal peanut feeder pictured here. I bought mine at a local farm supply store. I haven’t seen any online but you could try a local bird seed and supply shop or crack open Google and see if you can find one.


Take a wreath - make a nest!

Besides a giant nest, there are other creative options: you could make smaller nests or something entirely different such as a garden sign using the grape vine to spell the words. The giant nest is a perfect first project to get a feel for what it’s like to shape the grape vines.


How to make a garden art bird nest

Materials


  • 2 Grape vine wreaths (pick ones that can be unravelled)
  • Wire (16-20 gauge) – in colour similar to the wreath (I used about 5 feet of wire, total)
  • Spring clamps (to hold the nest in place while you’re working)
  • Large tub of water (to soak and soften the wreaths)
  • Twigs and leaves (optional)
  • Giant decorative eggs (or rocks that look like eggs)

The wreaths shown here worked very well – they are made of long grape vines stems, wrapped around each other.


Steps


Make a garden art bird nest

To get started, find any wires holding the wreath together and remove them. You can reuse these wire pieces for your bird nest assembly.


Make a garden art bird nest

When all of the support wires are removed, soak the wreaths in a large container of water for at least 24 hours (a few days longer is fine too). This will soften the grape vines so they will be fairly bendable without snapping.


Make a garden art bird nest

Add something heavy like this watering can to ensure that the wreaths stay fully submerged and do not float to the surface.


Make a garden art bird nest

After soaking the wreaths (24 hours or more), it’s time to make your nest. The grape vine stays bendable for an hour or so and then gradually stiffens up again as it dries.


Make a garden art bird nest

Gently unravel the vine until you have several long pieces. You may want to use a large bowl (like the yellow one pictured below) to have a model size to base your nest on.


Make a garden art bird nest

I found this covered wire at Michael’s—it goes nicely with the colour of the grape vine.


Make a garden art bird nest

Start winding the grape vine in circles (this will be the bottom center of the nest), starting with the smallest circle you can make without snapping the vine. As your work, hold the sides together with clamps.


Make a garden art bird nest

I added wire as I worked, winding it around sections of the nest and tucking in the ends. This is where you get new respect for how hard a bird works, although their methods are a little different!


When the nest reaches the desired size, finish joining it with wire until everything is securely in place. I added twigs and leaves to give it a more natural look. We all have nesting instincts!


Make a garden art bird nest

Find a good spot in the garden. Here I’ve got it filled with rock egss below the very popular cardinal peanut feeder:


Garden art bird nest made from grape vines
Here’s my favourite setting:

Garden art bird nest made from grape vines

Three blue eggs! I actually spray-painted a few decorative balls blue. Alternately, decorative eggs – painted and splattered with speckles would also look great.


Turn a wreath into a nest
I’m quite pleased with my giant nest. Now I just need to make a giant bird to go with it.

~Melissa the Empress of Dirt ♛


grapevine-bird-nest-c3b

Original article and pictures take empressofdirt.net site

Tuesday, March 22, 2016

Gourds Make Great Planters

Gourds Make Great Planters
mini pumpkins

Gourds, Gourds, Gourds


I love using gourds in my fall displays. In a previous post I showed how great these looked IN a planter… now I’ll show you how to use them AS a planter.


gourds and pumpkins

For the pumpkin, most people carve out from the top… but I chose to carve it out from it’s side.


pumpkin carving

Remove the innards and add a little soil to the pumpkin. If you plan to use this inside, don’t drill holes in the bottom but if you put this outside in an area where it will get rained on… then create drainage and drill in a few holes.


pumpking planter

I added a fall aster, a sedum, some pansy’s and a Tradescantia to this pumpkin planter.


pumpkin planter

For the Crookneck Gourd I used a melon baller to hallow out the innards. It was a little tough to get through the thick skin at first but once I got in, the rest was easy.


melon baller

The balance was off once I removed the pulp but I just added a stone to correct that and once I added a little soil and the pansy.. it was fine.


hallowed out gourd

crookneck gourd

How cute is this little planter?


gourd planters

AND it can be a mini hanging planter!


hanging gourd planter
Think outside of the pot and have fun with your

gourds.


pansy

Follow Sow and Dipity on:


or


Peace Love Garden


Original article and pictures take www.sowanddipity.com site