Create magical mini fairy doors to add a fun optical illusion to your tiny garden.
This project is based on a full-size project I made for my garden: Optical Illusion Garden Mirror.
For more ideas, see Fairy Garden Projects to Enchant the Wee Folk.

I may receive a commission if you purchase something mentioned in a link on this post for sites including Amazon.com. Other links may go to websites where I have been paid to write a blog or article. See the entire disclosure here.
Magical Garden Doors with Mirrors
I made this optical illusion garden art after seeing variations of it on garden tours. It’s a full-size mirror and gives a nice element of surprise in the yard.
To get this special effect, wood pieces are attached to a mirror, with the wood cut at different angles to give the illusion of an open door or window.
To keep it simple, I have done it without any math or complicated measuring involved.

I thought it would be fun to start making miniature versions of the projects I create for the garden. The mirror above is approximately 3-feet tall. The one below is 3-inches tall.

I’ll walk you through how I made it and share some tips. The potted plants (above) are made from polymer clay. This tutorial shares how to make inexpensive fairy garden accessories.
This idea could be adapted in all sorts of ways to add some magic and mystery to a miniature or fairy garden.
How to Make a Magical Mini Fairy Garden Door
Optical Illusion Design
It looks complicated but it’s really not. If you have paper, a pencil, and a ruler, you can create this design or one like it. And there’s no math involved.

For more, see this post on how I created my full-size optical illusion garden mirror. No matter what size, it’s all done the same way.

I haven’t provided a specific template because your design will need to be adapted to whatever size mirror you have. While a small square or rectangular mirror would be best, I happened to have a spare round mirror so that’s what I used.
Cut a bunch of long strips of balsa wood first, all with the same width, and then you can cut the specific lengths needed.
In the photo (below) you can see I used the printout of my diagram (from this post) as a guide.
I placed the wood strips over the diagram, and scored them with the cutting blade to indicate where I needed to make cuts. This is more precise than using a pencil.

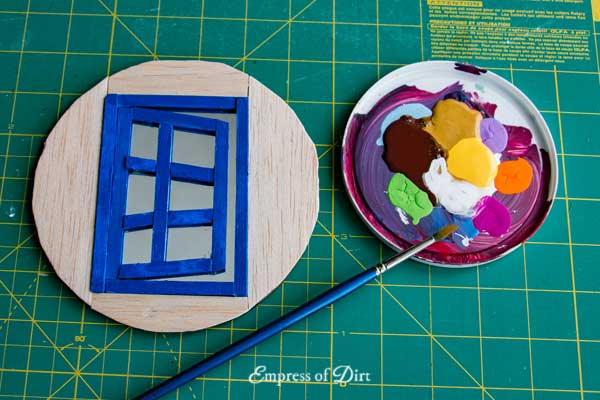
If you want a vibrant colours for the wood, it helps to prime it first. I use white acrylic craft paint.
Keep in mind that all sides of the wood will show, including the backs that will be glued to the mirror. Mirrors are sneaky that way, always showing more than we want.

Again, you will need to cover all sides of the wood with paint. Allow paint to dry thoroughly before continuing. Unless you want to mess the whole thing up.

Clean the mirror thoroughly with rubbing alcohol or methyl hydrate to remove any dirt, grease, or grime.
If needed, use painter’s tape on the mirror to mark where you need to place the balsa wood pieces.
Start with the outer frame, ensuring it is square before securing the glue. Glue-gun glue is not a permanent bond and can be peeled off if you make a mistake. More permanent glues are not as kind. Yes, I know that was redundant.

Because my mirror is round, I opted to frame it in more balsa wood to look like a wooden wall.


I used a little metal fish charm as a door handle and mounted it by gluing it to two small beads.
For hinges, you could glue on dollhouse/miniature hinges or add little pieces of balsa wood and paint them to look like hinges.


Done!
Display It
To display it, well, you don’t need me to tell you what to do, do you?
But just in case, this would look neat in a fairy garden, or on a baseboard inside the house (like a mouse door), or on the base of a tree trunk (although arborists tell us it’s not good to attach anything to a tree so let your conscience be your guide).
The one thing to keep in mind is, if you used balsa wood and a glue gun, it’s really not going to hold up outside. Best to keep it in a sheltered location or indoor fairy garden.
~Melissa the Empress of Dirt ♛


Original article and pictures take empressofdirt.net site
No comments:
Post a Comment