
I may receive a commission if you purchase something mentioned in a link on this post for sites including Amazon.com. Other links may go to websites where I have been paid to write a blog or article. See the entire disclosure here.
Options for Making Garden Art Flowers
While you can assemble them with a good, waterproof adhesive (more on this below), I find it’s best to also drill through the plates and secure them with wire. This way the dish flowers can stay in the garden throughout the seasons without the risk of falling apart. Don’t worry about drilling holes in glass: I promise you it’s way easier than it sounds.
But, if you don’t want to drill the glass, that’s fine! You simply use more adhesive instead of wiring the pieces together.
You’ll probably want to start watching at yard sales or thrift stores for suitable dishes so you can make several flowers all at once. I have also provided instructions for other glass garden art projects here, so if something doesn’t work for one creation, it will probably find use in another.
Love garden art and creative gardening ideas?
Drill or Not – Your Choice
These instructions will show you how to create glass garden flowers from start to finish, including a video showing how to drill through glass. With the right drill bit, it’s really a simple process and once you try it, you’ll definitely feel confident enough to make a whole bunch more.
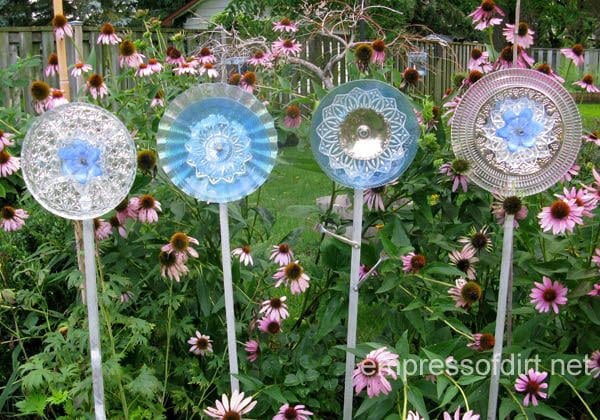
You can mount the flowers on wooden posts as I’ve done here, use rebar or pipes, or simply hang them on a wall or fence. This post shows an update of how I displayed them on my patio wall.
Plus, as soon as you are confident that you can indeed drill holes in all sorts of used kitchen items, the entire key to the garden art kingdom is yours.
Dish Flower Tools & Materials

- Used kitchen glassware and metal plates, bowls, serving dishes, votive candle holders…. I choose pieces around 1/8″ thick.
- Tiered serving dishes work great because they already have holes drilled in them.
- Old forks and spoons (to use as leaves on the wooden flower stem)
- Plastic or metal dish pan
- Old towel (you might drill a hole in it)
- 5/16″ diamond drill bit ($15-20 US) – cuts glass, marble, porcelain, granite, and slate
- 1/8″ masonry drill bit (optional-if you want to make a pilot hole in the glass to keep the diamond bit from slipping
- 1/2″ titanium drill bit (for drilling holes in the forks and spoons)
- Cordless drill
- Safety glasses and protective gloves
- Masking tape (optional)
- Sharpie marker
- 16-gauge wire (10 inches for each flower)
- Washer and bolt (1 each per flower) or strong metal buttons with two holes (1 button per flower)
- 1″x1″x48″ wood posts (1 for each flower)
- 1/2″ wood screws (for attaching forks and spoons to the wooden stem)
- copper pipe end cap (optional) for attaching flower to a pipe stem

Design
- Pick various sizes of dishes that look good together and fit well together.
- For the flowers you see here, I used clear and blue glass plates plus some small metal serving dishes.
- If you want to make several flowers to group together, you might want to pick a colour theme (blues, reds, greens, or simply all bold colours or pastels).
Set-Up
- Place folded towel in bottom of dish pan.
- Add enough cold water to cover towel plus a little more.
- Have dishes, drill (and bits), and safety glasses and gloves ready.
- Mark the plates where you want to drill each hole with the Sharpie.
Optional – Pre-Drill
- Place a small piece of masking tape over the intended drill hole area and pre-drill a starter hole using a 1/8″ masonry drill bit. The masking tape keeps the drill from slipping. The starter hole helps the diamond drill bit stay in place.
This video is fairly old but it does show me drilling a hole in a dish with one hand! The other hand is hold the camera, so you can see it’s not difficult.
Drill The Glass
This will take from 1-4 minutes per dish, depending on the glass.
- Place the glassware in the dish pan. Allow some water onto the surface of the glass.
- Put on your fancy safety glasses and gloves.
- Start drilling on medium speed, holding the drill at a 45 degree angle to the plate.
- Hold the drill steady but do not press too firmly against the glass. The diamond drill bit will do the work. You want consistent speed, not force.
- After about ten seconds, slowly move the drill (while you’re drilling) to a 90-degree angle, directly over the hole.
- As you drill it will look like little clouds of smoke are moving in the water around the hole. That’s the tiny bits of glass being drilled away.
- Usually after a minute or two , the drill bit will suddenly plunge through the plate when the hole is done (be prepared).
Drilling Metal Plates & Cutlery
- Thin metal serving dishes drill quite easily using a metal (titanium) drill bit.
- Metal cutlery (forks, spoons) can really vary for ease of drilling. You just have to try and see if it works. I have luck with about half of what I try. The rest are mightier than me and my drill and will survive a nuclear attack.
Assembly & Adhesive
Assemble the Flower
- Place some silicone sealant wherever the plates will be touching each other to keep the pieces from rubbing too tightly together. Work from back to front and line up the drilled holes as you go.
- Allow the sealant to dry (usually takes 3 hours).
- Thread a nut onto a 10″ piece of wire and fold the wire in half. Pinch the wire together to hold the nut in place and thread the wire through a washer. Thread everything through the front of the dishes. The nut and washer keep the wire from slipping through the flower. Alternately you could use a two-hole metal button at the center of your flower to hold the wire in place.
Prepare the Wooden Stem
- Drill a pilot hole and then a 5/16″ hole through the wooden stem. (Drilling the pilot hole first keeps the wood from splitting.)
- Use forks and spoons as leaves, attaching them with small wood screws.
- Hammer post into ground.

- Attach flower by threading wire through hole in wooden stem and secure at back.
Alternate Way to Mount the Flower
- You can also attach a copper pipe end cap to the back of the flower (using the same silicone sealant as adhesive). Allow to dry and insert matching copper pipe as a stem.

Original article and pictures take empressofdirt.net site
No comments:
Post a Comment