Tuesday, August 9, 2016

How to Weave a Natural Willow Christmas Wreath

How to Weave a Natural Willow Christmas Wreath
Tutorial showing how to use natural materials to create a simple willow wreath

Tutorial showing how to use natural materials to create a simple willow wreath


Making a wreath requires very little in the way of materials and equipment and will take you only about an hour to complete, start to finish.


Willow rings involved creating a circle and then weaving more switches into it. You can make them as thick or thin as you’d like and once made they’ll last for years. Best of all, you can decorate them each winter as an inexpensive and natural Christmas wreath.


Willow comes in a wide range of colours and textures


Each year on the Isle of Man John ‘Dog’, and fellow willow enthusiast Kevin, offer basket weaving and Christmas decoration classes. This year, they’re also offering classes on how to make St. Brigid Crosses, star wands, and willow Christmas wreaths.


There are many types of willow and they come in a wide range of colours and textures. The important thing to remember in choosing the one for your projects is that you can choose any and all of them. It’s completely up to you and your preference. You can find willow that’s deep red and shiny, dusky green-grey, or even matte black. The image above shows a selection of willow that John ‘Dog’ brings to his courses for students to use.


Tutorial showing how to use natural materials to create a simple willow wreath

How to make a Willow Christmas Wreath


Materials needed


  • 5-10 Willow switches approximately 5-6′ long and 1/4″-1/2″ in diameter
  • Fresh greenery from the garden – sprigs of pine, cedar, fir, and/or foliage from other evergreens
  • Raffia ribbon (optional)
  • Dried fruit (optional)
  • Christmas ornaments (optional)

You’ll also need Secateurs to cut the willow and string or florist wire to attach any decorations and greenery to the ring.


Making a wreath requires very little in the way of materials and equipment and will take you only about an hour to complete, start to finish. The willow used for this project came from John ‘Dog’ and he sourced it from a friend’s property. Growing willow on your land can help drain boggy areas and can also provide you with a regular and sustainable source of firewood.


If you can’t source willow and greenery from your own land, you might be able to find them at a local florist or tree surgeon. Another idea is to get in touch with local farms and the stallholders at Farmers Markets. Even if there isn’t any for sale at the stall, it is more than likely that you’ll be able to find a course through the resourceful folks at the market.


Tutorial showing how to use natural materials to create a simple willow wreath
Decorate your home with this beautiful and natural willow Christmas wreath...handmade by you! It's an easy and quick project that will leave you with a stunning decoration fit to decorate any stylish home #Christmas

1. The artistry of a wreath lies in the willow frame which will take the most time to make in this project. It’s fairly simple though once you get the hang of it. You begin by taking one of your willow switches and gently bend it to train it to want to go in a circular shape. Be gentle when ‘taking the Spite’ out of it, as it’s called, since you don’t want the willow to break or kink.


Tutorial showing how to use natural materials to create a simple willow wreath
Decorate your home with this beautiful and natural willow Christmas wreath...handmade by you! It's an easy and quick project that will leave you with a stunning decoration fit to decorate any stylish home #Christmas

2. Twist your switch into a circle shape just over twelve inches in diameter, or really as large as you’d like to go. The trick here is to twist from the end of the thicker part so that the extra willow that’s left hanging outside of the circular shape is thinner and more pliable.


Weaving this leftover piece of willow around the initial circular shape will hold the whole thing in place. Reach your arm through the center of the wreath and grab hold of the very end of the willow you want to pull through. If you try to pull from other parts of the shaft then it’s possible your willow will bend or kink and you want to avoid doing that for cosmetic reasons. Pulling the end of that switch back through the center of the wreath again and again will naturally twist it around the circle and create the basis of the wreath.


Note: you will likely have extra willow that won’t tuck into the frame at the end. Don’t worry about this and just let it stick out for the time being. You’ll trim all excess willow at the end.


Tutorial showing how to use natural materials to create a simple willow wreath
Decorate your home with this beautiful and natural willow Christmas wreath...handmade by you! It's an easy and quick project that will leave you with a stunning decoration fit to decorate any stylish home #Christmas

2. Take the second willow switch and set the thicker end approximately six inches back from the thickest end of the first switch. By setting, I mean inserting it from the back of the wreath and pulling slightly so that the existing frame holds the new switch in place.


Hold the switch in place with one hand, then reach with your second through the opening in the center of the wreath and grab the very end of the new switch. Pull it through and continue this pattern all around the wreath until nothing more can be pulled through.


Tutorial showing how to use natural materials to create a simple willow wreath
Decorate your home with this beautiful and natural willow Christmas wreath...handmade by you! It's an easy and quick project that will leave you with a stunning decoration fit to decorate any stylish home #Christmas

Tutorial showing how to use natural materials to create a simple willow wreath

Tutorial showing how to use natural materials to create a simple willow wreath

Tutorial showing how to use natural materials to create a simple willow wreath

5. Decorate your willow frame with fresh greenery by simply tucking the ends in between the shafts of willow. I’ve also used raffia ribbon and some gold sprayed pine cones and Christmas ornaments to finish the wreath with simple, yet classy accents.


Tutorial showing how to use natural materials to create a simple willow wreath

If using fresh greenery, the wreath will survive longer when outside in the cold, such as hung from a door or gate. Indoors it won’t last as long so if you’d like to decorate for inside the house, consider using dried materials or even artificial leaves and decor.


Tutorial showing how to use natural materials to create a simple willow wreath

Original article and pictures take lovelygreens.com site

Monday, August 8, 2016

How to Weave a Natural Willow Basket

How to Weave a Natural Willow Basket

Video Basket Weaving Series with John “Dog”


Buying a handmade willow basket can be very expensive. On the other hand, making your own will cost you little more than your time.


My two natural willow baskets are as beautiful as they are functional. I admire them every day in the house and when there’s wild edibles or apples to be collected, they serve the task perfectly. My friend John “Dog” Callister made the baskets for me and after using them I wanted to learn how to make my own.


A two year old willow basket


The last of the videos in the series is the one I think you should begin with. It shows what the basket looks like over time and how I use it to collect apples. It’s interesting to see how the bright yellow willow we began with changed to a russet but the soft grey held its colour.


The video follows with the last steps to finishing off a handmade basket including attaching the handle.


An Introduction to Basket Weaving


This is a sit-down casual chat with John “Dog” to discuss how much time and willow it takes to make a basket. It takes him just over an hour to make a small basket but students in his classes will take 2-3 hours.


Be prepared with 100 pieces of willow when you go into making a basket — it really takes that much!


Part 1: How to Weave a Willow Basket


This part outlines how to create the base of the basket. Tools you’ll need to create a basket include secateurs, a weight, needle nose pliers, and a fid.


Part 2: Building the sides of the basket


With the base complete, the second part continues with attaching the uprights and creating the sides of the basket. Finishing with a simple weave at the top, you’ll move on to part 3 to complete the project.


To see another of John Dog’s projects, head over to see how he makes simple willow Christmas wreaths.


Original article and pictures take lovelygreens.com site

Friday, August 5, 2016

How to plant a Succulent Treasure Chest

How to plant a Succulent Treasure Chest
Succulent Treasure Chest DIY from Lovely Greens

Use a small wooden chest and succulent cuttings to create this tiny planter


Have you thought that succulents look like jewels? Each lush cluster of juicy leaves like a precious stone, one more beautiful than the last. Taking a few of them and planting them into a treasure chest makes so much sense. Whether mini, as in this tutorial, or in a larger chest, the succulents planted inside will intermingle and grow down the sides like a living carpet of gems. What a lovely thing to have growing in your home or garden or even better to give as a gift.


This post may contain affiliate links. Thank you for your continued support of this site!


How to use any container to plant up a treasure trove of lush and delicate succulents #succulents

You can’t go wrong with mixing and matching succulents. They happily grow together and fill bare spaces with their soft yet spiky greenness. They also don’t need much in the way of soil so they’re great for using in places and containers that might not be able to hold much of it. Mini planters are perfect for succulents and practically any container can be converted into a planter as Ashley from The Bees Knees showed me for this tutorial.


Ashley uses succulents in many of her pieces and though she doesn’t consider herself all that green-fingered, she says that making and taking care of succulents is both easy and inexpensive. You can make them up in an afternoon and with just minimal watering and aftercare, you can enjoy the beauty of your living artwork pieces for years to come. Here’s how you make them:


How to make a Succulent Treasure Chest


Materials needed:

– A small chest container (or any container any will do, be it wooden, plastic, metal, or shell)

– A square of plastic, be it a garbage bag, or any other non-permeable plastic

Cactus potting mix

Activated carbon/charcoal

– Sand – beach sand, building sand, Pink sand, Blue sand any non-toxic sand works!

Assorted Succulents: Jade plant, Hen and Chicks, Alpines


Tools

Long tweezers – for helping place the succulents

– Spoon – for scooping and patting the potting mix, sand, charcoal

– Paint brush – for gently brushing the succulents of any excess dirt

– Spray bottle filled with water


Step 1 – Take Succulent Cuttings

Basically all you do is locate or purchase your succulents and pinch off small pieces like you see in the image above. These plants grow easily from small pieces taken from the parent plant so if you have succulents growing in the garden, or you see some growing on a wall outside your home, or in a public space, go on and take a a few pieces. Be sensible and respectful if it’s not in your own garden though. Check out this link for a gorgeous assortment of succulents.


Afterwards, leave your ‘cuttings’ out in a cool and airy place for a few days so that the broken stems have time to dry and develop calluses. After this, you can plant the succulent into practically any soil and it will grow to become a whole new plant!


How to create compost for succulents #succulents

Step 2 – Create the Growing Medium

Take the piece of plastic and use it to line the bottom and sides of your chest/container. Leave the edges overhanging for now. Now layer in a thin layer of sand, about 1/2″ deep if it’s a small container like shown in this tutorial. Next, a fine layer of the charcoal, and on top of both of those layers fill the rest of the container to the top with cactus compost. Trim the plastic lining so that it comes up to the top edge of your planter.


These layers help to create drainage (sand), sanitize the sand and compost (charcoal), and create a free-draining growing medium (cactus compost).


Step 3 – Plant the Container

Spray the cactus compost with water until it’s moist but not soaking wet. Using the long tweezers, create spaces in the compost and gently insert each succulent cutting. Place taller succulents at the back, trailing ones at the front and sides and medium to small height succulents in the centre. When you’re finished with your arrangement, use a paintbrush to gently clean any soil off the succulent leaves then set the planter in a warm, light, and airy space. Try not to touch the planter for the first few weeks other than to water it so that the cuttings have time to establish themselves. Afterwards, feel free to move it around and gift it.


How to use any container to plant up a treasure trove of lush and delicate succulents #succulents

Step 4 – Aftercare

Care of your succulent planter is easy. The plants like moist soil so try to keep an eye on the planter, especially on warm days. Use the squirt bottle to spray between the leaves and directly onto the compost. The plants won’t require any other additions but they will grow and potentially start developing roots on their stems. This is their way of finding a new place to grow so trim these dangly and leggy pieces off and plant them up in a new container!


If you liked this tutorial you’ll also like this one on how to create a DIY Succulent Terrarium. Ashley from The Bees Knees shows us again how to create a succulent planting but this time inside a gorgeous glass container. What I like about this one is that you see the layers of soil, sand, and charcoal from the sides and you can also hang the terrarium in a window or above a work space.


Original article and pictures take lovelygreens.com site

Tuesday, August 2, 2016

How to Paint Watercolor Succulents the Easy Way

How to Paint Watercolor Succulents the Easy Way

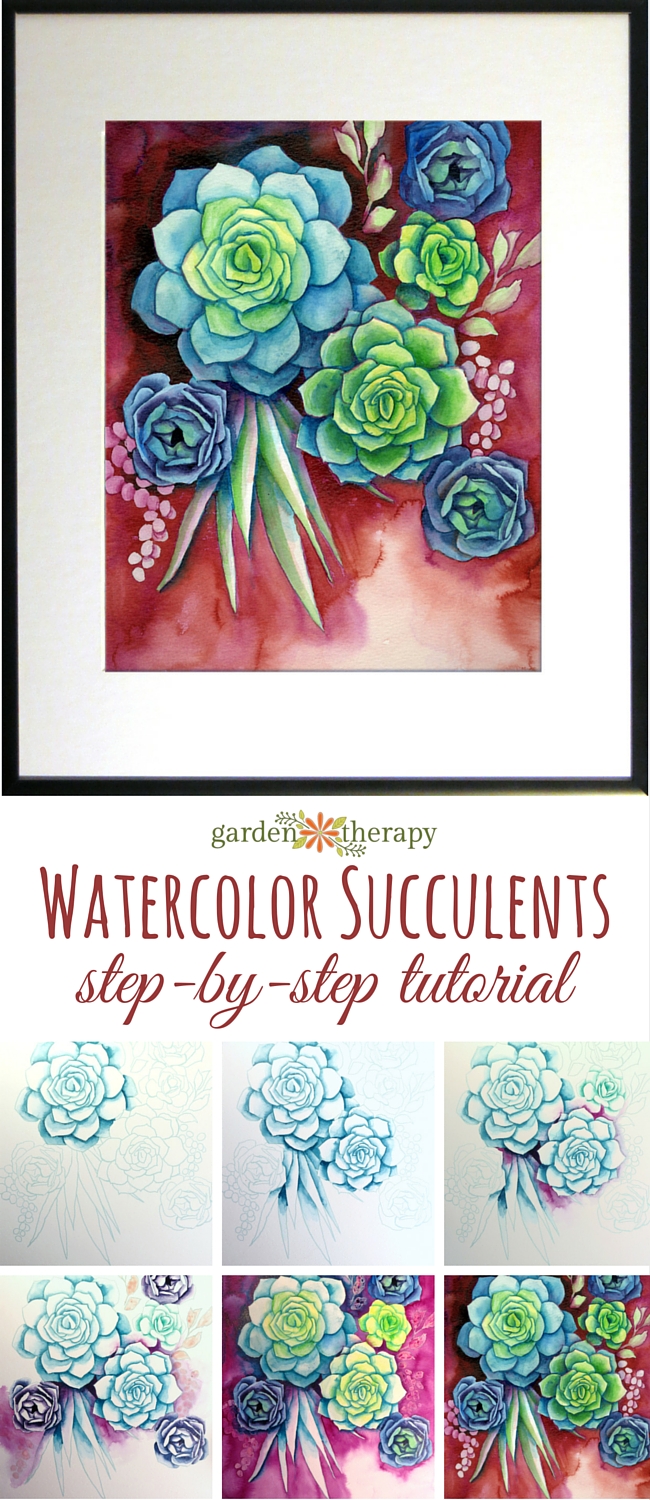
Have you ever wanted to learn how to paint the easy way? I love the look of watercolor painting but I admit that I find it a bit intimidating to get started with. It’s probably been 20 years since I dabbled in the light touch of water and paint, finding myself more at home with forgiving acrylics. Then I discovered the work of artist Dana Martin, who takes inspiration from nature and brings it to life with a dab of paint and ink. Dana has agreed to show us the steps to make your very own watercolor succulents painting. The best part? She has started the piece for us by creating a download of the image to get us started!


Step by step instructions for how to make this watercolor succulents painting with a downloadable pattern

How to Paint Watercolor Succulents


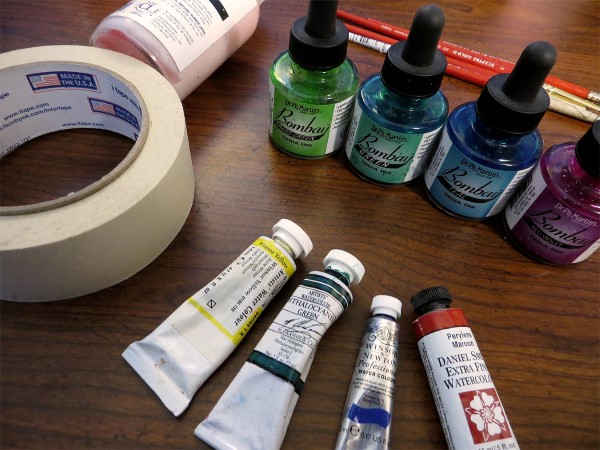
Materials


  • Printable succulent template – see it HERE
  • Watercolor paints and/or inks*
  • 8.5”x11” or 9”x12” sheets* of 140 lb. watercolor paper (for this demo, I used a sheet of Canson Montval).
  • Masking tape painters tape

*For this demo, I used 4 watercolors: (Yellow Ochre, Phthalocyanine Green, Cobalt Blue, Perylene Maroon) and 4 Dr. Ph. Martin’s Bombay inks (Grass Green, Green, Teal, Red Violet)


Because I like to use rich, dark colors in my art, I work with artist-grade, highly pigmented paints. I use inks as well as watercolors because the inks are permanent once dry; they won’t bleed if you paint over them. That said, you don’t have to have fancy paint to make art. Use what you have on hand. This project can be done with as little as a basic watercolor pan set. The colors will probably not be as dark as those shown here, but you can still paint a beautiful watercolor.


How to Paint Watercolor Succulents Materials

Optional Materials:


  • Masking fluid (not recommended for anyone with a latex allergy or for children 12 and under)
  • 11”x14” mat with 8”x10” opening
  • 11”x14” frame

Note: in this demo, I describe the steps I went through to create my version of the Watercolor Succulents painting, but it is just one of countless ways this painting could be done. While I hope this demo is useful to you, it is a guide only. There is no wrong way to make art. Every painting is unique, and when you paint, you get to make the choices!


Make it!


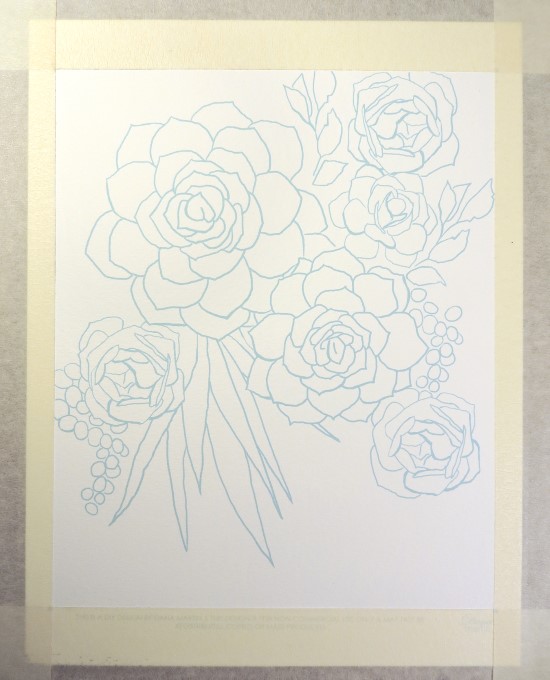
First, print the Watercolor Succulents image on the watercolor paper. To do this step: use the link below to see the file, then save it to your computer. Remember where you saved it so you can access it again. Print the page and you are ready to get started! You can choose from a light blue or light sienna design.


To prep for painting, tape the paper to the work surface so it won’t buckle when it gets wet. Use the guide dots in the corners to align the tape. The tape should be placed so that it just barely covers the dots.


How to Paint Watercolor Succulents Step (1)

Nearly the entire painting is done with one basic watercolor technique: fading edges. Be sure to have two brushes on hand for this — a fine pointed brush to apply the color (Teal ink) and a slightly larger brush to apply clean water.


How to Paint Watercolor Succulents Step (2)

To fade the edges of the succulents, lay down a brush stroke along the edge of each leaf, and then immediately go over the outer edge of that brushstroke with the clean wet brush so that the color fades out.


Define more of the succulents with Teal ink and the same fading edge technique.


How to Paint Watercolor Succulents Step (4)

Lay in a little Red Violet ink for contrast.


How to Paint Watercolor Succulents Step (5)

Then, switch to Green ink for the next succulent.


How to Paint Watercolor Succulents Step (6)

Mix Teal ink and Red Violet ink to paint the next three succulents.


How to Paint Watercolor Succulents Step (7)

There are two small areas in the painting with little round leaves. Paint over these with a light wash of Red Violet ink, and when it is dry, cover the little round leaves, as well as the two branches of leaves in the upper right corner, with masking fluid. Use cheap old brushes to do this and wash the brushes immediately afterward because the fluid will ruin them if it dries on the bristles.


How to Paint Watercolor Succulents Step (8)

Note: masking fluid saves time, because once it dries you can paint over the entire sheet of paper without worrying about getting paint in the wrong places. Masking fluid contains latex and is slightly toxic, so be sure to work in a ventilated area while applying it. If you are doing this project with children or you simply prefer not to use masking fluid, feel free to skip this step. You can always paint around the areas where you don’t want color.


Now, wet the entire background with a clean wet brush, before dropping in Red Violet ink. Paint around the large succulents. If the small leaves are covered in masking fluid, you can paint over them. Leave a small area in the bottom right corner unpainted to keep the background from looking too flat.


How to Paint Watercolor Succulents Step (9)

When this is dry, start giving the succulents a little more color. I used Yellow Ochre and Cobalt Blue for this, as well as a bit of Grass Green ink.


How to Paint Watercolor Succulents Step (11)

To have the background look just slightly more neutral, brush over it with a wash of Perylene Maroon.


How to Paint Watercolor Succulents Step (12)

When this is dry, remove the masking fluid. Start at one edge and gently pull the masking fluid off the paper. The paper can tear if the masking fluid is removed too roughly.


Now for the finishing touches. The succulents need just a little more color here and there to pull the painting together. Because Red Violet is the main color in the background, use light touches of it on the succulents to unite the palette. Also, add a bit more of the Grass Green ink to the centers of the succulents. Since Grass Green is the brightest color in this palette, it makes those areas pop.


The painting is done! Now all that needs to be done is put it in a mat and frame!


How to Paint Watercolor Succulents Step (13)

I hope that this demo has been helpful to you and that you’ve enjoyed creating your own unique piece of art. Feel free to tweet me a shot of your new painting @DanaDraws. I’d love to see your results!


About the Author


Dana Martin Artist

Dana Martin is an artist and illustrator whose vivid watercolors explore the intersection of nature and fantasy. She has illustrated for several magazines, including the ‘Weeder’s Digest,’ GreenPrints. Her Etsy shop, I’ll Call You from Paris, is home to lush botanical prints, whimsical flower girl paintings, and a hoard of other small treasures. She documents her artistic adventures (and misadventures) at The Illustrated Life.


Save


Original article and pictures take gardentherapy.ca site

Monday, August 1, 2016

How To Paint Rocks

How To Paint Rocks

Painted rocks and stones are an easy craft for any age group. The designs can be as simple or complex as you like.


If you would like to paint simple designs or follow your muse, you'll just need a few supplies (listed below) and you are ready to roll.


If you would like to learn how to paint animals and flowers like the ones pictured here, I've listed several good reference books that provide clear, step-by-step instructions, working one color at a time.


For more information on any of these resources, see my eBay collection:


Creative Painted Rock Resources


  • You can use any size rock or stone with a fairly smooth surface.
  • Make sure they are clean and dry before painting.
  • If you're new to this, you may find it easier to paint a palm-size rock rather than something smaller.
  • You'll notice most of the animals depicted on these rocks are sitting curled up—a convenient way of working with the shape of the rocks.


  • First cover the rocks with an acrylic paint primer (same stuff used on walls).
  • For the actual decoration and details, any acrylic craft paint is fine. The Martha Stewart brand shown here is very good.
  • Always allow the paint to dry completely before adding the next color or detail.


When the rocks are painted and completely dry, you can protect them with a sealant.


I like Mod Podge Outdoor but you can also use other good outdoor sealants.


Make sure you follow the directions on the label and apply several coats.


Tags:


painted rocks


craft projects

diy

garden art

painted stones

stone art

rock art

craft paint

easy craft

art supplies


Original article and pictures take www.ebay.com site