Tuesday, May 31, 2016

How To Make A Garden Frog Prince

How To Make A Garden Frog Prince
How to make a charming garden art frog prince for your garden.
How to make a garden art frog prince

Make a Frog Prince


A friend saw a garden art frog prince during a garden tour and asked me to make one. She didn’t have a photo, so all I had to go by was ‘it’s round, green, funny, and wears a crown’. Okay. I can make one of those! I confess, it’s not my usual style, but I was up for the challenge.


For Experienced (Or Adventurous) Crafters


This project is suitable for a crafty person with some experience (or someone willing to experiment). I say this because I work with thrifted items so your supplies are not going to be the same as mine: you’ll have to make some decisions and adaptations along the way to make it work.


Anatomy Of A Frog Prince


The frog prince is basically a ball (sturdy lamp globe or bowling ball) with wire arms and legs attached, and the body (ball) is covered in flat-bottom marbles. The accessories —crown, flowers, and whatever else you dream up—make it charming.


Materials


I’ll tell you what I used and also give some suggestions for alternate materials. I like to make-do with things I have on hand or can find used at yard sales or thrift shops.


Body


  • Sturdy glass lamp globe or old bowling ball (it will be easier to attach arms and legs if you use a bowling ball and can drill small holes in it).
  • Flat-bottom marbles (green). My globe is 7″ in diameter and I used approximately 220 (3/4″) flat-bottom marbles.
    TIP: If you will doing a lot of projects using these marbles, there are sellers online who sell them in bulk.

Arms & Legs


Eyes


  • Plastic ice cubes or ping pong balls or tea lights (pick something lightweight that will adhere easily).
  • Bottle caps (for eyelids-optional).
  • Googly eyes, two flat black marbles, or something to else you can attach that looks like eyeballs. Or you could paint them on.

Mouth


  • Red beads or flat-bottom marbles or paint.

Embellishments


  • Crown, synthetic flowers, toy diamond ring, toy ladybug, butterfly, bee, glass slipper…
  • Plant pot stand or toy chair (for frog to sit on).

Bonus Points


  • If you use a bowling ball, you can drill a hole in it to hold a fork painted red (with spray paint or nail polish) as a long tongue catching a fly.

Tools & Adhesive


  • Needle-nose pliers for bending arm and leg wires.
  • Silicone sealant (waterproof, outdoor, clear-drying) to use as adhesive.
  • Caulking gun (for silicone sealant in a tube).

Assembling Your Frog Prince


You’ll need to work in sections, allowing the silicone to dry so the marbles don’t shift as you move the ball around.


1. Prepare the arms and legs. This is where you have to use your crafty sense and adapt.


If you’re using a bowling ball body, you can make separate arms and legs (with wire and beads) and insert them into drilled holes.


For my glass globe body, I did the following:


  • I used 16 gauge wire. I used one long piece for the arms and one for the legs. The length you need will depend on how large your body ball is—you’ll need approximately 3x the diameter of the ball.
  • The middle section of each wire is going to wrap around the body ball (see photo below). Test it out to see how what length you’ll need, allowing enough length for forming hands/feet with some twists or spirals.
  • Twist one end of the wire with the pliers to form whatever sort of hand/foot looks good to you. I played around with a few shapes (hoping for something like a webbed foot) but settled on a simple spiral. You may want the feet to be larger than the hands.
  • Add enough beads to fill the space from the hand/foot to the body x2. No beads are needed on the section of wire that will wrap around the body because it will be covered with marbles.
  • After adding all the beads, form the second hand/foot with the pliers—this keep the beads from slipping off the wire. My frog arms used 36 beads total.

Here’s one of the hand/foot ideas I tested out:


Frog Prince Garden Art DIY
Here I’m testing out the wire arms to see how they look:

Frog Prince Garden Art DIY
2. Prepare The Eyes

  • I used green plastic ice cubes but you can use anything that seems eyeball-ish to you. Ping pong balls would work too.
  • Attach or paint on the eyeballs and eyelids (I used bottle caps) and allow to dry.
  • Have eyes ready to attach to body during next step.

3. Decide where you want the arms, legs, eyes, and mouth. You could mark the areas on the body with a Sharpie marker if that helps. The flat-bottom marbles will be applied over the wires, around the eyes and mouth, and covering the rest of the body.


4. Attach the arms and legs and eyes


This part can get messy and requires a sense of humour and willingness to adapt, as much of life does. Keep a damp rag available for wiping off your fingers.


  • If you’re using a bowling ball, drill tiny holes to insert the arm/leg wires and a tongue (if you’re adding one), and attach the eyes. It will look particularly frog-ish if you put the eyes fairly far apart.
  • Attach the arm and leg wires to the globe by applying silicone sealant (works as adhesive), holding the wire in place, and adding marbles over top. Decide where you want the eyes and add marbles around them. As the silicone sets, it will hold everything in place. You may want an assistant to hold things in place while you work.
  • TIP: Set aside any smaller marbles (or green beads) for filling in little gaps between the body marbles.

Here you see the frog with his arm/leg wires attached, eyes in place, and marbles over top the wires to hold everything in place. I’ve set the lamp globe on a cup to hold it steady and off the table while I’m working:


Frog Prince Garden Art DIY
5. Make The Mouth

  • Attach red beads (or whatever you’re using) to form a nice wide mouth. I outlined my frog’s mouth with blue/purple beads for more definition.
  • Now is a good time to set the green body marbles all around the mouth.

Frog Prince Garden Art DIY
6. Marble The Body

  • Cover all remaining areas of the body with flat-bottom marbles.
  • You might want to fill in any gaps with smaller marbles or green beads.
  • As mentioned, you’ll probably need to work in sections and let one area dry before working on the next.

7. Embellish Your Boy


When everything is dry, it’s time to dress up your Prince.


Some ideas include:


  • A crown (kind of essential, I think), toy— flowers, bugs, diamond ring, a throne or chair, little flower pots, watering can… anything you like!

Frog Prince Garden Art DIY

And he’s ready for the garden. Clearly this is one of the goofiest garden art items I’ve ever made but it was fun to figure it out. I’m not sure if he’s hideous, cute, or a bit of both!


~Melissa the Empress of Dirt ♛


How to make a charming garden art frog prince for your garden.

Original article and pictures take empressofdirt.net site

Friday, May 27, 2016

How to Make a Garden Art Chandelier

How to Make a Garden Art Chandelier

Make a garden art chandelier using some old household junk, marbles, and lamp crystals.


For more, also see how to make a mini greenhouse from old house windows.


Make a garden art chandelier using some old household junk, marbles, and lamp crystals.

I may receive a commission if you purchase something mentioned in a link on this post for sites including Amazon.com. Other links may go to websites where I have been paid to write a blog or article. See the entire disclosure here.


Garden Chandelier


My garden chandelier was one of the first garden art projects I made for my garden, and it’s still one of my favourites. Using a recycled metal kitchen colander, some thrifted lamp parts, marbles, and glass gems, it’s a unique trash to treasure chandelier.


This is a do-it-yourself chandelier but there is no electrical wiring involved. It’s simply a pretty garden decor item that looks lovely as it sparkles year round with the sunlight streaming through. I particularly like how it adds some vibrance to the snowy winter garden.


I’ve listed complete instructions and ideas for finding materials below. Depending on your local resources and if you get lucky finding recycled lamp crystals, you should be able to make one for about $20.


Do It Yourself Chandelier


Make a garden art chandelier using some old household junk, marbles, and lamp crystals.
Bring some bling to your garden!

I suggest using a kitchen colander or some other similar metal item that already has some holes in it. This will make it easy to attach the wires holding the marbles. Personally, I really like the combination of rusty or rustic with something exquisite or up-scale but you can pick what suits you best. It’s your art, after all.


One thing to really watch for is old ceiling lamps at thrift shops and yard sale. There’s a lot of really tacky ones from the 1970s and 80s that actually have a lot of useful, reusable parts on them including faux crystals. Ignore how ugly the lamp is and consider harvesting the parts. I save the plastic-coated wires and wire chains for other garden projects. It can all be put to good use eventually.


Make a garden art chandelier using some old household junk, marbles, and lamp crystals.

Garden Chandelier Parts
How To Make A Garden Chandelier

Chandelier Parts


The point of making garden art from old stuff is to use what you have or can find in the garbage or cheap at a thrift shop. Don’t get hung up on finding a particular part: let serendipity guide you and adapt to what you find. There’s so many possibilities!


  • Metal kitchen colanders and metal lamp shades make an excellent base. I look for anything that has holes already in it and seems sturdy, this way I can thread wire through the holes to hang the beads, marbles and crystals.
  • Round and flat-bottom marbles Use an outdoor silicone sealant such as GE Silicone II Clear Sealant or an adhesive like Weldbond to attach flat-bottomed marbles to the colander. I also wrap round marbles in wire to create my own dangling crystals.
  • Beads Check thrift shops for bags of glass, crystal, plastic, and wooden beads.
  • Old lamp crystals These can really range in price. I found some of mine in the garbage on an old, ugly, 1970’2 lamp but they also show up on eBay for ridiculously (high) prices. If you can’t find any, substitute with beads or old necklace parts or anything else that will catch the light and add the colour you want.
  • Wire The lower the gauge number, the thicker the wire. I use 16-20 gauge wire. Quality can really vary. I do not like Dollar Store wire—it tends to be too flimsy. I try to find something that won’t snap when I twist it. You want it strong enough to endure wet and snowy weather but not so thick that it looks bulky.
  • Copper Wire Copper has become quite expensive these days, however, sometimes people get rid of things like old copper tubes that were used for water lines to refrigerators. I take them when I see them in the garbage. Copper wire works great for wrapping marbles because it’s thick but flexible.
  • Adhesive Outdoor adhesives have become really good in recent years. I like GE Silicone II Clear Sealant and Weldbond. Decide whether you want to work with a caulking gun or squeeze tube. Caulking gun tubes tend to be much less expensive overall and they’re not really guns, people! They’re dispensers, really.


Want an easy way to turn an old chandelier into a bird feeder? The orioles love this one.


Marbles and Wire On Garden Chandelier

Garden Chandelier Winter and Summer
How To Make A Garden Chandelier

Make a garden art chandelier using some old household junk, marbles, and lamp crystals.

Original article and pictures take empressofdirt.net site

Wednesday, May 25, 2016

How to Make a Floating Pond Planter

How to Make a Floating Pond Planter

Homemade floating pond planters or mini islands are a lovely way to add seasonal pops of colourful flowers to your garden pond. You can also use them to sail garden art or candles on a summer evening.


After some experimenting, I came up with a truly simple way to make my own, just using supplies from the garden shed. I’ll walk you through the steps so you can make your own pond oasis.


Related: How I Built a Garden Pond (All by Myself)


Homemade floating pond planters or mini islands are a lovely way to add pops of colourful flowers to your garden pond. You can also use them to sail garden art or candles. They are very pretty on a summer evening.

I may receive a commission if you purchase something mentioned in a link on this post for sites including Amazon.com. Other links may go to websites where I have been paid to write a blog or article. See the entire disclosure here.


Create a Floating Island of Beauty for Your Pond


Floating pond containers, sometimes called mini islands, starting appearing in gardens over the past few years. I just love how they add a burst of colour to the pond, especially when I’m waiting for the water lilies to bloom.


Homemade floating pond planters or mini islands are a lovely way to add pops of colourful flowers to your garden pond. You can also use them to sail garden art or candles. They are very pretty on a summer evening.

Buy or Make


These floating containers are available in shops or you can make your own. There are several styles and sizes here on Amazon if you want to get ideas.


I tried making them several different ways and finally opted for the simplest way because it worked so nicely in my pond.


Note of Caution
Most plants have some level of toxicity if consumed by humans or animals including fish. Before adding any plants to your pond, be sure they will not be harmful to your fish. This not only pertains to a floating planter, but any plants in your garden where the wind could blow the fruit or leaves into the water.

I have not found a good list to refer you to so for now I will have to leave it for you to do Google searches to research your plant choices.


How to Make a Floating Pond Planter


Step 1


Make a floating ring with the pool noodle, wire, and waterproof tape.


Homemade floating pond planters or mini islands are a lovely way to add pops of colourful flowers to your garden pond. You can also use them to sail garden art or candles. They are very pretty on a summer evening.
Cut the noodle to fit around the black, plastic pot, just under the top lip.

Homemade floating pond planters or mini islands are a lovely way to add pops of colourful flowers to your garden pond. You can also use them to sail garden art or candles. They are very pretty on a summer evening.
Cut a piece of 16-gauge wire the length of your noodle piece plus six inches. You will also need a piece of landscape fabric this length x 12 inches deep.

Homemade floating pond planters or mini islands are a lovely way to add pops of colourful flowers to your garden pond. You can also use them to sail garden art or candles. They are very pretty on a summer evening.
Form a small loop on one end of the wire and thread it through the entire noodle.

  • Bring the two noodles ends together as closely as possible and join the wire ends, forming a ring.
  • Clip off any excess wire.

Homemade floating pond planters or mini islands are a lovely way to add pops of colourful flowers to your garden pond. You can also use them to sail garden art or candles. They are very pretty on a summer evening.
Cover the noodle ends in waterproof tape, covering the area where you joined the wire.

Homemade floating pond planters or mini islands are a lovely way to add pops of colourful flowers to your garden pond. You can also use them to sail garden art or candles. They are very pretty on a summer evening.

Step 2


Wrap the noodle ring in landscape fabric.


Homemade floating pond planters or mini islands are a lovely way to add pops of colourful flowers to your garden pond. You can also use them to sail garden art or candles. They are very pretty on a summer evening.

Step 3


Insert the black, plastic pot, slide the covered ring up, just below the lip of the pot, and turn the whole thing over.


Homemade floating pond planters or mini islands are a lovely way to add pops of colourful flowers to your garden pond. You can also use them to sail garden art or candles. They are very pretty on a summer evening.

Step 4


Tuck the fabric in nice and tight, all around the pot.


Stop at this step if you want a fancy hat instead.


Homemade floating pond planters or mini islands are a lovely way to add pops of colourful flowers to your garden pond. You can also use them to sail garden art or candles. They are very pretty on a summer evening.

Step 5


Insert a small bag of stones to weigh down the bottom of the pot.


Homemade floating pond planters or mini islands are a lovely way to add pops of colourful flowers to your garden pond. You can also use them to sail garden art or candles. They are very pretty on a summer evening.

Step 6


Add potted flowers, garden art, lanterns, candles, or whatever you like.


As mentioned, you want to be mindful of plants that could be toxic to pond fish, not just from these containers but anything growing in your garden that could blow into the pond.


Also, the inserted flower pot can be housed in a thick plastic bag if you’re using plants that do not like their roots constantly wet. Many annuals, though, are fine with this.


If your pond is really large, you can attach a leash to the floating planter to make it easier to pull it back to shore. For smaller ponds like mine, a bamboo stick works fine.


Homemade floating pond planters or mini islands are a lovely way to add pops of colourful flowers to your garden pond. You can also use them to sail garden art or candles. They are very pretty on a summer evening.
In the one pictured below, I added a berry wreath, pickle dish, and a votive candle.

Homemade floating pond planters or mini islands are a lovely way to add pops of colourful flowers to your garden pond. You can also use them to sail garden art or candles. They are very pretty on a summer evening.
Surprise Frog Taxi

After adding a few of these to my pond, I discovered that frogs love them too! They jump into the planters and ride around all day, sunbathing and napping. It’s so sweet!


Frog riding in a floating garden pond planter.

If you make this project, I love to see photos shared on my Empress of Dirt Facebook page.


~Melissa the Empress of Dirt ♛


Original article and pictures take empressofdirt.net site

Tuesday, May 24, 2016

How to Make a Butterfly Feeder

How to Make a Butterfly Feeder

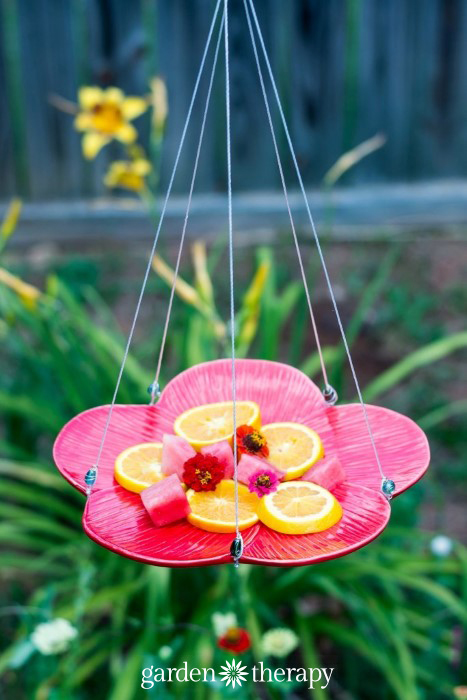
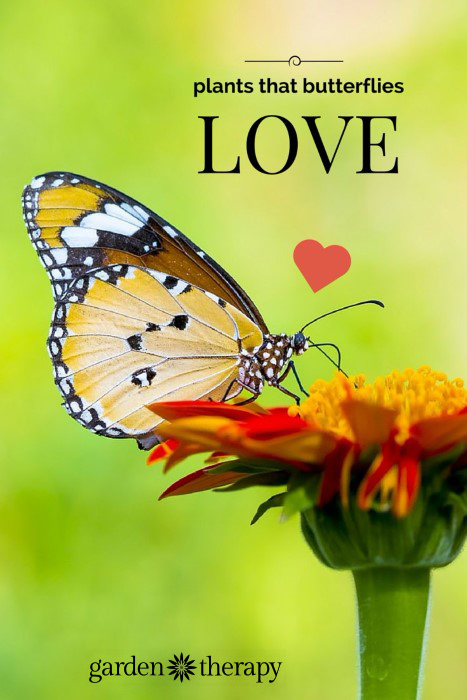
Butterflies are magical creatures that grace us with their beauty. Their bright colors are a welcome addition to any garden. As with bees, they are essential pollinators. How do you attract them your yard? There are many plants that they love, but an easy way to attract butterflies to your garden is to make a butterfly feeder.


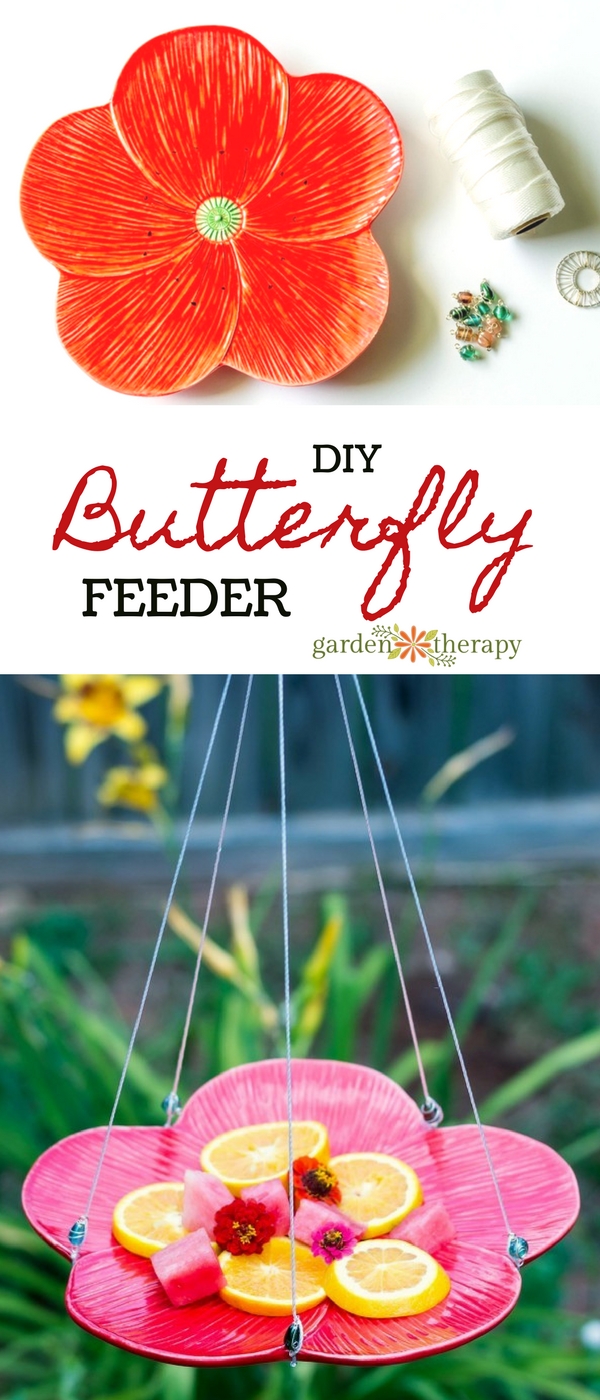
Make this! DIY beaded butterfly feeder instructions

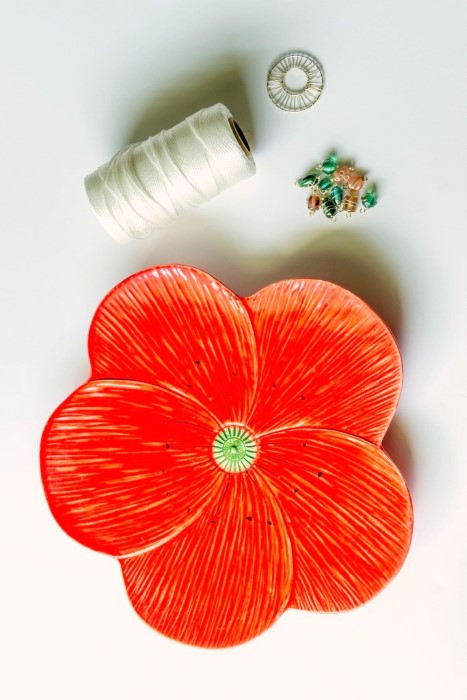
Supplies


  • Plate
  • Mason line or twine
  • Washer (or another metal ring)

Any type of plate will do. The plate I used is shaped like a hibiscus flower. There are notches where the “petals” connect, making it easier to fit in the macrame-style holder. If you plan to use a round plate, you will need to get a wall mount plate holder.


How to Make a Butterfly feeder

I used mason line to hang my feeder. I used it because it’s made from a synthetic material that will not deteriorate as fast as natural twine. The feeder will hang outside in an area with little shelter and I wanted to make sure the rope holds through the whole season. The beads are optional. I like the way they dress up the feeder. Butterflies delight us with their beauty, so I decided to make this feeder extra pretty for them.


How to Make a Feeder


How to Make a Butterfly feeder macrame style

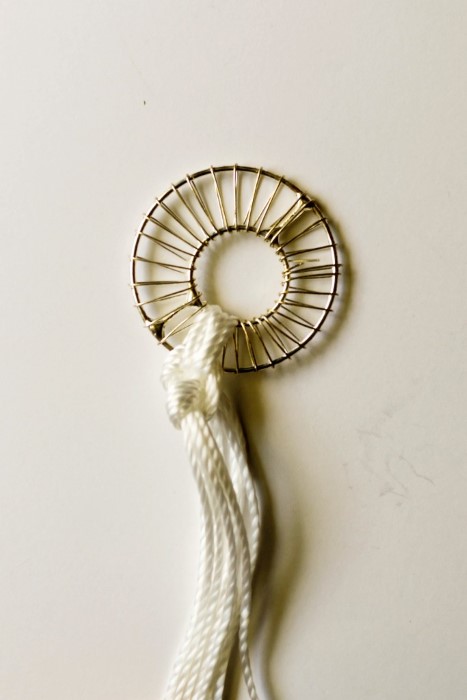
Cut 5 lengths of mason line about 3 feet long. I used 5 pieces of string because I have 5 petal notches on my plate. If you are using a round plate with a wall hanger, you should only need 4 lengths of string. Loop the pieces of string through the metal ring and tie a double knot. Do not worry about the ends at the moment.


How to make a beaded butterfly feeder

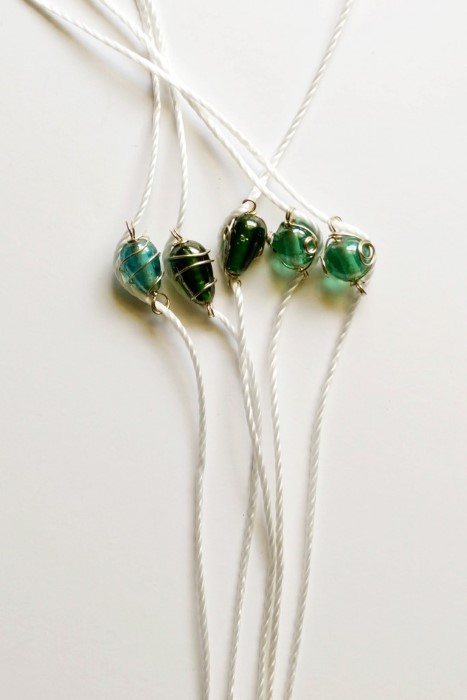
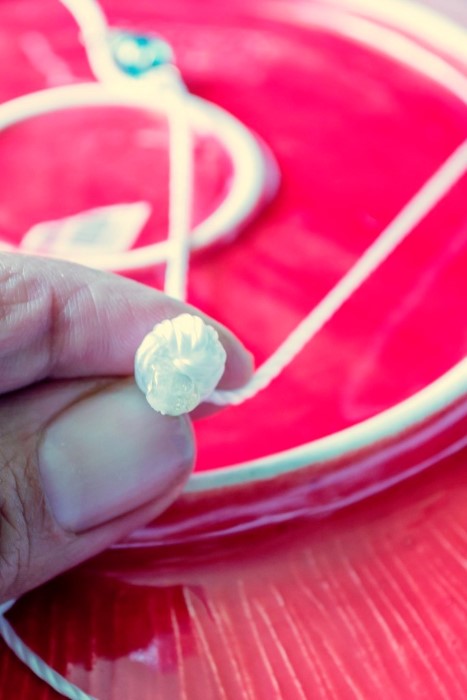
If you are using beads, add them about 12 inches from the top. Make sure the beads all line up evenly. Then, tie a knot underneath each bead.


How to Make a Butterfly feeder knots

Tie all the strings together about 6 inches down from the beads. Cut the excess mason line a half inch from the knot. Use a lighter or flame from a candle to lightly melt the edges of the strings. I melted mine all the way back to the base of the knot. Do this to the knot that’s securing the metal ring too. This will keep frays at bay and help keep the knot from slipping.


How to Make this DIY butterfly feeder and attract more butterflies!

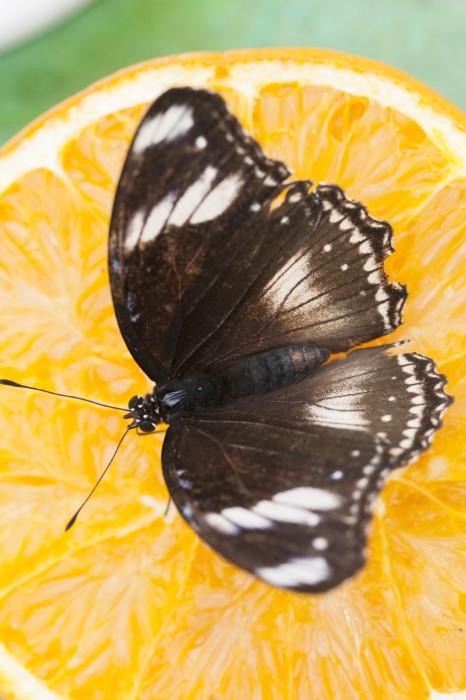
Set the plate in the holder and hang it up in a sunny place in your garden. What should you feed butterflies? They feed on nectar (sugar from a plant). So, fresh fruits work very well here. You can also make nectar from honey and water, but I think it’s less messy to add some fruit to the plate. Butterflies are attracted to red, yellow, orange, pink and purple colors, so keep that in mind when selecting fruit. If you are worried about ants getting in on the feast, you can add a bit of water to the dish as a deterrent.


Butterfly on orange in DIY butterfly feeder

Tips for Attracting Butterflies


A butterfly feeder is only one way to attract butterflies to your garden. If you want to keep them really happy, you will need to have plants that serve the needs of all the life stages of the butterfly. Adults need nectar, a safe place to lay their eggs, food for their larvae and a place to form chrysalides (cocoons). In addition to the right plants, butterflies like full sun, a place to rest their wings and a place to drink. An easy way to create a butterfly sanctuary is to plant bright flowers that love full sun, add a flat rock to the garden for the butterflies to bask and put a small shallow pan of water out for them to drink.


Plant these flowers in your garden to attract butterflies

Butterfly-Friendly Plants


You really cannot go wrong with any type of brightly colored flower for butterflies. However, remember that the plants must support the larvae and cocoons as well. There are many butterfly-friendly plants; so the chances are you can find a few that will suit your growing zone. Here’s a list of some plants that will attract butterflies to your garden:


  • Allium
  • Aster
  • Bee Balm
  • Black-eyed susan
  • Blanket flower
  • Butterfly bush (Buddleia)
  • Catmint
  • Dill
  • Goldenrod
  • Lantana
  • Lavender
  • Lilac
  • Lupin
  • Milkweed
  • Nasturtium
  • Phlox
  • Purple Coneflower
  • Sage
  • Shasta daisy
  • Sweet alyssum
  • Yarrow

Find out more about why some butterflies love milkweed and how to grow it in your garden here. In addition to having a pretty flower garden, you can attract these lovely pollinators at the same time; a perfect garden partnership.


Now, don’t forget about the bees! Here is how to attract them to your garden (and a bee bath project that the butterflies will love).


Butterflies and bees aren’t the only beneficial insects you want in your garden! Find out about the 7 best bugs for the garden.


Pin it!


How to make a Butterfly Feeder

Original article and pictures take gardentherapy.ca site

Friday, May 20, 2016

How to Make a Botanical Art Birdfeeder

How to Make a Botanical Art Birdfeeder
Turn a plain birdfeeder into a botanical beauty with this pressed flower art project. And, good news, you can adapt the project to fit what you have—fresh, pressed flowers not required.

You May Have an Art Tool in Your Printer


This project started with an old homemade birdfeeder I purchased at a yard sale for $1.


I originally thought it would be neat to decoupage pressed flowers to the birdfeeder, as I have been obsessing over pressed flower projects recently, but I knew I didn’t want to give up my collection.


That’s when I remembered an art obsession many of us had back in the early 2000s when home computer printers and digital cameras started to become more affordable.


Scanning!


If your home printer allows scanning, you can create images of pressed flowers, butterflies, and anything else that flattens nicely to make unique art sheets. Once printed, you can decoupage them to any surface like this feeder.


I’ll show you how I gave this birdfeeder a botanical makeover.


Turn a plain birdfeeder into a botanical beauty with this pressed flower art project. And, good news, you can adapt the project to fit what you have—fresh, pressed flowers not required.

In projects like these beeswax flower pots (see below), it’s best to use the actual pressed flowers. But, for something like a birdfeeder, it’s preferable to use printed copies of the flowers to ensure durability. Plus, it’s a Mod Podge opportunity, which is kind of hard to resist.


Make your own beeswax flower pots with pressed flowers
Want to know how to press flowers including a super fast method?

See How to Press Flowers and Leaves here.


Scan It, Janet


The quality of scans you get varies greatly by make and model. My printer is in the Canon MX series and I’d rate the quality of the pressed flower scans, even on the best settings, as mediocre at best. It’s fine for printed documents, but it doesn’t really have what’s needed to capture the colours and depth of botanicals. I haven’t tested other printers but I do recall artists having good luck with various Epson printers that have the capacity to better capture some depth of field. Some can capture so much depth that it’s possible to scan entire live plants as well by placing them near the open document table (scanning surface). In fairness, if a printer isn’t designed for this purpose, it’s just dumb good luck if it’s a scanning genius.


That said, I used my less-than-perfect home printer for this project.


So, to get the images, I place the pressed flowers and leaves face down on the glass (also called the document table) and carefully place a background piece of paper or cardstock on top. This prevents the lid from damaging the botanicals when the lid is closed during the scanning process.


Scanning software allows you to preview the item, in case you want to make any adjustments, and then properly save the image.


For instructions on creating pressed flowers and leaves instantly, click here.


Turn a plain birdfeeder into a botanical beauty with this pressed flower art project. And, good news, you can adapt the project to fit what you have—fresh, pressed flowers not required.

Scanned Botanicals


Here’s some of the scans I tested for this project. I used black, brown, and white backgrounds.


Turn a plain birdfeeder into a botanical beauty with this pressed flower art project. And, good news, you can adapt the project to fit what you have—fresh, pressed flowers not required.
For wow-power, I love the black background but I didn’t think it would look great on a birdfeeder in the garden.

Turn a plain birdfeeder into a botanical beauty with this pressed flower art project. And, good news, you can adapt the project to fit what you have—fresh, pressed flowers not required.

The brown is okay, but it looked like the white would really make the flowers stand out. Also, white in general is quite eye-catching in the garden as you do not see it very often. Even daisies aren’t truly white.


Turn a plain birdfeeder into a botanical beauty with this pressed flower art project. And, good news, you can adapt the project to fit what you have—fresh, pressed flowers not required.

What if I Don’t Have Any Pressed Flowers?


What If I Don’t Have a Scanner?


  • Try your friends, an office, or local copy shop in case they’ll let you bring in your botanicals to scan. You never know.
    There are millions of scanners out there that are hardly ever used. You might also find one at a thrift shop.

Transforming an Old Birdfeeder


Here’s the $1 feeder.


Turn a plain birdfeeder into a botanical beauty with this pressed flower art project. And, good news, you can adapt the project to fit what you have—fresh, pressed flowers not required.
I took it apart, washed it, and painted it white with some exterior latex paint.

Turn a plain birdfeeder into a botanical beauty with this pressed flower art project. And, good news, you can adapt the project to fit what you have—fresh, pressed flowers not required.

Make Your Own Botanical Art


Here’s the steps:


  1. Scan pressed flowers, leaves, butterflies, or whatever you like. Save the images at 300 dpi with top quality settings.
  2. Make any adjustments you want to the images. You can use Photoshop Elements, or a free program like Gimp, or anything you might have.
    For my scans, I needed to brighten the images quite a bit. The scans themselves were a bit muddy or dark looking, and the laser printer I use (at a local copy shop) makes everything darker than the original. Also, I scaled my images down a bit in size to fit the project. It could also look nice to use large floral prints and wrap the designs around the feeder. Always so many options in art!
  3. Print your scans on regular printer paper, not photo paper. If you have a laser printer, you’re all set. If you have an inkjet printer like I do, it’s best to get decoupage and image transfer prints done on a laser printer to avoid a problem with bleeding (i.e. you don’t want the ink to run or smear). You can make it work with inkjet with some extra steps (letting the print dry for 24 hours, spraying on an acrylic fixative and pre-coating the print with glue), but paying 50 cents a print at a local copy shop is probably easier.
  4. Cut out the prints to suit your birdfeeder. If you frequently craft with paper, consider getting a paper trimmer like this one. It was sent to me by Fiskars and it’s my new BFF. It just makes it so easy to get perfect cuts on long lengths of paper.

Turn a plain birdfeeder into a botanical beauty with this pressed flower art project. And, good news, you can adapt the project to fit what you have—fresh, pressed flowers not required.

5. Attach prints to feeder with Mod Podge. You can use regular Mod Podge or the type specially made for outdoor projects (see it here).


For best results, apply a thin layer of Mod Podge to the feeder. Place your print on the Mod Podge and gently press into place, pressing away any air pockets, and smoothing out the surface. You can use a brayer, or smooth-edged plastic card, or fingers. Whatever works.


I worked on one section at a time, cutting and pasting all at once so I wouldn’t mix up my pieces.


The Mod Podge is used both as a glue and a sealant as you’ll see in the next step.


Turn a plain birdfeeder into a botanical beauty with this pressed flower art project. And, good news, you can adapt the project to fit what you have—fresh, pressed flowers not required.
Let the Mod Podge dry at least 20 minutes before applying the first top coat.

Work in thin layers, allowing each layer to dry thoroughly before adding the next one. For an outdoor project like this one, 2-3 coats should be good. If the feeder is kept outdoors year-round, you may need to add fresh Mod Podge each year as it gradually wears down over time.


Mod Podge washes off your hands and paint brush with soap and water.


And that’s it. Reassemble the feeder and it’s ready for display.


I am still debating whether I’ll keep mine indoors or outdoors. I like it as a plant holder:


Turn a plain birdfeeder into a botanical beauty with this pressed flower art project. And, good news, you can adapt the project to fit what you have—fresh, pressed flowers not required.
To turn it back into a birdfeeder, I used hardware cloth (wire mesh) where the old plastic panels used to sit.

Turn a plain birdfeeder into a botanical beauty with this pressed flower art project. And, good news, you can adapt the project to fit what you have—fresh, pressed flowers not required.
It’s quite eye-catching in the blandness of the early spring garden:

Turn a plain birdfeeder into a botanical beauty with this pressed flower art project. And, good news, you can adapt the project to fit what you have—fresh, pressed flowers not required.
It didn’t take long for the birds and squirrels to realize they had a new feeder to explore.

Wrap Up


The ideas in this post have given you a lot of options. If you don’t have pressed flowers, you can purchase them, or purchase digital scans of them, or use any other printed art you like. Just be sure the paper works nicely with Mod Podge and the inks don’t run.


For more ideas, see 25 Pressed Flower Art & Craft Projects.


~Melissa the Empress of Dirt ♛


Empress of Dirt TV


Turn a plain birdfeeder into a botanical beauty with this pressed flower art project. And, good news, you can adapt the project to fit what you have—fresh, pressed flowers not required.

Original article and pictures take empressofdirt.net site